Tag Archives: Endgame Tactics

Endgame technique: King and Queen against Pawn on 7th rank with Support of King

Filed under Beginner Chess Tips, Chess Basics, Chess Strategy, Chess tactics, Endgame Tactics
Tagged as , ,

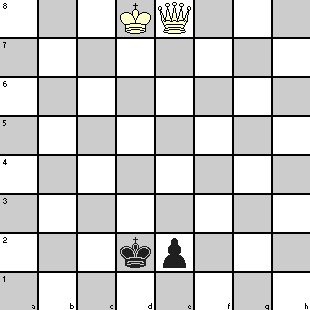
King and Queen vs. King and Pawn on seventh rank

White to play and win.

We have started with White King and Queen quite far removed from Black’s King and Pawn though in actual such situations they may be closer – but the tactics remain the same.

Let us see what strategy White must follow.

  1. Queen must keep Black King in check to stop the pawn promotion except in situation at 6.
  2. Primary aim is to capture the pawn after which checkmate is easy as it becomes a King and Queen vs. King endgame.
  3. Except for giving checks, Queen alone can achieve nothing. To capture the pawn, White King has to occupy one of the three squares on sixth rank that are in contact with the pawn.
  4. To move White King, Queen has to stop moving (i.e., giving check) and this is possible only if Black King can be made to block its own pawn.
  5. To force this on Black, the Queen must be able to give check from a square on Black’s sixth rank which is on a file next to the pawn’s file
  6. When the Black King moves to a square on 7th rank next to the pawn, Queen can take the square on the other side of the pawn.
  7. If the Queen gets an opportunity to move to the promotion square, the fight is over.

In the position shown, if the Queen can force the Black King to d1 or f1 square, then a check from d3 or f3 respectively will compel the King to move to e1 blocking the pawn. The White King can use this opportunity to advance one square and through this process reach d3 or e3 or f3 square after which the Queen can capture the pawn.

Black’s strategy is not to allow the Queen to move to e1 as that virtually ends the fight. His King should remain within one square of the pawn and avoid moving to e1 square if possible.. Even when it is forced to e1, it should go to f2 or d2 on next move depending on whether the Queen is on d3 or f3. If Black King goes to f1 or d1, the Queen will simply move to f3 or d3 to force the Black King back to e1 and the end will be faster!

Use the following to create a .pgn file and use a program like Winboard to play the moves.

1. Qd7+ Kc2 2. Qc6+ Kd2 3. Qd5+ Ke3 4. Qe5+ Kf2 5. Qf4+ Kg2 6. Qe3 Kf1 7. Qf3+ Ke1 8. Kd7 Kd2 9. Qf4+ Kd1 10. Qd4+ Kc2 11. Qe3 Kd1 12. Qd3+ Ke1 13. Kd6 Kf2 14. Qf5+ Ke3 15. Qg5+ Kd3 16. Qg3+ Kd2 17. Qf2 Kd1 18. Qd4+ Kc2 19. Qe3 Kd1 20. Qd3+ Ke1 21. Kd5 Kf2 22. Qd2 Kf1 23. Qf4+ Kg2 24. Qe3 Kf1 25. Qf3+ Ke1 26. Kd4 Kd2 27. Qd3+ Ke1 28. Ke3 Kf1 29. Qxe2+ 1-0

This technique does not work if the pawn is in bishop or rook file. With a bishop pawn, when the Queen checks Black King at b1 (or g1) from b3 (or g3) square, Black King will move to a1 (or h1) square, as the case may be. If the White King now tries to advance, the pawn gets promoted. The pawn can be left unprotected as it will be stalemate if the Queen captures the pawn!

If it is a rook pawn, Black will shuttle his King among squares a1-b1-b2 or h1-g1-g2. If the Queen delivers check from b3 (or g3), Black King goes to a1 (or h1). On check from c3 (or f3) square, Black King moves to b1 (or g1) so that no baseline check is possible from c1 (or f1) and for check from other baseline squares, the King moves to b2 (or g2). White Queen cannot go to b3 (or g3) with Black King at a1 (or h1) as it becomes a stalemate. So White King does not get any opportunity to advance.

But win is possible in these cases if the White King happens to be much nearer, within two steps of the Black King. The pawn can be allowed to Queen but taking advantage of this interval, the White Queen can deliver checkmate with support from the King. Try it out yourself keeping the strategy in mind.
Revisiting some old chess strategies: Utilizing ‘the Square’

Filed under Chess Basics, Chess Strategy, Chess tactics, Chess Tutorials
Tagged as , , ,

We are quite sure that all of you studied basic geometry in your school days. Among the first few theorems you studied, there was one that said: sum of any two sides of a triangle is greater than the third. You believed it to be universally true, didn’t you? Well, let me prove that it is not true for some parts of your chessboard!

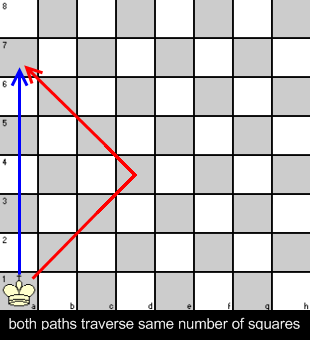
two sides equal one

Let us consider the triangle formed by the squares a1, d4 and a7. If your King is sitting on a1, how many steps does it need to reach a7 walking along the a-file? Let us count: a2-a3-a4-a5-a6-a7, total 6 steps. Now let it go along the other two sides, a1-d4 and d4-a7, and count: b2-c3-d4-c5-b6-a7, total 6 steps again! Have I proved my point?

Some of you must be wondering what the point is in all this and others may be downright annoyed about such a silly proposition. But if you bear with us, we can tell you that keeping the above in mind can help you to tackle successfully many chess problems involving King and Pawn endings, either for a win or for a draw.

Take the simplest chess endings with a King and Pawn for both sides but positioned near opposite edges of the chessboard. You may have to follow a strategy of keeping options open for your King to move to either edge depending on the tactical plan of your opponent. The chess tactics for you will be to maintain a middle path till your opponent makes that critical move disclosing his plan and you can accordingly move your King to the required side.

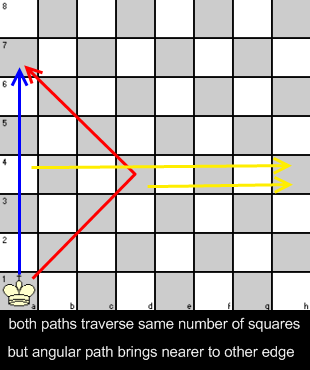
middle of the road keeps options open

The above diagram shows the principle behind such tactics. The square a7 can be reached in same number of steps from either a4 or d4 but if you need to move midway to the other edge, you can move to h4 in three steps from d4 against seven steps from a4. We hope you understand the merit of such tactics. If you think carefully, you will realize that the concept of the square lies behind this chess tactics.

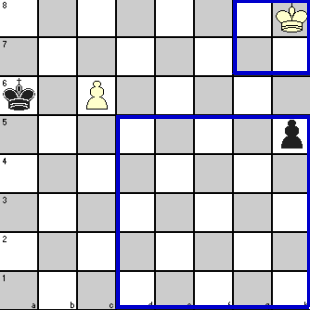
To make it clear with an example, we draw your attention to the endgame position described in Chess tactics in end games. For easy reference, the position is reproduced below where White with first move can snatch an ‘impossible’ draw!

White to move and draw

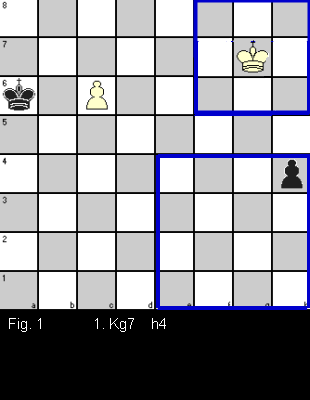
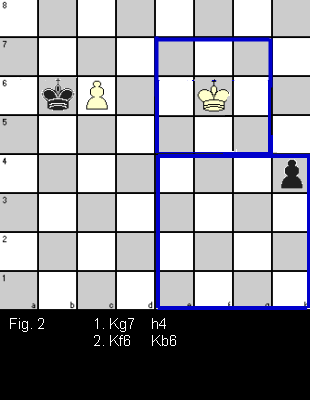
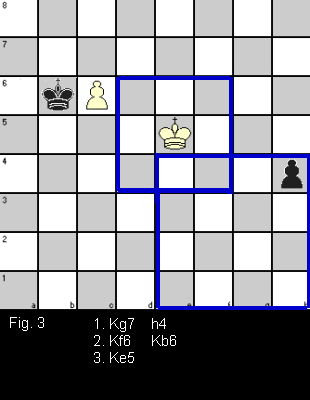
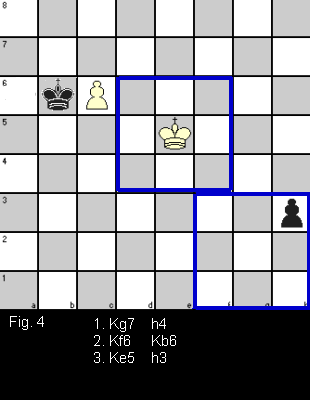
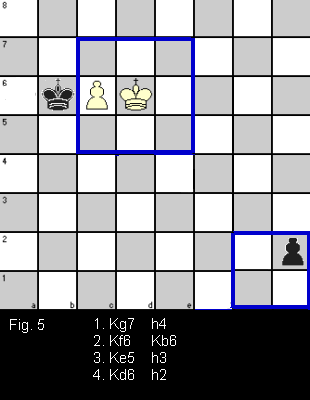
You can see the comments against the moves in the referred article – here we only show how the ‘square’ boundary changes with each move by Black Pawn. We also show how the White King’s area of effective influence ultimately comes in contact with his own pawn and intersects the ‘square’ of the Black pawn (indicating the possibility of capture) after his 3rd move (Fig. 3).

figure1   figure2
figure3   figure4
figure5   figure6

The triggering action was Black’s 3rd move (Fig. 4). This move disclosed Black’s intention to promote his pawn, so White King veered towards his own pawn (Fig. 5) to promote it likewise. Had Black captured the White pawn at this stage (3. … Kxc6) leaving his own pawn at h4, White King would move towards the Black pawn. White King would be able to step into the Square (refer Fig. 3) by playing 4. Kf4 and it would also be able to capture the Black pawn. White’s strategy ensured a draw either way.

Remember that the above chess tactics can be applied in many other endgame positions, not necessarily only the King and Pawn types. You only have to remember this type of chess tactics of moving the King along a diagonal.


Chess Tactics: Some more applications of Zugzwang

Filed under Attacking tactics, Chess Basics, Chess lessons, Chess tactics, Endgame Tactics
Tagged as , ,

On the principle of ‘practice makes perfect’, after you have learned about zugzwang and its application in Chess Tactics: should some of them be prohibited?, we bring you two more examples, one an endgame study and the other from actual play.

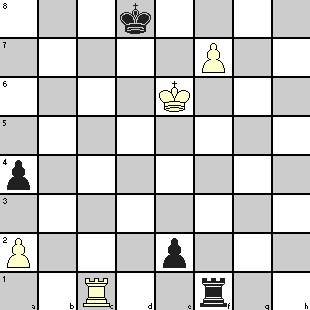
The following diagram shows a study which is slightly more elaborate than the previous examples in the sense of having both pieces and pawns.

endgame study showing zugzwang

White to play and win.

You can see that both White’s KBP and Black’s KP are one step away from promotion. But White’s first move apparently does not give any benefit because of following problems:

  • 1. f8=Q Rxf8 2. Re1 Re8+ after which White Rook’s attempt to capture Black’s KP (with support from the King of course) will result in exchange of Rooks and a draw.
  • 1. Rxf1 exf1=Q and it is Black who will win!
  • If White Rook leaves 1st rank, Black Pawn will promote
  • 1. Rb1 e1=Q+ 2. Rxe1 Rxe1+ and Black wins again

Well, you have now probably guessed the move after above options have been ruled out.

The solution is:

1. Re1 Rf2   On 1. … Rxe1 2. f8=Q+ Kc7 3. Qc5+ Kd8 4. Qa5+ (3. … Kb7 4. Qb4+), Black loses Rook
 
2. a3   This blocking move takes away Black’s options and puts him under zugzwang!
2. Rf1  
3. Rxe2 Rf3  
4. Rd2+ Kc8  
5. Rd5 Kc7  
6. Rf5 Re3+  
7. Kf6   The Pawn will promote on next move.


We now give you an example from actual play that took place in a 1953 Danish tournament between A. Kupferstich and J. Andreassen.

Nothing much could be found about A. Kupferstich except that he was part of Danish team in 9th Chess Olympiad held at Dubrovnik in 1950 and also represented Denmark in several friendly matches during 1947-1955. Except that J. Andreassen was a player from Denmark, I could find nothing more about him.

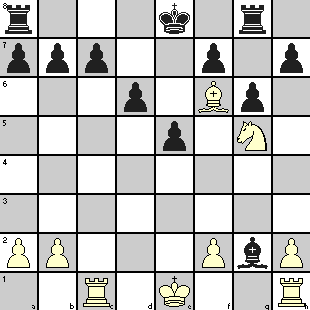
The diagram shows the position after 20 moves.

getting to a zugzwang

Though White has an extra Knight, he has four pawns less and his Kingside pawns are isolated. His Rook is under attack and it is natural to expect him to play 21. Rg1 after which Black would play 21. … Bc6 protecting his weak c7 pawn. But White possibly felt that he would have a much better attacking prospect with his Knight and Bishop close to enemy King if he could position his Rook on the 7th rank by capturing the c7 pawn instead of trying to protect his Rook at h1!

This is how the game rolled on.

21. Rxc7! Bxh1  
22. Nxf7 Bd5   Black tried to guard f7 square because of 23. Nxd6+ Kf8 24. Rf7#
23. Nxd6+ Kf8  
24. Bg5 Rh8   Black tried to create an escape hole against 25. Bh6+ with mate to follow.
25. Bh6+ Kg8  
26. Rg7+ Kf8  
27. Rc7+ Kg8   Poor Black King had no other go! White could have reduced his agony somewhat by playing 27. Rxb7+ straightaway, unless he was running slow on his clock!
 
28. Nc8 Bc6   Of course 28. … Rxc8 29. Rxc8+ Kf7 30. Rxh8 leaves Black a solid Rook down.
29. Rg7+ Kf8  
30. Rxb7+ Kg8  
31. Rg7+ Kf8  
32. Rxa7+ Kg8   All these moves can be taken as a demonstration of the power of discovered checks!
33. Rxa8 Bxa8  
34. Nd6! Resigns   The ‘zugzwang’ move!


The Knight and Bishop totally immobilizes the Black King and Rook. Black has to helplessly wait for an execution by a final Knight check at e7 or f6.

Even in this position, the game holds interest as White’s task is not easy. He still has to deliver checkmate as stated above but cannot afford to move the Knight till his King is positioned at e6 or f6 or e7 to prevent Black King’s escape when the Knight is moved.

Black’s strategy will be to push his pawns forward till those get captured at e3 and g3. Then he will use the Bishop to prevent White from carrying out his Knight maneuver and also try to capture both White pawns if they try for promotion. If White captures the Bishop, Black can claim stalemate.

What should White do? He should capture Black’s e- and g-pawns and move his King to e6 or f6 or e7. The Knight can then deliver check via (e4-f6 or e8-f6) or (c8-e7 or f5-e7).

Black knows that if White King is at e7, only (e4-f6 or e8-f6) is possible for Knight and Bishop positioned at c6 blocks these moves. If White King is f6, only (c8-e7 or f5-e7) is available to the Knight and Bishop can go to any square on c8-h3 diagonal to block those. Only if the King is at e6, all four options become available, but Bishop can check from d7 or d5 (remember that the Bishop is taboo!) to force White King to f6 or e7.

Assume that White King has reached f6. The Bishop has to be at d7 to guard c8 and f5 and to keep eye on White pawns. So White keeps pushing one of the pawns forcing the Bishop to leave its post to capture the pawn which otherwise gets promoted. The Knight can then move to c8 or f5 to deliver checkmate on next move.

It is possible to win even if White did not have those pawns, but that is another story!

No discussion on zugzwang is complete without reference to “The Immortal Zugzwang Game” between Friedrich Samisch and Aron Nimzowitsch played at Copenhagen in 1923. You have to play it yourself to see its beauty.


Chess Tactics: should some of them be prohibited?

Filed under Attacking tactics, Chess Basics, Chess lessons, Chess Strategy, Chess tactics, Endgame Tactics
Tagged as , ,

Though I said ‘some’ but actually I meant one that goes under a German name and seems to have been in use in German chess literature since since early ninteenth century. It is supposed to have been introduced in English chess literature in early twentieth century by Emanuel Lasker, himself a German!

The word I have in mind is zugzwang. I understand that ‘zug’ means move and ‘zwang’ means ‘compulsion’, so the combined word means ‘compulsion to move’. Essentially, a player is said to be under zugzwang when any move that he makes will make his position worse and not to move would be the best move. But chess rules do not permit a player to skip move and the affected player under compulsion to move is committing a kind of ‘suicide’ by his move! Are you getting my point now? Suicide goes against the laws in most countries of the world and forcing another man to commit it is still more heinous! Shouldn’t therefore be a law against zugzwang (and wouldn’t the victims agree)?

Enough of chatter, can we see some example you will say. Though this is a potent weapon in chess endgames, it can occur at any time.

We first see an endgame problem that, though a very simple one, teaches you what zugzwang is and was created by French composer Henri Rinck (1870-1952) who was arguably the World’s Greatest Composer of chess problems.

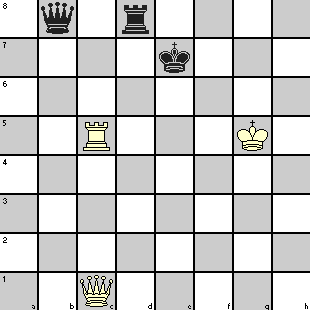
a simple zugzwang

White has to play and win in the position shown. The moves are:

1. Rc7+ Rd7  
2. Qc5+ Kd8   2. … Ke6 3. Qf5+ loses the Rook
3. Kh6  


Black has the move and he is in zugzwang as any move makes him lose. Let us see what some of his options are:

King moves:
3. … Ke8 4. Qe5+ Kf7 5. Rxd7+ Kf8 (or Kg8) 6. Qxb8#

Rook moves:
3. … Rxc7 4. Qf8+ Kd7 5. Qxb8 wins.
If Black’s Rook leaves his second rank without any check, White will play 4. Qe7#

Queen moves:
3. … Qxc7 4. Qf8#.

Black Queen cannot deliver any viable check and trying to remain in contact with c8 square only enables its capture by White. If it loses contact with c8 square, White plays 4. Rc8#.

There are many other options available to Black and we have left it to you to find how the correct move (very important) by White in all the situations result in his winning the Black Rook or Queen or both, or delivering checkmate to the King.

You will notice that putting opponent in zugzwang is preceded by an idle (sometimes blocking) move by the attacker that forces the defender’s hand. In above example, 3. Kh6 was such a move.

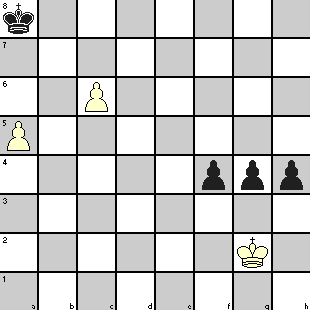
Now that you have seen a simple one, here is another problem which is slightly more complex. This is a very old problem but quite instructive as similar position may arise in one of your endgames also. White is to play and win.

a little more complex zugzwang

With two isolated pawns against three connected pawns, White may appear to be at a disadvantage but White’s winning line is as follows:

1. a6 Kb8   Black King had to move to prevent 2. c7
 
2. Kg1 f3   The idle move Kg1 to wait and watch is the only move that wins for White by creating zugzwang on Black
 
3. Kf2   White’s strategy is simple: move the King to face whichever Black Pawn has advanced. Once that Pawn gets blocked, Black has to move another Pawn. In the meanwhile, Black King cannot move either way without allowing the other White Pawn to promote! You may try with other Pawn moves to verify the tactics.
3. h3  
4. Kg3 h2  
5. Kxh2 f2  
6. Kg2 g3  
7. Kf1  
7. g2+  
8. Kxf2 g1=Q+  
9. Kxg1 Kc7   With no more pawn to move, Black King is forced to take the move it was trying to avoid.
10. a7 Kxc6  
11. a8=Q+   White wins.


Because of its unusual nature, it is a popular theme for chess compositions and Susan Polgar’s blog of July 1 has a problem on this topic.

In Chess Tactics: Some more applications of Zugzwang, you will see a third problem and a game where this tactics was used.


Chess Endgame Tactics: Rook and Pawn endings – Part 4

Filed under Chess lessons, Chess tactics, Chess Tutorials, Endgame Tactics
Tagged as ,

You have already seen the established chess tactics for a well-known Rook and Pawn ending called Lucena Position. Here we discuss about Philidor position, another equally well-known chess ending with Rook and Pawn that gives a draw to the defending player if he plays actively and with precision.

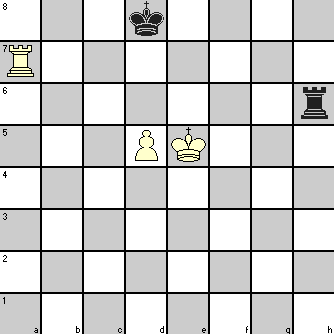
Philidor position in Rook and Pawn ending

The requirements for this position are:

  • The pawn of the attacking side and its King have not crossed their 5th rank. The King is in contact with the Pawn
  • The defendant King is on the promotion square or on a square adjacent to it
  • The defendant Rook is on the 6th rank (its own 3rd rank) preventing the enemy King from going forward

The Pawn may be on any file. But as you know from earlier discussions on Rook and Pawn endings, Pawn on Rook file makes the defending King’s job easier.

The position of the Rook of the attacking side (the side having the Pawn) is not directly relevant except for its ability to come to the help of the King and Pawn when necessary. But it is in the interest of the attacking side not to allow the defending King to come forward and create complications. The Rook positioned on the 7th rank keeps the defending King confined to its base rank.

However, check by the attacking Rook does not help in any way as the defending King keeps shuttling between the queening square and the square in front.

The defending side’s strategy:

So long as the Pawn does not move to its 6th rank, the defendant Rook keeps shuttling on that rank (which is its 3rd rank). If the Pawn moves to the 6th rank, the defendant Rook should go to its 7th or 8th rank and keep giving check from behind. There is no respite from check as the attacking King cannot take shelter behind the Pawn.

If the attacking side’s Rook tries to interpose, the defendant should exchange the Rooks. Since defendant King is already in front of the Pawn, all it has to do is to maintain opposition to enemy King, and the ending is a draw.

You can see that if the defending side plays passively and allows the enemy King to get to the square in front of its Pawn and the defending Rook is unable to deliver check, it will be a win for the attacking side. So the defending player has to remain alert if he has to get a drawn game.

A possible sequence of moves in the diagram position is shown below.

Without exchange of Rook:

1. Rg7 Rb6  
2. Rh7 Rg6  
3. d6 Rg1   As the White Pawn has advanced, White K cannot any more take shelter behind the Pawn, so it is safe to move the Black R. If it were done earlier, White would have played Kd6 with a win.
4. Ke6 Re1+  
5. Kd5 Rd1+  
6. Ke5 Re1+  
7. Kd4 Rd1+  
8. Ke5 Re1+   and so on without any headway


With exchange of Rook:

1. Rg7 Rb6  
2. Rh7 Rg6  
3. Rf7 Rb6  
4. Rf6 Rxf6   If Black avoids exchange, White K gets access to d6
5. Kxf6 Kd7  
6. Ke5 Ke7   Black must retain opposition to prevent White King’s access to d6
7. Kd4 Kd8  
8. Kc5 Kc7  
9. d6+ Kd8  
10. Kc6 Kc8  
11. d7+ Kd8  
12. Kd6   drawn due stalemate