Category Archives: Featured Chess Tips

Chess Tactics: Attacking castled King with the classic Bishop sacrifice Part 4

Filed under Attacking tactics, Chess Strategy, Chess tactics, Featured Chess Tips
Tagged as , , , , , , , , , , , ,

Position of white pieces

Before considering the sacrifice of light squared white bishop, it has to be ensured that:

  • the light squared white bishop is in the diagonal b1-h7 and there should not be any pieces hindering the movement of the bishop to h7 – if this is not fulfilled, there is no possibility for this attack at all in the first instance
  • There is no necessity that the bishop should capture the pawn at h7 – I mean there is no compulsion that the pawn should be there in h7. It is not even a necessity that the bishop should give a check on the black King. In other words, the King may not be at g8 square in some occasional cases.
  • the white knight should have been placed within the easy reach of the g5 square to give check on the black King when it captures the light-squared white bishop; in other words, the white knight should be either in f3 or h3 or in e4
  • The White queen should be capable of reaching h5 square, if possible, or else should be able to move to the “h” file

Position of black pieces

The position of the black pieces should meet the following guidelines:

  • Pieces should be there in the f7 and g7 squares.  In most cases, it would be only the pawns; but in certain cases, the dark-squared black bishop might be In g7
  • If the black queen and the rook occupy the d8 and f8 squares, then it would be ideal and the probability of attack on castled king sacrificing the bishop at h7 will be successful
  • It has to be ensured that the Black Knight is not anywhere near the f6 square and cannot be moved to that square instantly.
  • There should not be any threat for the b1-h7 diagonal from black’s Queen or light-squared bishop.

White has to ensure that the above conditions are completely met before embarking on this attack on the black King by sacrificing the light squared bishop.

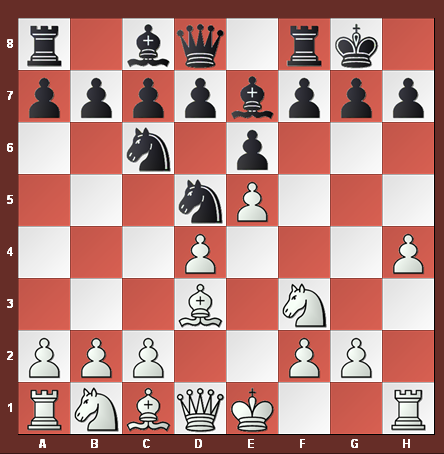
Lastly one of the variations you might be interested in looking at with reference to following diagram seen in Part 1 of this series:
1stsacimage

(White to move)

7. Bxh7+ Kh8  
8. Ng5 g6 White needs to move Knight to open d1-h5 line. 8…g6 tries to prevent White’s 9.Qh5
 
9. h5 Bxg5 Hoping for 10.Bxg5 Qxg5 11.hxg6 Nf4
 
10. hxg6 Nf4 Trying to prevent 11.Qh5
11. Bxf4 Bxf4  
12. Bg8+ Kxg8 12… Kg7 gives same result
 
13. Qh5 1 – 0 Checkmate on next move 14. Qh7# or 14.Qh8# depending on Black’s 13th move

Chess Tactics: Attacking castled King with the classic Bishop sacrifice Part 2

Filed under Attacking tactics, Chess Strategy, Chess tactics, Featured Chess Tips
Tagged as , , , , , , , , , , , ,

In Part 1 of Chess Tactics: Attacking castled King with the classic Bishop sacrifice, we looked at the main variation of the bishop sacrifice in Part 2 we will look at some of the possible variations.

Variation #1 – Capturing the Knight by dark squared black Bishop

bishopcapture

7. Bxh7+ Kxh7
8. Ng5+ Bxg5
9. hxg5+ Kg6
10. Qh5+ Kf5
11. Qh3+ Kg6
12. Qh7# 1 – 0

 
Variation #2 – Moving the King to h6

kingh6

7. Bxh7+ Kxh7
8. Ng5+ Kh6
9. Nxe6+ …. Here the black Queen is lost following a discovered check from Bishop at c1

 
Variation #3 – moving the king to g6

kingg6

7. Bxh7+ Kxh7
8. Ng5+ Kg6
9. h5+ Kh6
10. Nxe6+ …. Discovered check and threat on black Queen

 
Variation #4 – moving the king to f5 after g6

kf5move

7. Bxh7+ Kxh7
8. Ng5+ Kg6
9. h5+ Kf5
10. g4# 1 – 0

 
All the variations lead to one conclusion – victory to white led by the sacrifice of the light-squared bishop at h7. The attacking prowess of the bishop is unleashed at its entirety in the attacking of the castled king.

Ironically, the Greco’s sacrifice of the classic bishop sacrifice, which was recorded as early as 1619 in Greco’s handbook, was systematically reviewed and in 1911 by E. Vollemy. Since then, this classic bishop sacrifice is occasionally used as an attacking option, especially by the player playing white pieces.

Continue reading Part 3 of Classical Bishop Sacrifice….

Chess Tactics: Attacking castled King with the classic Bishop sacrifice Part 1

Filed under Attacking tactics, Chess Strategy, Chess tactics, Featured Chess Tips
Tagged as , , , , , , , , , , , ,

In the game of chess, bishops play a very important role both in attacking the opponent’s King as well as in defending one’s own King, especially using its unique capability of moving along the diagonals.

Before dwelling further into the attacking aspects of the bishop, let us recollect some of the basic features of the opening principles. In the opening stages of the game, we were taught that the pawn movements should be kept to the minimum such that the minor pieces such as knights and bishops are developed. Then the next thing one is advised to do is to go for castling either on the kingside or in the queenside, whereby the King is safeguarded, and the rooks at the flanks are brought to the center of the first or last ranks.

Mere castling of the king will not guarantee 100% safety and the castling should be followed with adequate precautionary measures in order to avoid devastating attack on the kingside by the bishops along the diagonals, especially the light-squared white bishop. Sounds strange – is it not? Read on.

This attack is primarily suitable for the player using white pieces when and only when the opponent castles on the kingside and the king is placed at g8 with pawns placed at f7, g7 and h7 respectively. The broad idea is to sacrifice the light-squared bishop of white by capturing the pawn at h7, drawing the king out and using the knight at g5 and the Queen moved to the “h” rank to say checkmate.

This attack on the castled black king by sacrificing the light-squared white bishop at h7 is called as the classic bishop sacrifice. This is one of the oldest attacks on the castled king, tried and tested as early as early 1600s, as writing about this attack is found in Gioachino Greco’s handbook in 1619. It is believed that Greco introduced this classic bishop sacrifice and as such the attack is also referred to as Greco’s sacrifice by some of the writers.

Before exploring more about this Greco’s sacrifice or classic bishop sacrifice, let us look at the game played by Greco where he employed this attack successfully. As per Greco’s handbook of 1619, he reached the position in the game as given below after six not particularly intelligent moves.

1stsacimage

(White to move)

Now, here comes the brilliant display of white involving the classic bishop sacrifice.

The mainline of the game is as follows :

7. Bxh7+ Kxh7
8. Ng5+ Kg8
9. Qh5 Re8
10. Qh7+ Kf8
11. Qh8# 1 – 0 There ends the game in white’s favor after the sacrifice of the light-squared bishop.

 
In Part 2 of Attacking castled King with the classic Bishop sacrifice we will look at some of the variations and how to play those variations for a win. Continue reading Part 2 of Bishop Sacrifice.

Chess Tactics: Attacking castled King with the classic Bishop sacrifice Part 3

Filed under Attacking tactics, Chess Strategy, Chess tactics, Featured Chess Tips
Tagged as , , , , , , , , , , , ,

Before learning more about the nitty-gritty aspects of this classic bishop sacrifice, let us explore one more game in the same category in a more systematic way for better understanding of this idea of attacking the castled king with bishop.

The position of the game is given hereunder:

agame

(White to move)

It is the turn of White to move and he launches the attack straightaway.

1. Bxh7+ Kxh7
2. Ng5+ ….

 
As stated earlier, let us analyze the game in a systematic way and try to explore all possible variations at the disposal of the black King and White’s response to those moves.

A cursory look at the position reveals that the black king has three options, in fact four options, at his disposal.

Black King can move either of the following four squares – g8, h8, g6 and h6.

Moving to h8 might not yield any result as the White can place his queen at h5 and threaten with check. Black king has no other option but to move to g8 and Queen’s next move to h7 is mate. So, this option is ruled out, in the first instance.

Let us look at the other three options.

Variation #1 – moving the king to g8:

The moves in this variation would be as follows:

2. …. Kg8
3. Qh5 Re8
4. Qxf7 Kh8
5. Qh5+ Kg8
6. Qh7+ Kf8
7. Qh8+ Ke7
8. Qxg7# 1 – 0

 
In this variation, White has used the pawns at h7, f7 and g7 as the primary points and relentless less pressure on the Black king with a series of checks ensures victory for the White, at the cost of the bishop sacrifice at h7.

Variation #2 – moving the king to h6:

The moves in this variation would be as follows:

2. …. Kh6
3. Qg4 Rh8
4. Nxe6+ Kh7
5. Qxg7# 1 – 0

 
Here white might also consider using the discovered check in the third move itself instead of Qg4 and capture the black queen, while ensuring that victory is assured.

Variation #3 – moving the king to g6:

This is one variation where black has some sort of chance to extend the game and force any mistakes from white.

2. …. Kg6
3. h4 Rh8
4. h5+ Rxh5
5. Qd3+ f5
6. exf6+ Kxf6
7. Qf3+ Ke7
8. Qf7+ Kd6
9. Qxh5 …. White can win from this position

 
Now, we have explored the game in its entirety with all the possible variations, and can conclude that this classic bishop sacrifice would be worth considering for attacking the castled king.

However, one needs to exercise great caution as any wrong calculation or non-satisfaction of any condition might jeopardize the entire plan and would backfire abruptly.

Before considering this option, one should question himself whether the sacrifice of the light squared bishop at h7 is feasible or whether it would yield the desired outcome. The answer for this question lies in the satisfaction of certain specific conditions, both from the perspective of the location of white pieces as well as black pieces. If there is any deviation in this basic position that need to be fulfilled, there is no guarantee that the sacrifice would yield the desired results. In Part 4 of classical bishop sacrifice we will look at things to consider before going for the bishop sacrifice.

Continue reading Part 4 of Classical Bishop Sacrifice