Filed under Attacking tactics, Chess Basics, Chess lessons, Chess Opening, Chess Strategy, Chess tactics, Chess Tutorials
Tagged as Attacking tactics, chess combination, Chess Opening, chess opening guide, Chess Strategy, Chess tactics, Chess Tutorials
A vivid example on importance of center control in chess showed you the importance of this aspect of chess openings. At the risk of overstressing the point, here we bring another short game played with Sicilian Defense which is supposed to give Black a good fighting chance against White’s King Pawn opening.
We have already discussed about the theory behind one variation of Sicilian opening in Chess Opening: Control of Center – Part 1 and showed examples in Chess Opening: Sicilian Defense Theory to Practice about the kind of play that can win for White or Black.
Sicilian Defense is the choice of combative players because Black is playing to create advantage, not just to achieve equality. At the same time, Black must realize that by not directly going for the control of center, he may be allowing White an early initiative. Therefore Black has to play carefully so as not to be swept off his feet by a quick attack before his own thrusts have taken effect.
Just adopting Sicilian Defense without this realization is not going to help Black to get the upper hand. He must be prepared to play aggressively but precisely in line with the theories to snatch the initiative, otherwise it could be a recipe for swift demise! That is what happened in the following game played at Bad Gastein in 1948 and we try to identify where Black went wrong and allowed White his brilliant attack.
|
|
Nicolas
Rossolimo
|
Ivan
Romanenko |
|
|
|
1. |
e4 |
|
|
Aims to control d5 and f5 and create space for King side initiative
|
|
1. |
… |
c5 |
|
|
|
Shows black’s intention to go for Sicilian Defense.
This move apparently violates the principle of controlling the central and semi-central squares as it applies pressure only to d4.
Unlike moves like …e5 or …Nc6 which challenge center control or develop minor pieces, …c5 does neither. It also needs some more pawn movements like …d6, …e6, …a6 etc., allowing White a lead in development with attacking chances.
Then why go for it?
On the positive side, it gives Black
- space advantage on Queenside and further actions on that flank
- pawn majority at center by exchanging this pawn with White’s d4 pawn when he advances it to get full control of center
- control of open c-file after the exchange, using his Queen or Rook in that file to facilitate Queenside counterplay
|
|
2. |
Nf3 |
Nc6 |
|
Moves and countermoves to wrest control of d4 and e5 squares
|
|
3. |
Bb5 |
|
|
|
|
To quote Al Horowitz, this move was ‘actually an idea of Nimzowitsch, who called it one of his little jokes in the opening’. It was Rossolimo who adopted it many times to achieve remarkable success (as in the present game). That is how this line of Sicilian Defense goes under the name of Nimzowitsch-Rossolimo attack (ECO code: B31)
The main purpose is to get a rapid development and a strong center with c3 and d4. The struggle for d4 dictates the tactics for both sides and Black must be ready to capture on d4, else White gets great lead in development.
|
|
3. |
… |
g6 |
|
Black is getting ready to develop his KB to g7 and to apply pressure on d4 and e5 squares.
White’s usual intention is to play Bxc6, giving Black doubled pawns. Black’s major responses are 3…g6 preparing …Bg7, 3…d6 preparing …Bd7, and 3…e6 preparing 4…Nge7.
|
|
4. |
0-0 |
Bg7 |
|
White safeguards his King and wants to use KR as part of his attacking plans. Black of course carries on with his development plans.
|
|
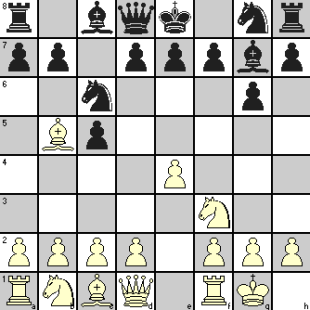
Position after 4 moves

|
|
5. |
Re1 |
|
|
Normal continuation is 5. c3 Qb6 with a struggle for control of d4. The text move was introduced by Gurgenidze for expected line of play along 5. Re1 e5 6. b4
|
|
5. |
… |
Nf6 |
|
This changes track from control of d4 to attacking e4 pawn and exposed the Knight to an early attack.
|
|
6. |
Nc3 |
|
|
White develops his Knight to support his QP as also his KB and adds to the control of d5
|
|
6. |
… |
Nd4 |
|
|
|
In keeping with the strategy discussed against move 3, Black should have gone for 6. … e5 followed later by …Qb6. Other alternatives would be 6 … d6 to enable …Bd7 or to safeguard his King (because of the distant and not so distant pins by White’s Bishop and Rook) by …0-0. The text move was not consistent with any of these ideas and hence a questionable move.
|
|
7. |
e5 |
Ng8 |
|
Black’s inhibited play and inconsistencies allow White considerable space in center with tempo through attacks on enemy pieces.
|
|
8. |
d3 |
Nxb5 |
|
See how Black is surrendering all initiative to White. While White opens lines for his QB, Black’s QB is still locked in and his King’s Knight has retreated and blocked castling for his King. His center pawns remain immobile. The exchange of Knight and Bishop was originally the intention of White’s 3rd move to reduce Black’s control on d4 and e5. Without being forced, Black Knight has taken the trouble of wasting several moves to give White what he wanted!
|
|
9. |
Nxb5 |
a6 |
|
Another questionable move by Black. As subsequent moves show, White’s QN was headed for d6 square, Black’s move just assisted it in taking that step!
One of the basic tenets in chess is that you should not force a badly placed enemy piece to move to a better square. By extension of the logic, do not induce your opponent to take a move that he was ready to take. Both these lose tempo for you as you could use that time to make more profitable moves for your own pieces.
|
|
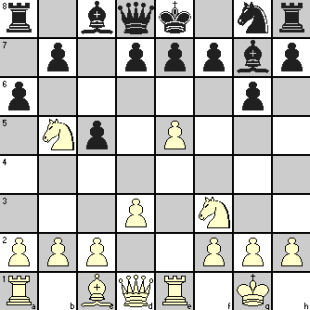
Position after 9 moves

|
|
10. |
Nd6+! |
exd6? |
|
White knew that the capture of his Knight would give him a fierce attacking opportunity and so his move was an excellent idea. But Black still fell for it, making a bad situation really worse by exposing his King to the possibility of a discovered check. After this, White’s attack through a brilliant combination simply rolls on.
|
|
11. |
Bg5! |
|
|
|
|
White has timed his moves to perfection! He held back the discovered check to first drive away the Queen which could come to some help against what White planned. With an immediate discovered check, Black would be able to extricate himself with Ne7.
There is a couple of important lessons here. Firstly, you can sometimes get out of a difficult situation by returning the material that was sacrificed by your opponent to gain an attack. By doing this, you are still even on material, but the opponent’s attack may fizzle out. Trying to hold on to the material only adds to your difficulties.
Secondly, you need not be in a hurry to execute a move which is there for the taking when you can make some other move that compels your opponent to attend to it first. All good players know this maxim of looking for a better move when a good move has been found.
The text move by White takes care of both these possibilities.
|
|
11. |
… |
Qa5 |
|
11. … Qb6 would not be any better.
|
|
12. |
exd6+ |
Kf8 |
|
|
|
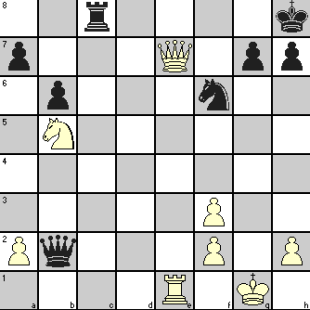
At this stage, White’s win was only a matter of time and most players would possibly go for the simple 13. Qe2 with one likely line as:
13. Qe2 Bf6 14. Qe8+ Kg7 15. Ne5 (threatening 16. Qxf7#) Bxg5 16. Qxf7+ Kh6 17. Qf8+ Kh5 18. g4+ Kh4 19. Qf3 (threatening 20. Qg3#) Bf4 20.Qxf4 Nf6 (or Qb4) 21. Nf3+ Kh3 22. Qg3#
But White found a more elegant line.
|
|
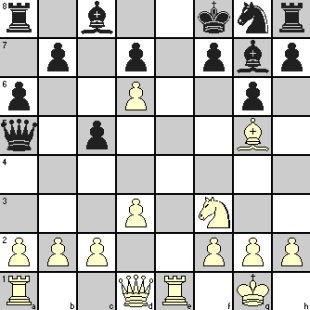
Position after 12 moves

|
|
13. |
Re8+! |
Kxe8 |
|
|
|
14. |
Qe2+ |
Kf8 |
|
|
|
15. |
Be7+ |
Ke8 |
|
15. … Nxe7 16. Qxe7+ Kg8 17. Ng5 with Qf7# to follow
|
|
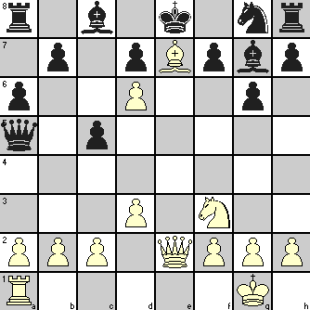
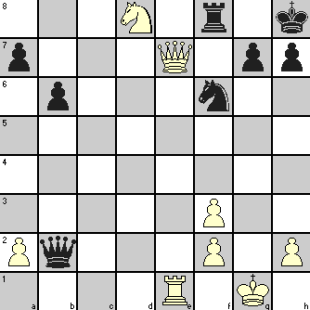
Position after 15 moves

|
|
16. |
Bd8+! |
Kxd8 |
|
|
|
17. |
Ng5 |
Resigns |
|
It is either 18. Nf7# or 17. … Nh6 18. Qe7#
|
|
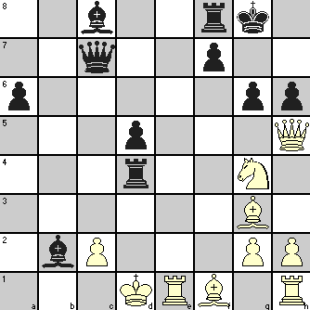
The final position:
 |
Starting from our article on winning chess strategies in various posts we have stressed the importance of controlling the center in your chess games. In our latest series of articles, we mentioned this strategy as one of the aims for any chess opening as can be seen in Chess Opening: Control of Center, showing the theoretical analysis of some popular openings. This idea was further developed through examples of master games which showed how such opening theories are put into practice in these games.
We now show you a vivid example of how the aggressive play by one GM against another who was somewhat passive in this respect made a very short shrift of the game in only 15 moves. This may be an extreme example and was chosen only to stress our point, therefore don’t expect to get such quick results in your games. However, the idea remains valid.
The game employs Pirc Defense (ECO code: B07) which gives Black an advantage of adapting his center policy to the development strategy employed by White. But this has the drawback of giving White a much greater freedom in the center. As a result, in case of aggressive play by White, Black gets so busy in tackling White’s thrusts that he may miss out on his own plans unless he treads very carefully.
This game was played out in a tournament at Tashkent in 2008. In the FIDE list of Grandmasters as on April 1, 2009, White was ranked at 67 and Black at 393.
|
Igor Kurnosov
(Russia) |
Marat Dzhumaev
(Uzbekistan)
|
|
|
| 1. |
e4 |
d6 |
|
|
| 2. |
d4 |
Nf6 |
|
|
| 3. |
Nc3 |
g6 |
|
|
| 4. |
Bg5 |
Nbd7 |
|
Black’s text move is considered unfavorable. The recommended line is 4. … h6 5. Bh4 Bg7. Other lines like 4. … Bg7 or , to remain more flexible, 4. … c6 followed by b5 and Qa5 for action on Queen side are also expected to give Black a better game. |
| 5. |
Qd2 |
a6 |
|
|
| 6. |
0-0-0 |
b5 |
|
|
| 7. |
e5 |
b4 |
|
Black overstretched himself by this move if you consider the lines suggested by theory.
|
|
 |
| 8. |
exf6 |
bxc3 |
|
|
| 9. |
Qxc3 |
e6 |
|
The unopposed progress of the advanced White pawns so close to the hemmed in Black King and Queen remain a thorn in the flesh, seriously affecting the normal development of Black pieces |
| 10. |
Re1 |
Nb6 |
|
|
| 11. |
d5 |
Na4 |
|
11. Nxd5 would not help against what followed |
| 12. |
Qc6+ |
Bd7 |
|
|
|
 |
| 13. |
Rxe6+! |
fxe6 |
|
|
| 14. |
dxe6 |
Bg7 |
|
A case of too little too late! If 14. … Bxc6 15. f7# |
| 15. |
exd7+ |
Resigns |
|
|
| |
 |
| |
The final position |
15. … Qxd7 16. f7+ Kxf7 17. Qxd7+ Kf8 18. Qe7+ Kg8 19. Bc4+ d5 20. Bxd5#
15. … Kf7 16. Bc4+ Kf8 17. fxg7+ Kxg7 18. Bxd8 Rhxd8 19. Qxa4 gives White overwhelming material superiority.
Filed under Beginner Chess Tips, Chess Basics, Chess lessons, Chess Opening, Chess Strategy, Chess tactics, Chess Tutorials
Tagged as chess opening guide, chess openings, Chess Strategy, Chess tactics, Chess Tutorials
In Chess Opening: Queen’s Gambit Theory to Practice and Chess Opening: Nimzo-Indian Defense Theory to Practice, you have seen that starting with the basic theory of the respective openings discussed in Chess Opening: Control of Center – Part 3 and Chess Opening: Control of Center – Part 2, how some actual games proceeded to bring win to White as well as Black. The idea was to enable you to look carefully at the moves by the players to understand where White or Black went wrong in following the rules of chess strategy as well as chess tactics, which handed over the game to their opponents.
In continuation of the same theme for developing your comprehension about the opening theories, we now take up two games using Sicilian Defense that was discussed in Chess Opening: Control of Center – Part 1. Here also, White wins one game and Black wins the other within practically the same number of moves. None of the players may be known to you but all had ELO ratings in 2300-2600 range.
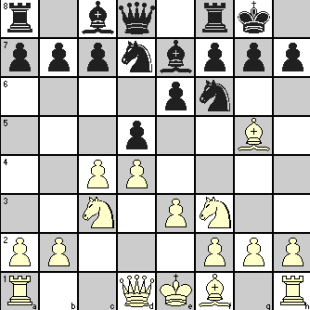
Since you have seen the first five moves of Sicilian Defense Najdorf variation in Chess Opening: Control of Center – Part 1, here we start with move 6 in both the games (ECO code: B95)
Borek Bernard-Tomas Civin
Prague, 2003 |
|
Leonid Milov-Robert Ruck
Griesheim, 2002
|
| 6. |
Bg5 |
e6 |
|
|
|
6. |
Bg5 |
e6 |
|
|
| Position after move 6 |
|
Position after move 6
|
 |
|

|
| 7. |
Qf3 |
Nbd7 |
|
|
|
7. |
Qf3 |
h6 |
|
|
| 8. |
0-0-0 |
Qc7 |
|
Had 5. … a6 not been played, White Knights would be able to move to b5 to harass the Black Queen. |
|
8. |
Bh4 |
Nbd7 |
|
|
| 9. |
Qh3 |
Nc5 |
|
|
|
9. |
0-0-0 |
Qc7 |
|
|
| 10. |
Bxf6 |
gxf6 |
|
|
|
10. |
Qh3 |
Be7 |
|
|
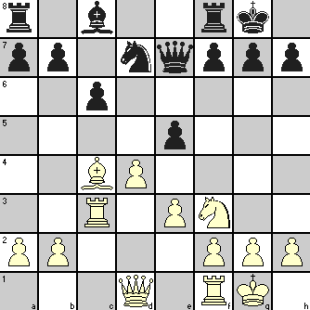
| Position after 10 moves |
|
Position after 10 moves
|
 |
|

|
You may note that White’s position is nearly identical in both games, but Black’s position looks cramped in both, though more solid in game 2.
|
| 11. |
Be2 |
b5 |
|
|
|
11. |
f4 |
b5 |
|
|
| 12. |
a3 |
Rb8 |
|
|
|
12. |
a3 |
Rb8 |
|
|
| 13. |
b4 |
Nb7 |
|
|
|
13. |
e5 |
dxe5 |
|
|
| 14. |
Bh5 |
Nd8 |
|
|
|
14. |
fxe5 |
Nxe5 |
|
|
| 15. |
Rhe1 |
Bd7 |
|
|
|
15. |
Bg3 |
b4 |
|
|
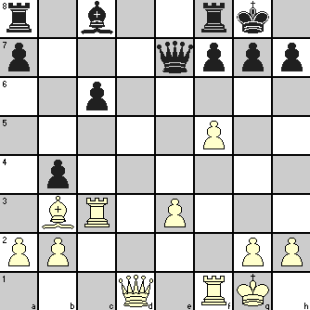
| Position after 15 moves |
|
Position after 15 moves
|

|
|
 |
| 16. |
Nd5! |
exd5 |
|
|
|
16. |
axb4 |
Rxb4 |
|
|
| 17. |
exd5+ |
Be7 |
|
|
|
17. |
Nf3 |
Nfg4 |
|
|
| 18. |
Rxe7+ |
Kxe7 |
|
|
|
18. |
Qh5 |
Bf6 |
|
|
| 19. |
Qe3+ |
Ne6 |
|
|
|
19. |
Re1 |
g6 |
|
|
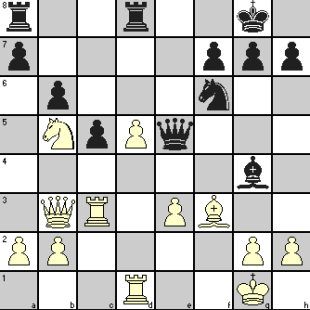
| Position after 19 moves |
|
Position after 19 moves
|
 |
|

|
| 20. |
Bxf7 |
Kxf7 |
|
|
|
20. |
Nd5 |
exd5 |
|
|
| 21. |
dxe6+ |
Kg7 |
|
|
|
21. |
Nxe5 |
0-0! |
|
|
| 22. |
Nf5+ |
Kg6 |
|
|
|
22. |
Nxg4 |
Bxb2+ |
|
|
| 23. |
Rd5 |
Resigns |
|
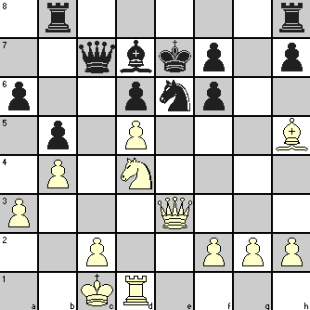
White was threatening 24. Qh6#
23. … h6 24. Qg3+ Kh2 (24. … Kh5 25. Ng7#) 25. Qg7#
23. … Bxe6 24. Qh6+ Kf7 25. Qg7+ Ke8 26. Qxc7 (threatening 27. Qe7#) Bxf5 27. Qxb8+ Kf7 28. Qxh8 etc.
White missed a quicker win by:
23. Qh6+ Kxf5 24. Qh5+ Ke4 (24. … Kxe6 25. Re1# or 24. … Kf4 Rd4#) 25. Qd5+ Kf4 26. Rd4#
|
|
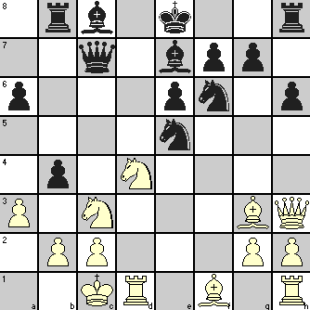
23. |
Kd1 |
Rd4+ |
|
White Resigned.
After 24. Ke2 Qxc2+ 25. Ke3 Qd2+ 26. Kf3 Bxg4+ 27. Qxg4 Rxg4 28. Kxg4 Qg5+ 29. Kf3 (29. Kh3 Qf5+ 30. Kh4 Bf6#) Qh5+ etc. with checkmate only a matter of time. |
| The final position |
|
The final position
|
 |
|
 |
Filed under Beginner Chess Tips, Chess Basics, Chess lessons, Chess Opening, Chess Strategy, Chess tactics, Chess Tutorials
Tagged as Chess Opening, chess opening tips, Chess Strategy, Chess tactics, Chess Tutorials
Like we did in Chess Opening: Queen’s Gambit Theory to Practice to expound with examples on how QGD opening theory in Chess Opening: Control of Center – Part 3 can turn out in practice, here we show practical examples on Nimzo-Indian Defense theory discussed in Chess Opening: Control of Center – Part 2.
To show both sides of the defense, we picked up two games, one going in favor of White and the other in favor of Black. What should be interesting is that in both these games of approximately equal length, Garry Kasparov was on the Black side and both were played around the same period. It gives a better opportunity to understand what Kasparov (or his opponents) did right or wrong to produce different results! Both games use the chess opening of Nimzo-Indian Defense Normal Variation (ECO code: E53).
Vladimir Kramnik-Garry Kasparov
London, 2000 |
|
Evgeny Vladimirov-Garry Kasparov
Batumi, 2001
|
| 1. |
d4 |
Nf6 |
|
|
|
1. |
d4 |
Nf6 |
|
|
| 2. |
c4 |
e6 |
|
|
|
2. |
c4 |
e6 |
|
|
| 3. |
Nc3 |
Bb4 |
|
|
|
3. |
Nc3 |
Bb4 |
|
|
| 4. |
e3 |
0-0 |
|
|
|
4. |
e3 |
0-0 |
|
|
| 5. |
Bd3 |
d5 |
|
|
|
5. |
Bd3 |
d5 |
|
|
| 6. |
Nf3 |
c5 |
|
|
|
6. |
Nf3 |
c5 |
|
|
| 7. |
0-0 |
cxd4 |
|
|
|
7. |
0-0 |
cxd4 |
|
|
| 8. |
exd4 |
dxc4 |
|
|
|
8. |
exd4 |
dxc4 |
|
|
| 9. |
Bxc4 |
b6 |
|
|
|
9. |
Bxc4 |
b6 |
|
|
 |
|
 |
Identical position has been reached as the same moves have been played in both games.
|
| 10. |
Bg5 |
Bb7 |
|
|
|
10. |
Qe2 |
Bb7 |
|
|
| 11. |
Re1 |
Nbd7 |
|
|
|
11. |
Rd1 |
Bxc3 |
|
|
| 12. |
Rc1 |
Rc8 |
|
|
|
12. |
bxc3 |
Qc7 |
|
|
| 13. |
Qb3 |
Be7 |
|
|
|
13. |
Bb2 |
Bxf3 |
|
|
| |
|
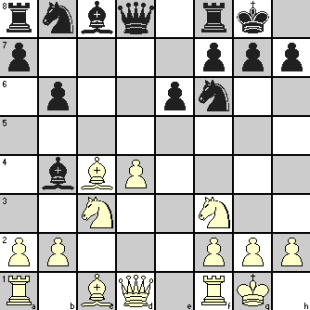
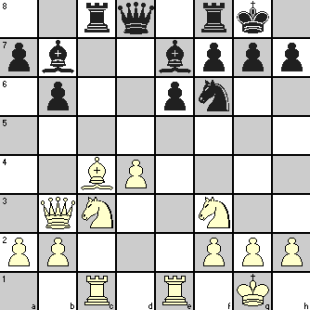
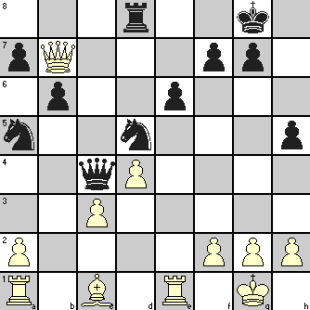
Position after 13 moves
|
| |
|

|
| 14. |
Bxf6 |
Nxf6? |
|
Black’s move creates all the subsequent problems. 14. … Bxf6 would be better. But there are records of other games where the same moves were played and the games ended in a draw but in those games, Black did not accept the offer of Bishop sacrifice by White at move 15.
|
|
14. |
Qxf3 |
Qxc4! |
|
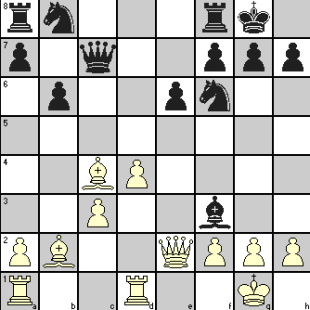
With the offer of this exchange sacrifice, Black laid a nice trap for White’s Queen! |
Position after 14 moves
|
|
|

|
|
|
| 15. |
Bxe6! |
fxe6 |
|
As pointed out earlier, Black could possibly do better to play 15. … Rc7
|
|
15. |
Qxa8 |
Nc6 |
|
|
| 16. |
Qxe6+ |
Kh8 |
|
|
|
16. |
Qb7 |
Nd5 |
|
|
| 17. |
Qxe7 |
Bxf3 |
|
|
|
17. |
Re1 |
Rb8 |
|
|
| 18. |
gxf3 |
Qxd4 |
|
|
|
18. |
Qd7 |
Rd8 |
|
|
| 19. |
Nb5 |
Qxb2 |
|
|
|
19. |
Qb7 |
h5 |
|
|
| 20. |
Rxc8 |
Rxc8 |
|
|
|
20. |
Bc1 |
Na5 |
|
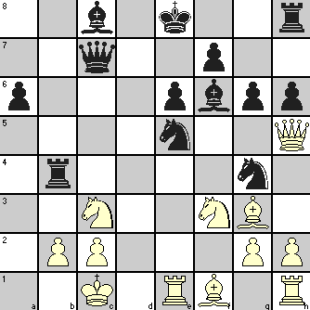
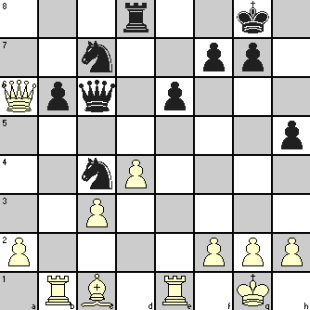
The White Queen is pathetically trapped! When Black offered the exchange sacrifice at move 14, he must have envisaged this situation.
|
| Position after 20 moves |
|
Position after 20 moves
|
 |
|

|
| 21. |
Nd6 |
Rb8 |
|
|
|
21. |
Qxa7 |
Qc6 |
|
|
| 22. |
Nf7+ |
Kg8 |
|
22. Ne8 would fail against 22. … Ng8
|
|
22. |
Qa6 |
Nc4 |
|
|
| 23. |
Qe6 |
Rf8 |
|
White’s move created Philidor’s position, which possibly made Black to bring his Rook to f8 but the Rook became vulnerable as shown by White at move 25. 23. … h5 could provide stiffer resistance.
|
|
23. |
Rb1 |
Nc7 |
|
White resigned as he has to lose his Rook to save his Queen |
| |
|
The final position
|
| |
|

|
| 24. |
Nd8+ |
Kh8 |
|
|
|
|
|
|
|
|
| 25. |
Qe7 |
|
|
Black resigned as 25. … Rg8 26. Nf7# or 25. … Re8 26. Qxe8+ Nxe8 27. Rxe8#. The only line that could offer a longer resistance is 25. … Rxd8 26. Qxd8+ Ng8 27. Qd5 and White would need to play carefully to translate his advantage into a win with Black trying to avoid a Queen exchange.
|
|
|
|
|
|
|
The final position
|
|
|
 |
|
|
While learning the theories behind the chess openings especially with an eye to center control and development of pieces, you must understand that if both players could continue along the best theoretical lines, the game would end in a draw! But theory cannot take you to the end because if it could, there would not be any point in playing that kind of chess!
So a stage will come where theory comes to an end ideally with both players at level, and thereafter the players are on their own. The game is then decided through one player making some mistake, however slight it may be, and the other player being able to identify and exploit it. You will often notice that one may be able to get away with a minor mistake but situation keeps getting worse with each additional wrong move. Of course, a palpably bad move will draw the curtains on the game that much faster!
In the three-part article on Chess Opening: Control of Center, we just showed how the initial moves for different openings aim to seize control of center. What happens after those initial skirmishes depends on how each player carries forward his ideas. Unless you examine practical games arising out of those opening moves, your grasp of the potentials will remain a little nebulous. For this reason, we plan to show you at least two master games on the openings discussed, one going in favor of White and the other in favor of Black, so that you get an idea of why those games produced opposite results!
In Chess Opening: Control of Center – Part 3, we took you up to the sixth move. In the following two games, you will see identical development up to the 12th move after which those take their own path.
Max Euwe-George Thomas
Hastings, 1934 |
|
Milan Vidmar-Movsa Feigin
Hastings, 1936
|
| 1. |
c4 |
e6 |
|
|
|
1. |
d4 |
d5 |
|
|
| 2. |
Nc3 |
d5 |
|
|
|
2. |
c4 |
e6 |
|
|
| 3. |
d4 |
Nf6 |
|
|
|
3. |
Nc3 |
Nf6 |
|
|
| 4. |
Bg5 |
Be7 |
|
|
|
4. |
Bg5 |
Be7 |
|
|
| 5. |
e3 |
0-0 |
|
|
|
5. |
e3 |
Nbd7 |
|
|
| 6. |
Nf3 |
Nbd7 |
|
|
|
6. |
Nf3 |
0-0 |
|
|
 |
|

|
Though the first game started differently, it has ultimately reached the same standard position. These initial moves were shown to impress on you that even when you are on unfamiliar ground, it is often possible to bring the game back to known territory through transposition of moves.
|
| 7. |
Rc1 |
c6 |
|
|
|
7. |
Rc1 |
c6 |
|
|
| 8. |
Bd3 |
dxc4 |
|
|
|
8. |
Bd3 |
dxc4 |
|
|
| 9. |
Bxc4 |
Nd5 |
|
|
|
9. |
Bxc4 |
Nd5 |
|
|
| 10. |
Bxe7 |
Qxe7 |
|
|
|
10. |
Bxe7 |
Qxe7 |
|
|
| 11. |
0-0 |
Nxc3 |
|
|
|
11. |
0-0 |
Nxc3 |
|
|
| 12. |
Rxc3 |
e5 |
|
|
|
12. |
Rxc3 |
e5 |
|
|
 |
|
 |
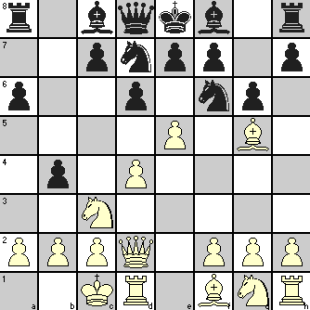
After the previous position, moves 7-12 are identical to bring both games to same identical position as dictated by theory of ECO code D68. If ECO code D69 is followed, the next two moves would be 13. dxe5 Nxe5 14. Nxe5 Qxe5. If you see the next two moves of the first game, you will see that it stuck to this route with a little difference in sequence, but the second game went into a different variation which went astray at move 15.
|
| 13. |
Nxe5 |
Nxe5 |
|
|
|
13. |
d5 |
e4! |
|
|
| 14. |
dxe5 |
Qxe5 |
|
|
|
14. |
Nd4 |
c5! |
|
|
| 15. |
f4 |
Qe7? |
|
By retreating the Queen there, Black allowed the unhindered progress of White’s KBP |
|
15. |
Nb5 |
Nf6 |
|
By chasing the Knight with his pawns, Black gained in tempo while acquiring more space. Black is eyeing the g4 square for his Knight taking advantage of the absence of defensive pieces close to White’s King. 15. Nc5 Qe5 16. Ng3 Nf6 would give White a better but complicated game.
|
| 16. |
f5! |
b5 |
|
|
|
16. |
Qb3 |
Qe5 |
|
White probably planned to advance his QP but Black’s Queen move pre-empted this by creating threats on White King’s position with a possible Ng4.
|
| 17. |
Bb3 |
b4 |
|
Black offered his c6 pawn to get White’s e3 pawn. White has no objection, he just wanted to time it right!
|
|
17. |
Be2 |
b6 |
|
Not 17. … Nxd5 as 18. Rxc5 would pin the Knight. But after the text move, this would be possible. |

|
|
|
| 18. |
f6! |
gxf6 |
|
The Black Queen’s position enabled White to sacrifice his KBP to break open Black’s castle. |
|
18. |
Rd1 |
Rd8 |
|
Trying to support the QP, White left his KBP weak and Black’s QB can force the exchange of White’s defender Bishop pinned against his Rook at d1.
|
| 19. |
Rxc6 |
Qxe3+ |
|
White timed the exchange of the pawns to bring his Rooks to exploit the broken castle of Black King. You may also notice how White’s pawn moves were gaining tempo whereas Black’s pawn moves were not getting anywhere!
|
|
19. |
f4 |
exf3 |
|
|
| 20. |
Kh1 |
Bb7 |
|
Though Black opened a line to the White King for his Bishop, White’s threats are more real. 20. … Be6 could provide a defense against White’s threats.
|
|
20. |
Bxf3 |
Bg4 |
|
|
| |
|

|
| 21. |
Rcxf6 |
Qe4 |
|
Black goes through his plans oblivious of White’s threats!
|
|
21. |
Rcd3 |
a6 |
|
|

|
|
|
| 22. |
Qd2! |
Kh8 |
|
Black vacated g8 square to position his Rook but White continued to be one step ahead!
|
|
22. |
Na3 |
b5 |
|
The Knight has practically been forced out of the game! |
| 23. |
Bxf7 |
Rac8 |
|
Black was hoping to get his QR to the 7th rank at c2 as the option of Rg8 has been taken away.
|
|
23. |
R3d2 |
c4 |
|
Black’s pawns keep marching ahead, severely restricting the movement of White pieces. |
| 24. |
R6f2 |
Rcd8 |
|
White defends his KNP and prepares his Queen to take control of the open g-file.
|
|
24. |
Qc3 |
Qh5 |
|
|
| 25. |
Qg5 |
Rd6 |
|
Black prevented 26. Qf6# but did not anticipate White’s stunning response!
|
|
25. |
Bxg4 |
Nxg4 |
|
White had to give in to allow the Knight’s move. |
| 26. |
Bd5!! |
Resigns |
|
Black cannot handle the mating threats by White Rook at f8 and by White Queen at g8. |
|
26. |
h3 |
Nf6 |
|
|
|
|
|
|
|
|
27. |
Rd4 |
Rd6 |
|
|
|
|
|
|
|
|
28. |
Nc2 |
Re8 |
|
|
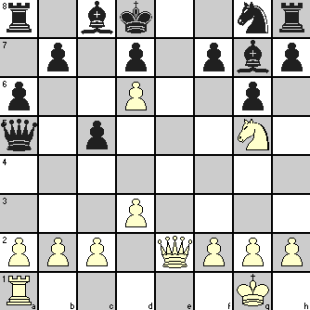
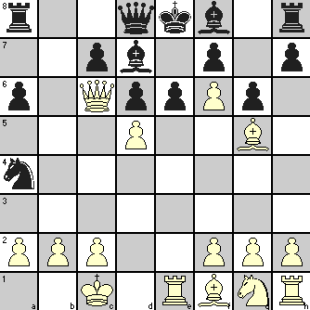
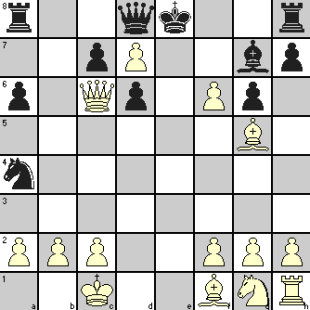
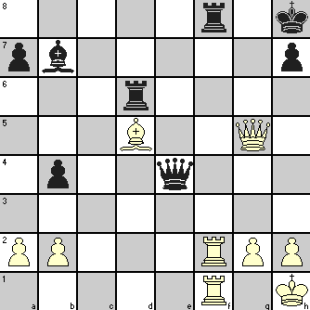
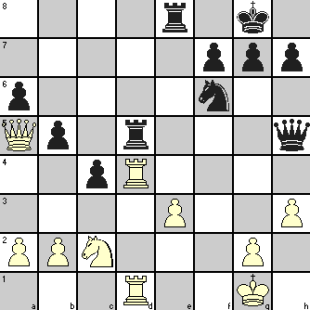
| The last board position is shown below. |
|
29. |
Qa5 |
Rxd5 |
|
White kept alive a mating threat on Black’s base rank and threatened to decimate Black’s Queenside pawns.
|
 |
|

|
|
|
|
|
|
|
30. |
Rxd5 |
Nxd5 |
|
|
|
|
|
|
|
|
31. |
Rd2 |
Qg6 |
|
|
|
|
|
|
|
|
32. |
Rxd5 |
Qxc2 |
|
White accepted the exchange of Knights hoping to save his KP by virtue of his threat of baseline mate of Black King.
|
|
|
|
|
|
|
33. |
Re5? |
Qd1+ |
|
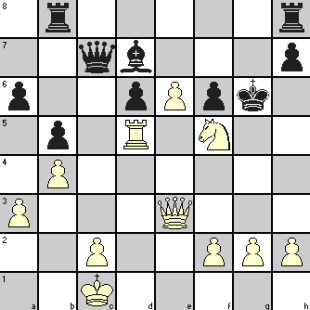
White resigned as he cannot avoid losing his Rook. White could offer greater resistance by 33. Rd8 Qc1+ 34. Kh2 Qxe3 35. Rxe8+ Qxe8 36. Qxa6 though Black would retain a marginal advantage because of his extra pawn.
|
|
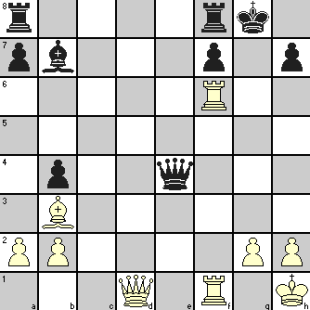
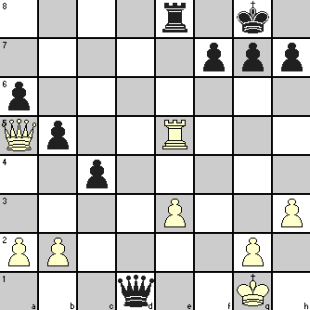
The last board position is shown below.
|
|
|
 |
