In Chess Tactics: The King’s role in attack – part 1, you saw how one King, while apparently running away from opponent’s checks, was actually moving towards the enemy camp to assist his own pieces for trapping the opponent’s King. By the time the opponent realized what was happening, it was too late to do anything about it.
The three games we have chosen for this article is slightly different from the aforesaid theme. Here a King deliberately steps out of his castled position and marches towards the enemy King to provide support to his own attacking pieces. Of course this was possible because though opponent’s heavy pieces were still on board, the pawn positions severely restricted their free movement and the attacking King deftly maneuvered through the crowded position.
First game –
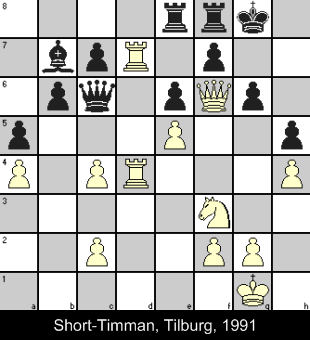
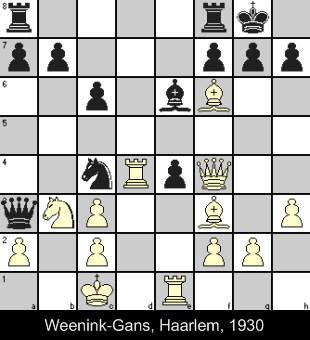
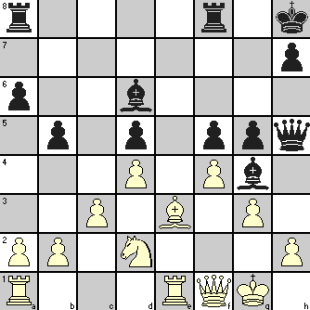
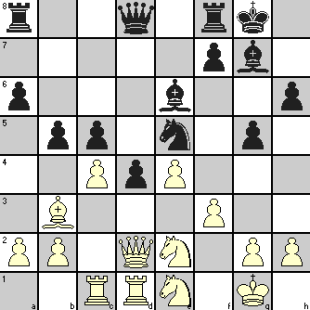
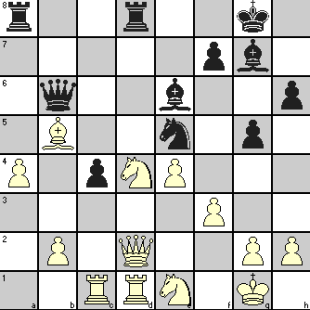
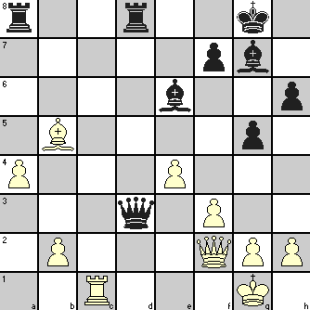
position after 30 moves:

|
31 |
Kh2 |
Rc8 |
|
If Black could guess the intention behind the White King’s move, he could try 31. … Bc8. We would have missed the interesting ending, but White could have still won the game by:
31. … Bc8 32. Ng5 Bxd7 33. Rf4. For example:
33. … Bc8 34. Nxf7 (threatening 35. Qxg6#) Rxf7 35. Qxf7+ Kh8 36. Qxg6 Qd7 37. Qxh5+ Qh7 (37. … Kg8 38. Rg4+ Kf8 39. Qh8+ Ke7 40. Qf6#) 38. Qxe8+ and Black has to give up his Queen to avoid checkmate.
|
|
32. |
Kg3 |
Rce8 |
|
Black is so short of option that he just keeps moving his pieces without much purpose! |
|
33. |
Kg4 |
Bc8 |
|
|
|
34. |
Kg5 |
Resigns |
|
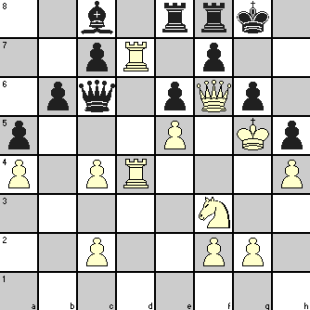
34. … Bxd7 35. Kh6 any 36. Qg7#
34. … Kh7 35. Rxf7+ Rxf7 36. Qxf7+ Kh8 37. Kh6 with mate in two moves. |
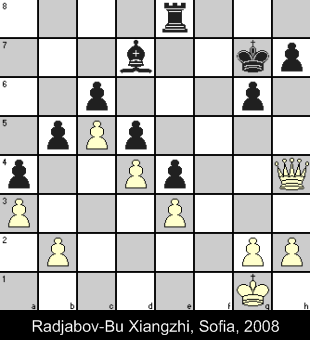
Position after 34. Kg5:

Second game –
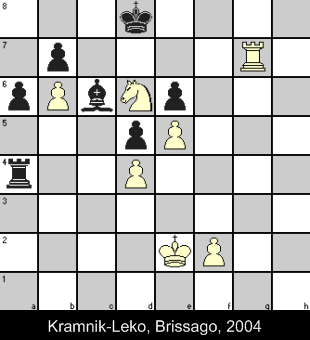
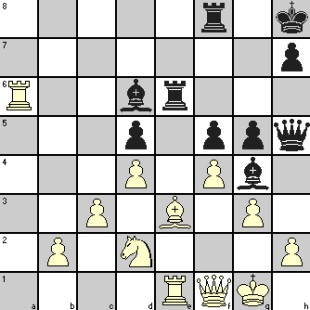
position after 33 moves:

|
34 |
f4 |
Ra2+ |
|
1…Rxd4 2. f5 exf5 3 e6 Re4+ 4 Nxe4 fxe4 (4…Bb3 5. Ke3) 5 Rc7, threatening Rxc6 |
|
35. |
Kf3 |
Ra3+ |
|
|
|
36. |
Kg4 |
Rd3 |
|
|
|
37. |
f5 |
Rxd4 |
|
|
|
38. |
Kg5 |
exf5 |
|
|
|
39. |
Kf6 |
Rg4 |
|
|
|
40. |
Rc7 |
Rh4 |
|
|
|
41. |
Nf7+ |
Resigns |
|
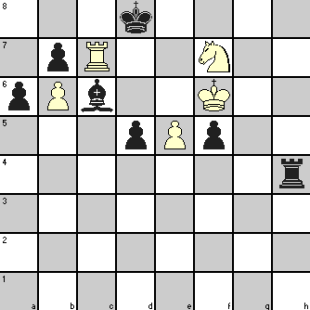
41. … Ke8 42. Rc8+ Kd7 43. Rd8# |
Position after 41. Nf7+:

Third game –
position after 28 moves:

|
29 |
Kf2 |
h6 |
|
|
|
30. |
Ke1 |
Re6 |
|
|
|
31. |
Qg3 |
Be8 |
|
|
|
32. |
Kd2 |
g5 |
|
|
|
33. |
Kc3 |
Kf8 |
|
|
|
34. |
Kb4 |
Bf7 |
|
|
|
35. |
Ka5 |
Kg7 |
|
|
|
36. |
Kb6 |
Kf8 |
|
|
|
37. |
Kc7 |
Kg7 |
|
|
|
38. |
Kd7 |
Kf8 |
|
|
|
39. |
Qf2 |
Rg6 |
|
|
|
40. |
Qf5 |
h5 |
|
|
|
41. |
g3 |
Resigns |
|
Black is totally tied up and White will soon be able to create passed pawns that will wear down any resistance Black may have in mind. |
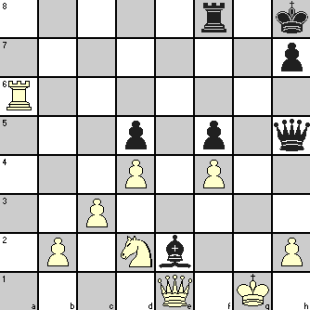
Position after 41. g3:

You will notice that the oldest game we chose in Chess Tactics: The King’s role in attack – part 1 was played in 1888 (there are even older examples in chess archives) and the latest one in this article is from 2008. So, you now know that such Royal ventures, though not so frequent, have continued to recur for more than a century even when chess theories and styles have undergone a lot of change over these years.
We hope that these games will broaden your thinking on the role of the King and to identify situations where such steps by the King may reap benefits for you.
“The King is a fighting piece. Use it!” is a remark ascribed to Wilhelm Steinitz who is regarded as the first World Champion in Chess. Nevertheless, your common experience may make you think of your King only as a liability, which needs to be protected at any cost and the cost sometimes becomes so high that you give up your efforts! Only when you have been able to survive till an endgame with only pawns around that you possibly appreciate the thoughts behind the remark of Mr. Steinitz!
But a search through chess archives will show you many games where a player did use his King as a fighting piece who traveled all the way into the opponent’s territory to capture pieces and pawns and to provide support to his own attacking forces for delivering checkmate!
I have picked up six such examples and divided those into two groups. In this article, we present three games with a little ironic twist because it was the opponent who was mostly attacking but the fighting King took opportunity of these checks to move where it wanted to go without loss of tempo! The opponent ultimately realizes that he has brought the doom upon himself by his failure to see the intention of the King taking a walk!
In the second article Chess Tactics: The King’s role in attack – part 2, we show another three games where the King boldly stepped out on his own by taking advantage of opponent’s constricted position and took the battle to the enemy King to create a winning position.
First game –
position after 31 moves:

|
32 |
Bc4+ |
Kg7 |
|
|
|
33. |
Re7+ |
Kg6 |
|
|
|
34. |
Bb3 |
Rg2+ |
|
|
|
35. |
Kh1 |
h3 |
|
|
|
36. |
Rd1 |
Rc8 |
|
|
|
37. |
Rd6+ |
Kf5 |
|
|
|
38. |
Rxa7 |
Rc1+ |
|
|
|
39. |
Bd1 |
Ne2 |
|
|
|
40. |
Ra5+ |
Kf4 |
|
|
|
41. |
Rf6+ |
Ke3 |
|
|
|
42. |
Re5+ |
Kf2 |
|
|
|
43. |
Rxe2+ |
Kf1 |
|
White looked at 44. … Rg1# or 44. Rxg2 hxg2# and resigned. |
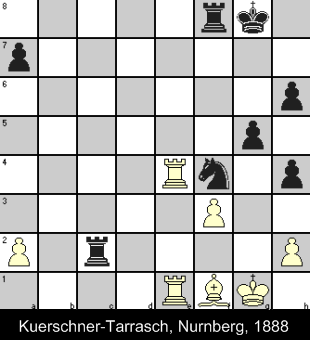
Position at the end of Black King’s journey:

Second game –
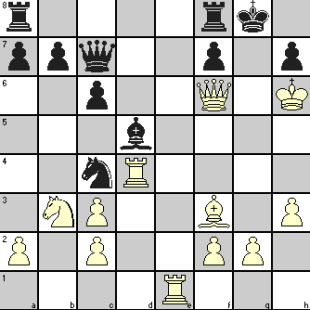
position after 19. … Qa3+:

|
20 |
Kd1 |
Nb2+ |
|
|
|
21. |
Ke2 |
Qa6+ |
|
|
|
22. |
Ke3 |
Nc4+ |
|
|
|
23. |
Kxe4 |
gxf6 |
|
|
|
24. |
Qxf6 |
Qb6 |
|
|
|
25. |
Kf4 |
Qc7+ |
|
|
|
26. |
Kg5 |
Bd5 |
|
26… Rfe8 27.Kh6 Kf8 28.Qh8+ Ke7 29.Rxe6+ Kxe6 (29… fxe6 30.Qg7#) 30.Nc5+ Ke7 (30… Kf5 31.g4#) 31.Re4+ Kd8 (31. … Ne5 32. Rxe5+ Qxe5 33. Qxe5+ Kd8 (33. … Kf8 34. Nd7+ Kg8 35. Qg7#) 34. Qd6+ Kc8 35. Qd7+ Kb8 36. Qxb7#) 32. Qxe8#
|
|
27. |
Kh6 |
Resigns |
|
Black cannot prevent Qg7# |
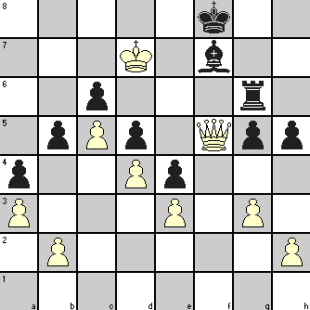
Position at the end of White King’s journey:

Third game –
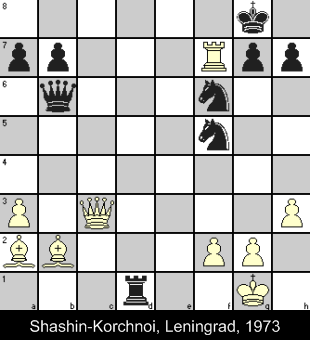
position after 23. … Rd1+:

The analyses are as given by Shashin himself, who considered this as the best game of his life.
|
24 |
Kh2 |
Qd6+ |
|
Shashin considered this as the losing move and according to him White could force a draw here by repetition of moves with the following line of play. (But if Korchnoi thought he was winning, he would not go for this!)
24. … Ng4+!! 25. hxg4 Qd6+ 26. Qg3 Nxg3 27. Rd7+ Kf8 28. Bxg7+ Kc8 29. Rxd6 Nf1+ 30. Kg1 Nd2+ 31. Kh2 Nf1+ 32. Kg1 Nd2+ etc. |
|
25. |
g3 |
Ng4+ |
|
|
|
26. |
Kg2 |
Nh4+ |
|
|
|
27. |
gxh4 |
Qh2+ |
|
|
|
28. |
Kf3 |
Qxf2+ |
|
|
|
29. |
Ke4 |
Qe2+ |
|
Not 29. Kxg4 because of 29. … Rg1+ 30. Kh5 g6+ 31. Kh6 Qxh4#
Black’s 29. … Qe2+ is a losing move. After 29. … Re1+ 30. Kd5 Rd1+ 31. Kc4 Kxf7 32. hxg4 Ke8, the game is still open. |
|
30. |
Kf4 |
Rf1+ |
|
|
|
31. |
Kg5 |
h6+ |
|
|
|
32. |
Kg6 |
Ne5+ |
|
|
|
33. |
Qxe5 |
Rg1+ |
|
|
|
34. |
Qg5 |
Qxb2 |
|
|
|
35. |
Rxg7+ |
Resigns |
|
35. … Kf8 36. Rg8# |
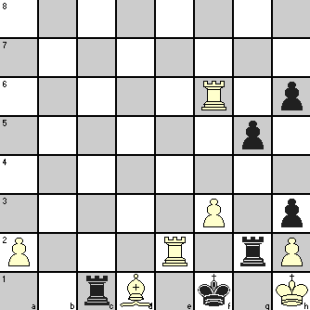
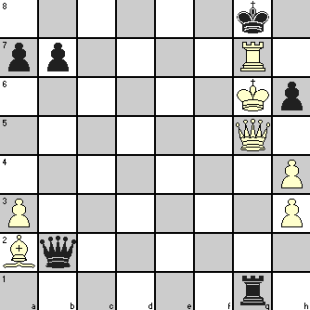
Position at the end of White King’s journey:

In Chess Tactics: The King’s role in attack – part 2, you will see examples of one King stepping out to approach and corner his opponent.
Have you ever lost a chess game which you should have won? We are not asking about some elaborate chess combination that you could not calculate properly nor about any gross oversight which forced you to capitulate. Rather, we are talking of inability to see a resource that would have completely turned the table in your favor. Though in Chess tactics: Some days are really not yours! we have shown some errors of judgment even at top levels, what we are discussing below are different from such cases.
In all the three examples, the player who resigned was convinced that his position was hopeless. But later analysis showed that if he made a particular move in that apparently lost position, he would have surely won the game!

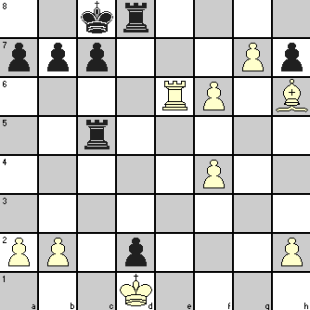
The above position was reached in a simultaneous display by a GM playing as White. Both players had passed pawns on the respective 7th rank. It was White’s turn to play but he thought that while Black’s Rook at d8 prevented his pawn promotion, he had no defense against Black’s threat of … Rc1+ followed by … d1=Q+. He therefore resigned without making any move.
He did not realize that he had a winning move in Rd6!
|
|
|
|
|
|
|
1. |
Rd6! |
Rxd6 |
|
White was threatening to capture that all important Black pawn and Black had to capture with his Rook
|
|
2. |
g8=Q+ |
|
|
It is White who first gets to promote his pawn with check! |
All White needed now was to maneuver the Queen to capture one of the Rooks and Black would not be able to promote his pawn. White could then push his f-pawn and Black would have to give up his other Rook to prevent this pawn promotion. White King would capture Black’s d-pawn and with the help of the Bishop would be able to promote one of his remaining pawns to win the game!

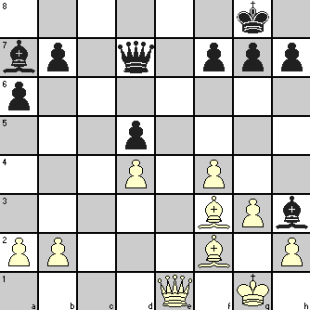
This was the position after 23 moves in a game played out between a GM (with white pieces) and an IM (with black pieces). See what happened next.
|
|
|
|
|
|
|
24. |
Bxd5 |
h6 |
|
Black could not capture the Bishop because of the threat 25. Qe8# |
|
25. |
Qe4 |
Qb5 |
|
White now realized that he was facing a threat of checkmate (26. … Qf1#) against which he could not find any defense!
26. Qe1 Qxd5 would allow Black to play 27. … Qg2#. So White decided to resign without making any move.
White was possibly blinded by this sudden threat to miss the simple defensive resource of 26. Kh1! After 26. … Qf1+ 27. Bg1, Black had no more threats and White had a better chance to win because of his extra passed pawn. |

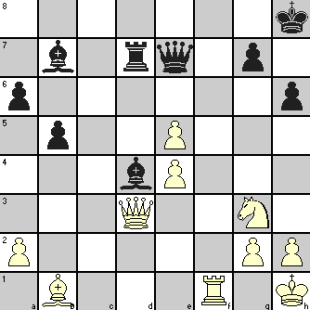
White had the move in this position after 34 moves in a game between two fairly strong players. The motif here is somewhat similar to the above. Only, here Black thought that he was losing material after White’s 36th move and resigned. Fact is, he had an opportunity to attack and gain enough material to force a win!
|
|
|
|
|
|
|
35. |
Nf5 |
Qxe5 |
|
|
|
36. |
Rd1 |
Resigns |
|
It looked to Black that he was going to lose his KB.
In fact, it would be White who would lose material if Black played 36. … Bg1 with the threat of 37. … Qxh2#.
After that, it would be either
37. Qg3 Rxd1 38. Qxe5 Bd4# or
37. Kxg1 Rxd3 38. Bxd3 Bxe4 39. Bxe4 Qxe4 with an easy win |
We hope the above examples will help you to realize that a battle is not lost till your opponent has won it! In a difficult situation, examine all possibilities however futile they may look. Think of giving up only when you are certain that you have explored all avenues and failed to find an escape route.
Before starting on this fourth article in this series on chess combinations, please read the boxed note at the start of Chess Combinations: beauties from lesser known masters – 3 to make the best use of the moves and comments in the chess game covered here.
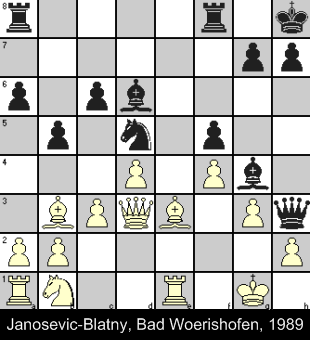
The game was played in the tournament at Bad Woerishofen in 1989. The game employs Ruy Lopez opening about which you have read in Chess Opening basics: Ruy Lopez (or the Spanish opening) and saw another example in Chess Combinations: beauties from lesser known masters – 3.
However, the present game follows the line of Marshall Gambit (ECO code: C89) where Black offers his KP in return for opening of diagonals b7-h1, d8-h4 and the e-file, hoping to use those at opportune time, and removal of White’s KN which normally acts as a defensive piece. The first diagram shows the position after 17 moves which were all played in line with the theories. In fact, you will find identical position in Euwe-Donner game played at Amsterdam in 1950 where the line changed track from move 18 and White won after 42 moves.
Let us see how it goes in the present game.
|
|
|
|
|
|
|
Position after 17. … Kh8:
|
|

|
|
18. |
Qf1 |
Qh5 |
|
Black had to avoid Queen exchange as it did not leave him with any compensation for his sacrificed pawn
|
|
19. |
Nd2 |
g5 |
|
|
|
20. |
Bxd5 |
cxd5 |
|
White removed the Knight to reduce pressure on f4 pawn to avoid the need to break up his castle.
20. fxg5 f4 21. gxf4 Nxf4 (threatening 22. … Nh3+) 22. Bxf4 Bxf4 with all kinds of threats.
|
|
Position after 20. … cxd5:
|
|

|
|
21. |
a4 |
bxa4 |
|
White is desperate to open some lines for movement of his pieces.
|
|
22. |
Rxa4 |
Rae8 |
|
White’s pawn structure totally immobilized his QB which also had to support the f4 pawn. Black exploited this to place his Rook on the open e-file (one of the objectives of his opening strategy).
|
|
23. |
Raa1 |
Re6 |
|
|
|
24. |
Rxa6 |
|
|
White hoped to pin the Bishop to safeguard his f4 pawn ………
|
|
Position after 24. Rxa6
|
|

|
|
24. |
… |
gxf4 |
|
……… but Black timed his exchanges perfectly to quash White’s ideas.
|
|
25. |
Bxf4 |
Rxe1 |
|
|
|
26. |
Qxe1 |
Bxf4 |
|
|
|
27. |
gxf4 |
Be2! |
|
White was ultimately forced to break up his castle and open the g-file. Black was prompt in utilizing this advantage.
|
|
The position after 27. … Be2
|
|

|
|
White resigned as he has no defense against coming 28. … Rg8+ without giving up his Rook. If the Rook moves, then 28. … Rg8+ 29. Kf2 (29. Kh1 Bf3+ 30. Nxf3 Qxf3#) Qxh2+ 30. Ke3 Re8+ 31. Ne4 Rxe4+ 32. Kd2 Bc4+ 33. Kd1 Rxe1+ 34. Kxe1 Qe2# |
Filed under Attacking tactics, Chess lessons, Chess Strategy, Chess tactics, Chess Tutorials
Tagged as attacking chess, attacking chess tactics, Attacking tactics, chess combination, Chess Strategy, Chess tactics, Chess Tutorials
Please note:
The best way for beginners to get better at chess and learn these ideas is to setup the position on a chessboard and go through the moves instead of trying to picture it. At this stage, understanding the ideas is more important than taking the burden of memorizing the positions.
As you keep gaining in experience, you do need to develop your power of visualization as without that, you won’t be able to work out deep combinations in your actual play.
In fact, in these articles on chess combinations, that is the purpose behind showing the positions after every few moves as the game progresses. Starting from one diagram and noting the moves till you reach the next one, check if your mental picture of the board tallies with that next diagram.
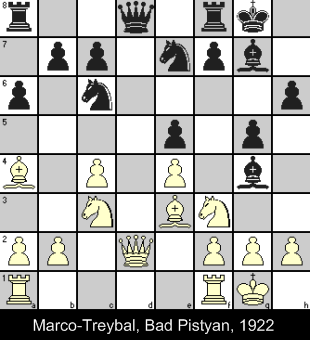
Continuing our theme on creating chess combinations, played out at a tournament at Bad Pistyan in 1922. Black chose the Neo-Steinitz defense which enhances Black’s chances in the Ruy Lopez opening that normally tends to be more in favor of White. But Black went one step further to take up initiative for a King side action based on his center control of e5 and d4 squares. White’s last move 12. Qd2 indicated his intention to bring a Rook to d1 for increasing control on d4. Black intended to undermine it by attacking the White Knight at f3 with 12. … Bg4. The Bishop would also pin the Knight against the Rook when it came to d1. Because if Black’s initial center control and King side pawn actions, White pieces have been somewhat restricted in their movement.
You should examine how Black continues his campaign from this point onwards.
|
|
|
|
|
|
|
Position after 12. … Bg4:
|
|

|
|
13. |
Rfd1 |
Nd4 |
|
The threat is 14 … Bxf3 15. gxf3 Nxf3+ attacking the Queen also.
|
|
14. |
Bxd4 |
exd4 |
|
|
|
15. |
Ne2 |
c5 |
|
Knight retreated as 15. Nxd4 Bxd1 would lose the exchange. Black brought more support for the pawn which further strengthened his hold on the center..
|
|
16. |
Ne1 |
Ng6 |
|
|
|
17. |
f3 |
Be6 |
|
White was able to drive away the irritating Bishop but at the cost of weakening his castle. Black immediately shifted attack from flank to center.
|
|
18. |
Rac1 |
Ne5 |
|
|
|
19. |
Bb3 |
b5 |
|
Black keeps raising the ante!
|
|
Position after 19. … b5
|
|

|
|
20. |
cxb5 |
c4 |
|
Black was not wasting time to restore his pawn balance. He pressed home his attack expanding his center control
|
|
21. |
Ba4 |
Qb6! |
|
Black again used one of his central pawn as bait to create a pin on the King.
|
|
22. |
Nxd4 |
axb5 |
|
White obviously could not capture with his Queen because of 22. … Nxf3+ which loses the Queen. Black timed his pawn capture to maintain his tempo though it meant losing another pawn.
|
|
23. |
Bxb5 |
Rfd8 |
|
Now Black creates a two-way pin on the Knight! It is an exemplary chess tactics on how to use the center control by pawns to launch attacks and then giving them up to bring the pieces into attack.
|
|
24. |
a4 |
|
|
White is still unaware of Black’s plan to exploit the pin.
|
|
Position after 24. a4
|
|

|
|
24. |
… |
Nd3! |
|
With one move, Black cuts off all the support for the Knight at d4. 25. Rxc4 Bxc4 26. Bxc4 Qxd4+ 27. Kf1 (27. Kh1 Rf2+) Qxc4 28. Nxd3 renews two-way pin on Knight and a solid Rook extra for Black
25. Bxc4 Qxd4+ 26. Kf1 Bxc4 (27. Nxd3 Bxd3+ 28. Qxd3 Qxd3+ 29. Rxd3 Rxd3) 27. Rxc4 Qxc4 28. Nxd3 gives same position as above
|
|
25. |
Nxd3 |
Qxd4+ |
|
|
|
26. |
Qf2 |
cxd3 |
|
|
27. |
Rxd3 |
Qxd3! |
|
27. … Qxf2+ 28. Kxf2 Rxd3 29. Bxd3 Rxa4 leaves White with two extra pawns against a Bishop – still a fighting chance. But Black’s move takes away a Rook against two extra pawns as shown below and White resigned.
28. Bxd3 Bd4 29. Qxd4 Rxd4 30. Bb5 Bb3 loses the a4 pawn also.
|
|
The position after 27. … Qxd3
|
|

|
