Tag Archives: Chess Strategy

Chess Tactics: Relevance of all-round play in chess

Filed under Chess tactics
Tagged as , , , , ,

The game of chess calls for shrewd analytical skills of positions coupled with calculations to gain control over the game. It is essential that good positional play should be entwined with calculations of moves and deployment of effective tactics assessing the overall position in the board. Having good control over the board positionally will not guarantee you any success over the opponent as long as you do not entwine the tactics effectively to gain control over the board. It is in this context that one should strive to be a good allround player instead of concentrating either only on his tactical skills or in positional factors.

In the following example, you will notice that having good positions will not lead to success as one silly error caused without giving importance to the opponent’s pieces, and due to paucity of time, ended up in losing the game from the winning position.

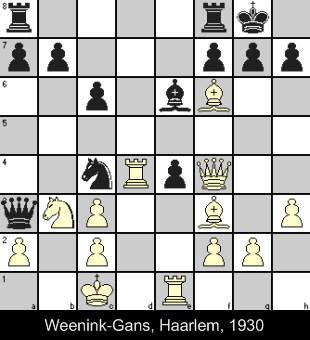
This is the position after 27 moves. It is the turn of the white to move now.

Position 1
White is a good player in positional chess and now, a cursory look at the board indicates that white has an extra pawn than black.  The game proceeded as follows :

28.    Rc1       h6
29.    Rc8+    Kh7
30.    Rc4       Qe5
31.    Rf4        Qc4

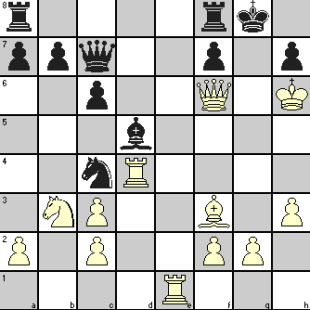
White, using his skills on positional chess has been making satisfactory progress.  The position after 31 moves is given hereunder:

Position 2
Not only is the white rook at f4 supporting the pawn at f2, the queen in b3 is threatening the black pawns at e6 and f7 and blocking their movement.

32.    Kh2    …..            Another good move from White in an attempt to develop his pawns with King’s assistance.

32.    …..        Kg7
33.    Rg4+    Kh7
34.    Rf4        Kg7
35.    Qb4       Qc2
36.    Kg2       e5
37.    Rg4+    …….            This is a wrong move from White that has exposed the pawn at f2.

37.    ……        Kg6            Black tries to capitalize on the wrong move by White.   He could have moved the King to h7 but instead preferred this move.

38.    Qxb6+    …….            White continues to attack with fervor considering the fact that time is running out, and Black tried to confuse the confused white by moving the king to the “f” file.

38.    …….    Kh5

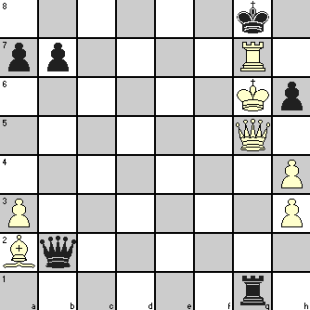
This is the position at the board at the end of 38 moves.

3rd Position
39.    e4+    ……            This is the blunder on the part of White.  He did not assess the winning position correctly and out of confusion and time constraint, deprived himself of a winning move in Kh3 and by calling check on Black, exposed the white rook at g4, and literally threw the game.

39.    ……    Kxg4
40.    Qe3    Rd3
41.    Qxh6    Rxg3            After this White resigned accepting defeat.

This is a clear example of how confusion caused by the opponent and paucity of time can change the whole advantage into a loss.

For any aspiring chess player to grow up the ladder and achieve success, he or she should develop as a complete player having allround skills and not relying on any particular skill as positional play or tactical player.  Positional analysis and calculation of the moves and counter moves are very essential for the deployment of a good successful chess strategy or an effective chess tactics.
Chess Tactics: The King’s role in attack – part 1

Filed under Attacking tactics, Chess lessons, Chess tactics, Chess Tutorials
Tagged as , , , ,

“The King is a fighting piece. Use it!” is a remark ascribed to Wilhelm Steinitz who is regarded as the first World Champion in Chess. Nevertheless, your common experience may make you think of your King only as a liability, which needs to be protected at any cost and the cost sometimes becomes so high that you give up your efforts! Only when you have been able to survive till an endgame with only pawns around that you possibly appreciate the thoughts behind the remark of Mr. Steinitz!

But a search through chess archives will show you many games where a player did use his King as a fighting piece who traveled all the way into the opponent’s territory to capture pieces and pawns and to provide support to his own attacking forces for delivering checkmate!

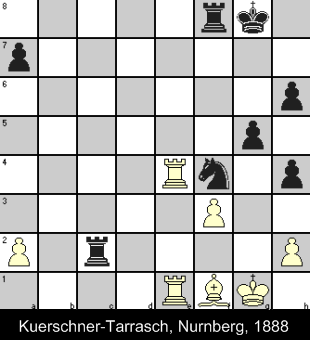
I have picked up six such examples and divided those into two groups. In this article, we present three games with a little ironic twist because it was the opponent who was mostly attacking but the fighting King took opportunity of these checks to move where it wanted to go without loss of tempo! The opponent ultimately realizes that he has brought the doom upon himself by his failure to see the intention of the King taking a walk!

In the second article Chess Tactics: The King’s role in attack – part 2, we show another three games where the King boldly stepped out on his own by taking advantage of opponent’s constricted position and took the battle to the enemy King to create a winning position.

First game –

position after 31 moves:

king-takes-a-walk1

32 Bc4+ Kg7
33. Re7+ Kg6
34. Bb3 Rg2+
35. Kh1 h3
36. Rd1 Rc8
37. Rd6+ Kf5
38. Rxa7 Rc1+
39. Bd1 Ne2
40. Ra5+ Kf4
41. Rf6+ Ke3
42. Re5+ Kf2
43. Rxe2+ Kf1 White looked at 44. … Rg1# or 44. Rxg2 hxg2# and resigned.


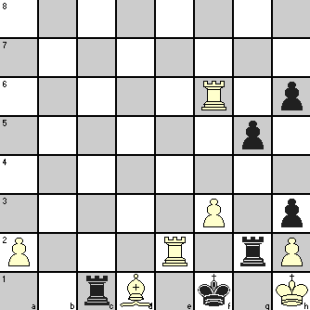
Position at the end of Black King’s journey:

king-takes-a-walk2


Second game –

position after 19. … Qa3+:

king-takes-a-walk3

20 Kd1 Nb2+
21. Ke2 Qa6+
22. Ke3 Nc4+
23. Kxe4 gxf6
24. Qxf6 Qb6
25. Kf4 Qc7+
26. Kg5 Bd5 26… Rfe8 27.Kh6 Kf8 28.Qh8+ Ke7 29.Rxe6+ Kxe6 (29… fxe6 30.Qg7#) 30.Nc5+ Ke7 (30… Kf5 31.g4#) 31.Re4+ Kd8 (31. … Ne5 32. Rxe5+ Qxe5 33. Qxe5+ Kd8 (33. … Kf8 34. Nd7+ Kg8 35. Qg7#) 34. Qd6+ Kc8 35. Qd7+ Kb8 36. Qxb7#) 32. Qxe8#
 
27. Kh6 Resigns Black cannot prevent Qg7#


Position at the end of White King’s journey:

king-takes-a-walk4


Third game –

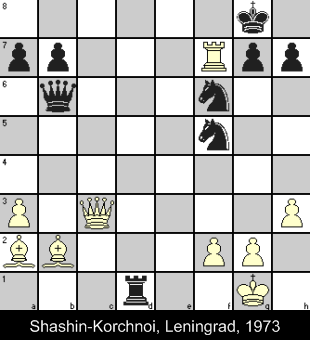
position after 23. … Rd1+:

king-takes-a-walk5

The analyses are as given by Shashin himself, who considered this as the best game of his life.

24 Kh2 Qd6+ Shashin considered this as the losing move and according to him White could force a draw here by repetition of moves with the following line of play. (But if Korchnoi thought he was winning, he would not go for this!)
24. … Ng4+!! 25. hxg4 Qd6+ 26. Qg3 Nxg3 27. Rd7+ Kf8 28. Bxg7+ Kc8 29. Rxd6 Nf1+ 30. Kg1 Nd2+ 31. Kh2 Nf1+ 32. Kg1 Nd2+ etc.
25. g3 Ng4+
26. Kg2 Nh4+
27. gxh4 Qh2+
28. Kf3 Qxf2+
29. Ke4 Qe2+ Not 29. Kxg4 because of 29. … Rg1+ 30. Kh5 g6+ 31. Kh6 Qxh4#
 
Black’s 29. … Qe2+ is a losing move. After 29. … Re1+ 30. Kd5 Rd1+ 31. Kc4 Kxf7 32. hxg4 Ke8, the game is still open.
30. Kf4 Rf1+
31. Kg5 h6+
32. Kg6 Ne5+
33. Qxe5 Rg1+
34. Qg5 Qxb2
35. Rxg7+ Resigns 35. … Kf8 36. Rg8#


Position at the end of White King’s journey:

king-takes-a-walk6


In Chess Tactics: The King’s role in attack – part 2, you will see examples of one King stepping out to approach and corner his opponent.


Chess Combinations: beauties from lesser known masters – 3

Filed under Attacking tactics, Chess lessons, Chess Strategy, Chess tactics, Chess Tutorials
Tagged as , , , , , ,

Please note:

The best way for beginners to get better at chess and learn these ideas is to setup the position on a chessboard and go through the moves instead of trying to picture it. At this stage, understanding the ideas is more important than taking the burden of memorizing the positions.

As you keep gaining in experience, you do need to develop your power of visualization as without that, you won’t be able to work out deep combinations in your actual play.

In fact, in these articles on chess combinations, that is the purpose behind showing the positions after every few moves as the game progresses. Starting from one diagram and noting the moves till you reach the next one, check if your mental picture of the board tallies with that next diagram.

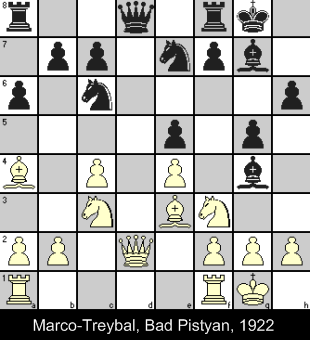
Continuing our theme on creating chess combinations, played out at a tournament at Bad Pistyan in 1922. Black chose the Neo-Steinitz defense which enhances Black’s chances in the Ruy Lopez opening that normally tends to be more in favor of White. But Black went one step further to take up initiative for a King side action based on his center control of e5 and d4 squares. White’s last move 12. Qd2 indicated his intention to bring a Rook to d1 for increasing control on d4. Black intended to undermine it by attacking the White Knight at f3 with 12. … Bg4. The Bishop would also pin the Knight against the Rook when it came to d1. Because if Black’s initial center control and King side pawn actions, White pieces have been somewhat restricted in their movement.

You should examine how Black continues his campaign from this point onwards.

Position after 12. … Bg4:
 
combination3a
 
13. Rfd1 Nd4   The threat is 14 … Bxf3 15. gxf3 Nxf3+ attacking the Queen also.
 
14. Bxd4 exd4  
15. Ne2 c5   Knight retreated as 15. Nxd4 Bxd1 would lose the exchange. Black brought more support for the pawn which further strengthened his hold on the center..
 
16. Ne1 Ng6    
17. f3 Be6   White was able to drive away the irritating Bishop but at the cost of weakening his castle. Black immediately shifted attack from flank to center.
 
18. Rac1 Ne5    
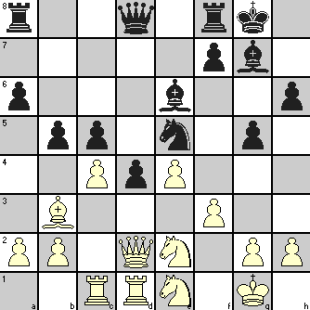
19. Bb3 b5   Black keeps raising the ante!
 
Position after 19. … b5
 
combination3b
 
20. cxb5 c4   Black was not wasting time to restore his pawn balance. He pressed home his attack expanding his center control
 
21. Ba4 Qb6!   Black again used one of his central pawn as bait to create a pin on the King.
 
22. Nxd4 axb5   White obviously could not capture with his Queen because of 22. … Nxf3+ which loses the Queen. Black timed his pawn capture to maintain his tempo though it meant losing another pawn.
 
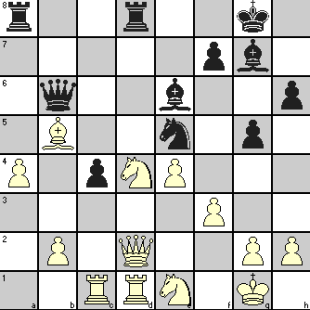
23. Bxb5 Rfd8   Now Black creates a two-way pin on the Knight! It is an exemplary chess tactics on how to use the center control by pawns to launch attacks and then giving them up to bring the pieces into attack.
 
24. a4 White is still unaware of Black’s plan to exploit the pin.
 
Position after 24. a4
 
combination3c
 
24. Nd3!   With one move, Black cuts off all the support for the Knight at d4. 25. Rxc4 Bxc4 26. Bxc4 Qxd4+ 27. Kf1 (27. Kh1 Rf2+) Qxc4 28. Nxd3 renews two-way pin on Knight and a solid Rook extra for Black
 
25. Bxc4 Qxd4+ 26. Kf1 Bxc4 (27. Nxd3 Bxd3+ 28. Qxd3 Qxd3+ 29. Rxd3 Rxd3) 27. Rxc4 Qxc4 28. Nxd3 gives same position as above
 
25. Nxd3 Qxd4+  
26. Qf2 cxd3  
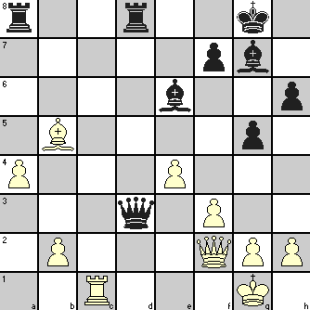
27. Rxd3 Qxd3!   27. … Qxf2+ 28. Kxf2 Rxd3 29. Bxd3 Rxa4 leaves White with two extra pawns against a Bishop – still a fighting chance. But Black’s move takes away a Rook against two extra pawns as shown below and White resigned.
 
28. Bxd3 Bd4 29. Qxd4 Rxd4 30. Bb5 Bb3 loses the a4 pawn also.
 
The position after 27. … Qxd3
 
combination3d


Center control in Chess makes for a forceful attack

Filed under Attacking tactics, Chess Basics, Chess lessons, Chess Opening, Chess Strategy, Chess tactics, Chess Tutorials
Tagged as , , , , , ,

A vivid example on importance of center control in chess showed you the importance of this aspect of chess openings. At the risk of overstressing the point, here we bring another short game played with Sicilian Defense which is supposed to give Black a good fighting chance against White’s King Pawn opening.

We have already discussed about the theory behind one variation of Sicilian opening in Chess Opening: Control of Center – Part 1 and showed examples in Chess Opening: Sicilian Defense Theory to Practice about the kind of play that can win for White or Black.

Sicilian Defense is the choice of combative players because Black is playing to create advantage, not just to achieve equality. At the same time, Black must realize that by not directly going for the control of center, he may be allowing White an early initiative. Therefore Black has to play carefully so as not to be swept off his feet by a quick attack before his own thrusts have taken effect.

Just adopting Sicilian Defense without this realization is not going to help Black to get the upper hand. He must be prepared to play aggressively but precisely in line with the theories to snatch the initiative, otherwise it could be a recipe for swift demise! That is what happened in the following game played at Bad Gastein in 1948 and we try to identify where Black went wrong and allowed White his brilliant attack.

Nicolas
Rossolimo

 
Ivan
Romanenko
 
1. e4   Aims to control d5 and f5 and create space for King side initiative
 
1. c5    
 
Shows black’s intention to go for Sicilian Defense.
 
This move apparently violates the principle of controlling the central and semi-central squares as it applies pressure only to d4.
 
Unlike moves like …e5 or …Nc6 which challenge center control or develop minor pieces, …c5 does neither. It also needs some more pawn movements like …d6, …e6, …a6 etc., allowing White a lead in development with attacking chances.
 
Then why go for it?
 
On the positive side, it gives Black

  • space advantage on Queenside and further actions on that flank
  • pawn majority at center by exchanging this pawn with White’s d4 pawn when he advances it to get full control of center
  • control of open c-file after the exchange, using his Queen or Rook in that file to facilitate Queenside counterplay
2. Nf3 Nc6   Moves and countermoves to wrest control of d4 and e5 squares
 
3. Bb5  
 
To quote Al Horowitz, this move was ‘actually an idea of Nimzowitsch, who called it one of his little jokes in the opening’. It was Rossolimo who adopted it many times to achieve remarkable success (as in the present game). That is how this line of Sicilian Defense goes under the name of Nimzowitsch-Rossolimo attack (ECO code: B31)
 
The main purpose is to get a rapid development and a strong center with c3 and d4. The struggle for d4 dictates the tactics for both sides and Black must be ready to capture on d4, else White gets great lead in development.
 
3. g6   Black is getting ready to develop his KB to g7 and to apply pressure on d4 and e5 squares.
 
White’s usual intention is to play Bxc6, giving Black doubled pawns. Black’s major responses are 3…g6 preparing …Bg7, 3…d6 preparing …Bd7, and 3…e6 preparing 4…Nge7.
 
4. 0-0 Bg7   White safeguards his King and wants to use KR as part of his attacking plans. Black of course carries on with his development plans.
 
Position after 4 moves
rossolimo_variation1
 
5. Re1   Normal continuation is 5. c3 Qb6 with a struggle for control of d4. The text move was introduced by Gurgenidze for expected line of play along 5. Re1 e5 6. b4
 
5. Nf6   This changes track from control of d4 to attacking e4 pawn and exposed the Knight to an early attack.
 
6. Nc3   White develops his Knight to support his QP as also his KB and adds to the control of d5
 
6. Nd4  
 
In keeping with the strategy discussed against move 3, Black should have gone for 6. … e5 followed later by …Qb6. Other alternatives would be 6 … d6 to enable …Bd7 or to safeguard his King (because of the distant and not so distant pins by White’s Bishop and Rook) by …0-0. The text move was not consistent with any of these ideas and hence a questionable move.
 
7. e5 Ng8   Black’s inhibited play and inconsistencies allow White considerable space in center with tempo through attacks on enemy pieces.
 
8. d3 Nxb5   See how Black is surrendering all initiative to White. While White opens lines for his QB, Black’s QB is still locked in and his King’s Knight has retreated and blocked castling for his King. His center pawns remain immobile. The exchange of Knight and Bishop was originally the intention of White’s 3rd move to reduce Black’s control on d4 and e5. Without being forced, Black Knight has taken the trouble of wasting several moves to give White what he wanted!
 
9. Nxb5 a6   Another questionable move by Black. As subsequent moves show, White’s QN was headed for d6 square, Black’s move just assisted it in taking that step!
 
One of the basic tenets in chess is that you should not force a badly placed enemy piece to move to a better square. By extension of the logic, do not induce your opponent to take a move that he was ready to take. Both these lose tempo for you as you could use that time to make more profitable moves for your own pieces.
 
Position after 9 moves
rossolimo_variation2
 
10. Nd6+! exd6?   White knew that the capture of his Knight would give him a fierce attacking opportunity and so his move was an excellent idea. But Black still fell for it, making a bad situation really worse by exposing his King to the possibility of a discovered check. After this, White’s attack through a brilliant combination simply rolls on.
 
11. Bg5!  
 
White has timed his moves to perfection! He held back the discovered check to first drive away the Queen which could come to some help against what White planned. With an immediate discovered check, Black would be able to extricate himself with Ne7.
 
There is a couple of important lessons here. Firstly, you can sometimes get out of a difficult situation by returning the material that was sacrificed by your opponent to gain an attack. By doing this, you are still even on material, but the opponent’s attack may fizzle out. Trying to hold on to the material only adds to your difficulties.
 
Secondly, you need not be in a hurry to execute a move which is there for the taking when you can make some other move that compels your opponent to attend to it first. All good players know this maxim of looking for a better move when a good move has been found.
 
The text move by White takes care of both these possibilities.
 
11. Qa5   11. … Qb6 would not be any better.
 
12. exd6+ Kf8  
 
At this stage, White’s win was only a matter of time and most players would possibly go for the simple 13. Qe2 with one likely line as:
 
13. Qe2 Bf6 14. Qe8+ Kg7 15. Ne5 (threatening 16. Qxf7#) Bxg5 16. Qxf7+ Kh6 17. Qf8+ Kh5 18. g4+ Kh4 19. Qf3 (threatening 20. Qg3#) Bf4 20.Qxf4 Nf6 (or Qb4) 21. Nf3+ Kh3 22. Qg3#
 
But White found a more elegant line.
 
Position after 12 moves
rossolimo_variation3
 
13. Re8+! Kxe8  
14. Qe2+ Kf8  
15. Be7+ Ke8   15. … Nxe7 16. Qxe7+ Kg8 17. Ng5 with Qf7# to follow
 
Position after 15 moves
rossolimo_variation4
 
16. Bd8+! Kxd8  
17. Ng5 Resigns   It is either 18. Nf7# or 17. … Nh6 18. Qe7#
 
The final position:
rossolimo_variation5


A vivid example on importance of center control in chess

Filed under Beginner Chess Tips, Chess Basics, Chess lessons, Chess Opening, Chess Strategy
Tagged as , , ,

Starting from our article on winning chess strategies in various posts we have stressed the importance of controlling the center in your chess games. In our latest series of articles, we mentioned this strategy as one of the aims for any chess opening as can be seen in Chess Opening: Control of Center, showing the theoretical analysis of some popular openings. This idea was further developed through examples of master games which showed how such opening theories are put into practice in these games.

We now show you a vivid example of how the aggressive play by one GM against another who was somewhat passive in this respect made a very short shrift of the game in only 15 moves. This may be an extreme example and was chosen only to stress our point, therefore don’t expect to get such quick results in your games. However, the idea remains valid.

The game employs Pirc Defense (ECO code: B07) which gives Black an advantage of adapting his center policy to the development strategy employed by White. But this has the drawback of giving White a much greater freedom in the center. As a result, in case of aggressive play by White, Black gets so busy in tackling White’s thrusts that he may miss out on his own plans unless he treads very carefully.

This game was played out in a tournament at Tashkent in 2008. In the FIDE list of Grandmasters as on April 1, 2009, White was ranked at 67 and Black at 393.

Igor Kurnosov
(Russia)
Marat Dzhumaev
(Uzbekistan)


1. e4 d6  
2. d4 Nf6  
3. Nc3 g6  
4. Bg5 Nbd7   Black’s text move is considered unfavorable. The recommended line is 4. … h6 5. Bh4 Bg7. Other lines like 4. … Bg7 or , to remain more flexible, 4. … c6 followed by b5 and Qa5 for action on Queen side are also expected to give Black a better game.
5. Qd2 a6  
6. 0-0-0 b5  
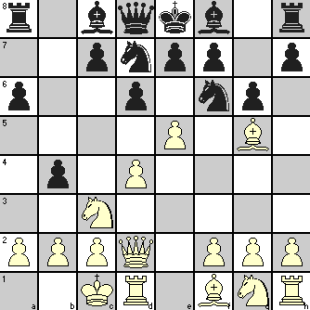
7. e5 b4   Black overstretched himself by this move if you consider the lines suggested by theory.


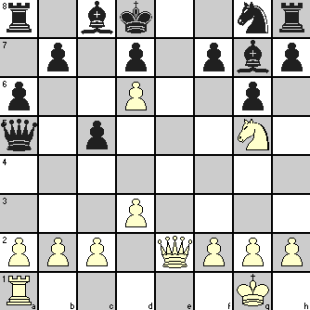
centercontrol1
8. exf6 bxc3  
9. Qxc3 e6   The unopposed progress of the advanced White pawns so close to the hemmed in Black King and Queen remain a thorn in the flesh, seriously affecting the normal development of Black pieces
10. Re1 Nb6  
11. d5 Na4   11. Nxd5 would not help against what followed
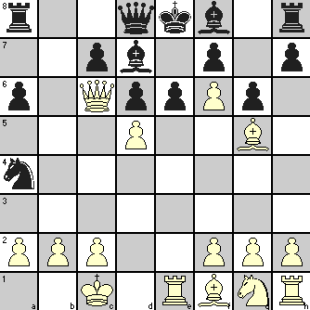
12. Qc6+ Bd7  


centercontrol2
13. Rxe6+! fxe6  
14. dxe6 Bg7   A case of too little too late! If 14. … Bxc6 15. f7#
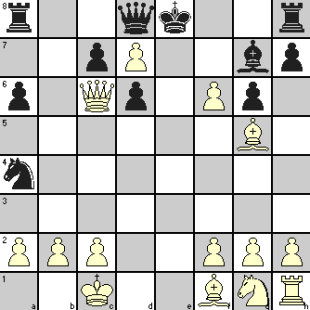
15. exd7+ Resigns  
 
  centercontrol3
  The final position


15. … Qxd7 16. f7+ Kxf7 17. Qxd7+ Kf8 18. Qe7+ Kg8 19. Bc4+ d5 20. Bxd5#

15. … Kf7 16. Bc4+ Kf8 17. fxg7+ Kxg7 18. Bxd8 Rhxd8 19. Qxa4 gives White overwhelming material superiority.