Tag Archives: Rook and Pawn endings

Chess Endgame Tactics: Rook and Pawn endings – Part 4

Filed under Chess lessons, Chess tactics, Chess Tutorials, Endgame Tactics
Tagged as ,

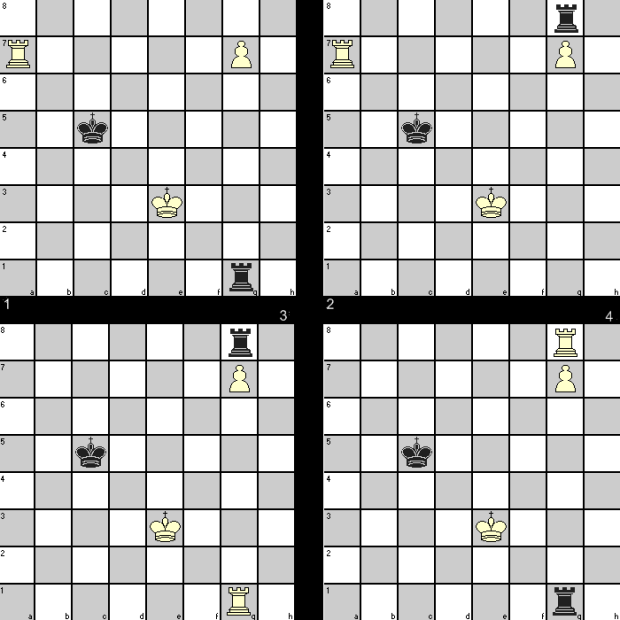
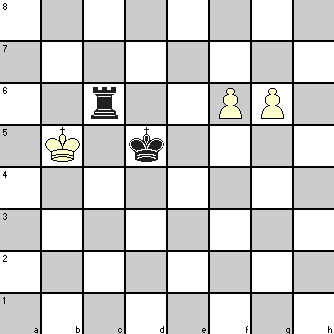
You have already seen the established chess tactics for a well-known Rook and Pawn ending called Lucena Position. Here we discuss about Philidor position, another equally well-known chess ending with Rook and Pawn that gives a draw to the defending player if he plays actively and with precision.

Philidor position in Rook and Pawn ending

The requirements for this position are:

  • The pawn of the attacking side and its King have not crossed their 5th rank. The King is in contact with the Pawn
  • The defendant King is on the promotion square or on a square adjacent to it
  • The defendant Rook is on the 6th rank (its own 3rd rank) preventing the enemy King from going forward

The Pawn may be on any file. But as you know from earlier discussions on Rook and Pawn endings, Pawn on Rook file makes the defending King’s job easier.

The position of the Rook of the attacking side (the side having the Pawn) is not directly relevant except for its ability to come to the help of the King and Pawn when necessary. But it is in the interest of the attacking side not to allow the defending King to come forward and create complications. The Rook positioned on the 7th rank keeps the defending King confined to its base rank.

However, check by the attacking Rook does not help in any way as the defending King keeps shuttling between the queening square and the square in front.

The defending side’s strategy:

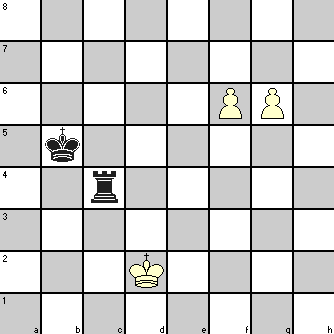
So long as the Pawn does not move to its 6th rank, the defendant Rook keeps shuttling on that rank (which is its 3rd rank). If the Pawn moves to the 6th rank, the defendant Rook should go to its 7th or 8th rank and keep giving check from behind. There is no respite from check as the attacking King cannot take shelter behind the Pawn.

If the attacking side’s Rook tries to interpose, the defendant should exchange the Rooks. Since defendant King is already in front of the Pawn, all it has to do is to maintain opposition to enemy King, and the ending is a draw.

You can see that if the defending side plays passively and allows the enemy King to get to the square in front of its Pawn and the defending Rook is unable to deliver check, it will be a win for the attacking side. So the defending player has to remain alert if he has to get a drawn game.

A possible sequence of moves in the diagram position is shown below.

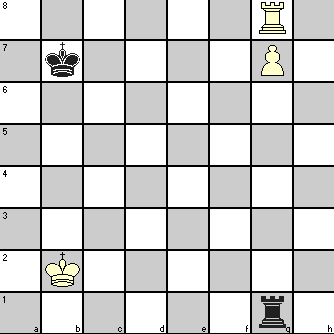
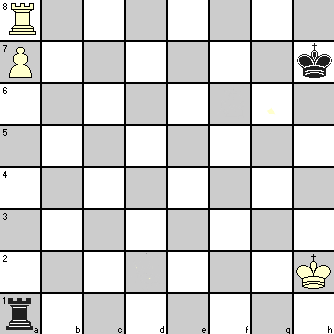
Without exchange of Rook:

1. Rg7 Rb6  
2. Rh7 Rg6  
3. d6 Rg1   As the White Pawn has advanced, White K cannot any more take shelter behind the Pawn, so it is safe to move the Black R. If it were done earlier, White would have played Kd6 with a win.
4. Ke6 Re1+  
5. Kd5 Rd1+  
6. Ke5 Re1+  
7. Kd4 Rd1+  
8. Ke5 Re1+   and so on without any headway


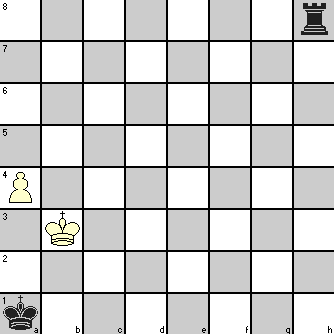
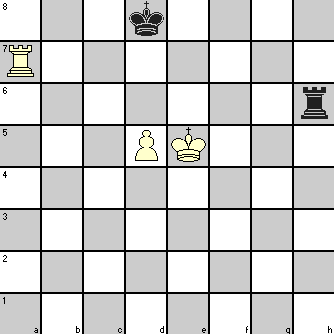
With exchange of Rook:

1. Rg7 Rb6  
2. Rh7 Rg6  
3. Rf7 Rb6  
4. Rf6 Rxf6   If Black avoids exchange, White K gets access to d6
5. Kxf6 Kd7  
6. Ke5 Ke7   Black must retain opposition to prevent White King’s access to d6
7. Kd4 Kd8  
8. Kc5 Kc7  
9. d6+ Kd8  
10. Kc6 Kc8  
11. d7+ Kd8  
12. Kd6   drawn due stalemate


Chess Endgame Tactics: Basic Rook and Pawn endings

Filed under Chess lessons, Chess tactics, Chess Tutorials, Endgame Tactics
Tagged as ,

In basic Rook and Pawn chess endings, as shown in following diagrams, White has a Rook and Pawn against only Rook for Black. White’s plan is to find ways to promote his Pawn with the help of his Rook while Black will use his Rook to try to stop that promotion.

Basic positions in Rook and Pawn endings

In position 1, the White Pawn cannot advance without getting captured. The White Rook cannot leave the seventh rank for the same reason. But the Black Rook is free to move up and down that file and still retain its hold on the Pawn.

In position 2 also, the White Rook cannot leave the seventh rank but White can now play Rf7 and Black Rook is unable to leave its position. If Black Rook moves along the rank, White will play Rf8 followed by g8=Q or gxf8=Q depending on Black Rook’s move.

The White Rook is badly placed in both these positions. But in position 3, the White Rook is able to move along the file and the Black Rook is tied to its position. If the White King can reach the Pawn first, Black will lose the Rook or the Pawn will get promoted. But if the Black King can do that, the Pawn will get captured. For the same reasons, Black’s position gets much better in position 4.

It should be clear that the Rook is best placed behind the pawn whether the Pawn belongs to you or not.

If we now examine the following position, we see how the promotion check can be effected or prevented.

Basic Rook and Pawn endings for promotion check

Here the White Rook cannot leave its position without allowing the Pawn capture by Black Rook. But to force White Rook to remain immobile, Black King itself is forced to shuttle between a7 and b7 squares only. If the King ventures to rank 6, White can immediately give check and promote the Pawn on next move. If the Black King remains on rank 7 but moves to c7, White will play Ra8! If Black Rook captures the Pawn, White’s move Ra7+ captures the Black Rook. Any other move by Black will allow White to promote the Pawn. In this type of situation, both the above two possibilities are to be considered when trying to move the King along a rank or file.

The rule that needs to be remembered in chess endings with Rook and Pawn against Rook is that if the defending King can reach the promotion square, it is a draw. If this can be prevented, the Pawn will get promoted. The exception is when the Pawn is on the Rook file because even if the attacking King reaches the promotion square. The defending Rook on Rank 7 or defending King in opposition or continuous check by defending Rook can prevent the Pawn promotion. It is extremely difficult to promote Rook’s Pawn because of the above and a draw is the most likely result.

We have shown in Chess Endgame Tactics for Rook and Pawn endings that a Rook alone cannot stop the promotion of one of the two connected passed Pawns when both have reached the sixth rank. But even a single Pawn in contact with its King, if able to advance to rank 4 or beyond, will draw against a Rook provided the enemy King cannot come to the support of its Rook. This will be clear from the following diagram.

Basic Rook and Pawn endings with Rook and Pawn against Rook

Though White Pawn has reached rank 4, White King has not. In this position with Black to play, Black would win as shown below.

1. Rh4  
2. a5 Kb1  
3. a6 Kc1  
4. a7 Rh8  
5. Kb4 Ra8  
6. Kb5 Rxa7   wins for Black


It can be seen that if the White King were one more step ahead, it would be supporting the Pawn preventing the capture by Black Rook. Having the first move, White would play Kb4 bringing both the King and Pawn to the 4th rank, and the end result would be a draw.

Chess Endgame Tactics: Rook and Pawn endings – Part 2

Filed under Chess lessons, Chess tactics, Endgame Tactics
Tagged as ,

In Part 1, you have seen some basic Rook and Pawn endings and how to tackle them. In this part, we will examine some more patterns.

A very well-established winning position in Rook and Pawn endings is known as Lucena position, supposedly taking its name from a Spanish chess writer of 15th century.

Rook and Pawn ending type 4

The Lucena position covers all such situations (or their mirror images) with the pawn on any file except the Rook’s file (a-file and h-file) and White having the first move.

In order to win, White has to tackle following problems:

  • White King has to come out to allow the pawn to promote
  • once out, it will have to get a respite from Black Rook’s check for White to get a chance to move his pawn
  • White King has to remain in touch with the passed pawn to prevent its capture by Rook
  • Black King must be prevented from approaching the queening square
  • A very precise set of moves is necessary for White to solve the problems and promote his pawn as shown below.

    1. Rf4 Rh1   Black’s other options result in following:
    1. … Ke7 2. Re4+ Kf6 3. Kf8 wins
    1. … Re2 (to prevent White Rook’s check) 2. Rh4 with 3. Kh8 to follow will also win
    2. Re4+ Kd7  
    3. Kf7 Rf1+  
    4. Kg6 Rg1+  
    5. Kf6 Rf1+   For any other move of Black Rook, White plays 6. Re5 followed by 7. Rg5 allowing White King to take shelter at g6
    Other options:
    5. … Kd6 6. Rd4+ Kc6 7. Rd8 Rf1+ 8. Ke5 Re1+ 9. Kf4 Rf1+ 10. Ke3 Re1+ 11. Kf2 ends further checks
    6. Kg5 Rg1+  
    7. Rg4   White King gets shelter from checks and the Pawn gets promoted on next move


    These moves by White King and Rook to reach the final position was described as “building the bridge” by GM Nimzowitsch, also known as Nimzovich (1886-1935), a great chess theoretician of his times.

    The White Rook’s move precisely to f4 is important. It is close enough to provide shelter to the King at the appropriate time while remaining far enough from the reach of Black King. For example, if White played 1. Rf5, the sequence of moves would be:

    1. Rf5 Ke7  
    2. Re5+ Kd6   2. … Kf6 3. Kf8 Rg2 4. Re7 Rg1 5. Rf7+ will win for White
    3. Kf7 Rf2+  
    4. Kg6 Kxe5  
    5. g8=Q Rg2+  
    6. Kf7 Rxg8  
    7. Kxg8   Drawn


    In Part 3, we will see why the Lucena maneuver does not work when the Pawn is on Rook file.

Chess Endgame Tactics: Rook and Pawn endings – Part 1

Filed under Beginner Chess Tips, Chess lessons, Chess Strategy, Chess tactics, Endgame Tactics, Forks
Tagged as ,

All is well that ends well is probably at its truest in case of chess endgames! The endgame is the phase where the amateurs are at greatest disadvantage against experienced opponents. They are often at a loss on how to move or position their few pieces and pawns, with the result that they lose or draw games that should have been won.

We have discussed about the general principles of the endgame tactics that should be adopted in different kinds of endings though these were for King and other pieces against a lone King. But amongst the endgame situations that occur in chess games, Rook and Pawn endings are by far the most common and so you should learn the specific tactics that will help you in handling different types of such endings effectively.

In fact, knowing these patterns is helpful for deciding on your action plans. If you know that the situation is favorable, you will persevere to get the win. But if the position is a theoretical draw, you can settle with your opponent without wasting time and effort.

The knowledge of such patterns also helps you to decide on your strategy even before entering the endgame phase. Depending on the chessboard situation, you can exchange and/or move pieces and pawns to reach the pattern that is best possible for you.

Let us now examine some basic positions in Rook and Pawn endings. One fundamental tenet is that a Rook is helpless against two connected passed pawns that have reached the sixth rank.

White to move and win:

Rook and Pawn ending type 1

  1. g7 Rc8    
  2. f7 Rb8+    
  3. Ka6 Kc6    
  4. g8=Q      

In the following position, White will win no matter who has the first move. Check for yourself.

Rook and Pawn ending type 2

But had the Black King been ahead of the pawns to cooperate with his Rook, both White pawns would be captured and Black would win.

Let us now look at King, Rook and Pawn against King and Rook. There are various possibilities.

Rook and Pawn ending type 3

We remind you again about what we said on Chess Strategies for positioning your Rook with reference to your passed pawn. Rook behind your Pawn adds power to it, Rook in front of it makes both immobile. The above is a typical situation which results in a draw. The White Rook cannot come out as the Pawn will get captured. If White King tries to go towards its Pawn, it will not get any shelter against Black Rook’s checks!

But Black has to ensure that the King remains on the seventh rank. If it were on, say, the sixth rank, White Rook would gain a tempo by delivering a check, and the Pawn gets promoted on the next move. Black will lose his Rook against the promoted Queen and White King and Rook will win against the lone King.

Even on the seventh rank, Black King must not stray beyond one square from the edge. See what happens otherwise.

1. Kg2 Kg7
2. Kf2 Kf7
3. Rh8 Rxa7
4. Rh7+ skewers the Rook and wins the game

The presence of other pawns on the board may sometimes mask the position containing above theme. If you can identify it and can make your pawn moves, even sacrificing those as necessary, in such a way that the enemy King is exposed and forced to move to the sixth rank or two squares away from the edge, you can apply above tactics to capture the Rook. Of course, you should be sure that the result of exchanges will not allow your opponent to get one of his pawns to reach position of promotion!

In Endgame Tactics for Rook and Pawn Endings Part 2, we will discuss some more endgames with Rook and Pawn.