Monthly Archives: June 2009

Chess Sacrifice as a Chess Tactics: timing in keeping with force accumulation

5
Filed under Attacking tactics, Chess lessons, Chess tactics
Tagged as , ,

A sacrificial attack that you are unable to take to a successful end (the realization of your aims) becomes a liability. If the opponent can defend successfully and thwart your attack, you are faced with the handicap of not only a deficiency in material but also loss of time and to regroup your pieces may become impossible. Your opponent will exploit your weaknesses to create his own attacks which you will possibly be unable to resist. The outcome is the opposite of what you intended with your sacrifice.

A badly planned or calculated attack is a wrong chess tactics that is always doomed to failure. But a frequent cause of your inability to conclude the attack is the inadequacy of your force at a certain stage to sustain the attacking tempo. So an accumulation of adequate forces is a part of your chess tactics prior to the launch of a sacrificial attack as you were told in Chess Sacrifice as Chess Tactics.

But an adequate accumulation per se is not enough. You must be able to make your sacrifice at the soonest possible opportunity to get the success. In chess, every move counts and if you delay or hesitate, the opponent may be able to guess your intention and a major reason for success of sacrifice, the surprise element, will be lost. Moreover, the delay will enable him to bring in more defenders that may totally refute your attack.

So the elements of a successful chess sacrifice are:

  • plan out the combination with your opponent’s possible reactions in mind
  • accumulate your forces and position them through tactical maneuvers
  • this process itself may involve some secondary sacrifices and that is why you often find that sacrificial attacks involve a series of sacrifices
  • while doing so, maintain the surprise element (some sacrifices in the previous step may be diversionary tactics!) by trying to hide your intention, keeping for last the move that may be a giveaway
  • while making these preparations, just don’t be so blinded by your own clever plans that you fail to notice what your opponent is doing and its impact on your plans

  • as soon as you think that your preparation is ready, initiate your attack with sacrifice

Here we present a game between Herman Pilnik and Miguel Najdorf that was played in a 1942 tournament held at Mar del Plata in Argentina.

Herman Pilnik (1914-1981) was born in Germany but emigrated to Argentina and became an Argentine Champion. He was awarded IM title in 1950 and GM in 1952. He later moved to Venezuela and stayed there till his death.

Miguel Najdorf (1910-1997) was a Polish master of Jewish origin. When he was in Argentina to play a tournament and WWII broke out, he decided not to return home and took Argentine citizenship. That saved him but not his family who perished in Nazi concentration camps. He became a Grandmaster in 1950. He was a profound theorist and contributed to many openings, the most famous being the Najdorf variation to Sicilian Defense which is used widely in master games.

The game illustrates our points on chess sacrifices regarding how the initial preparations are made and a series of sacrifices are planned to deliver the final blow, after which the last few moves towards a win become a formality! The attack is so brilliantly executed that you will feel as if all the moves by White constitute a long tactical combination!

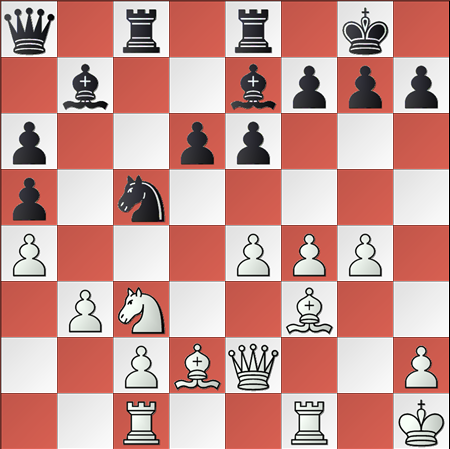
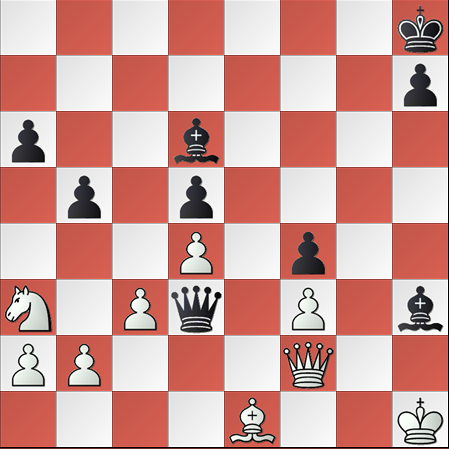
The diagram position occurs after 13 moves, though it is worth going through the whole game for the reasons mentioned in the previous paragraph as White started his manipulations as early as the 8th move!
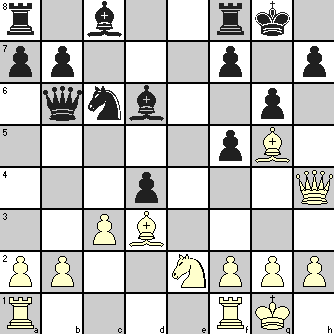
starting the maneuvers

The game went as below
(Note: The analytical comments are from one of the books of Fred Reinfeld where this game was a part of the collections.)

14. cxd4 Re8   Black’s move looks normal, but as can be seen later, 13. … Be6 would save a lot of trouble!
 
15. Bc4 h5   White threatens 16. Bxf7 Kxf7 17. Qxh7+
Black’s pawn move only helps to weaken the castle
16. Rae1 Re4  
17. Nf4 Qxd4   Look how White is maneuvering his pieces in position and keeps creating new threats like 18. Rxe4 fxe4 19. Nxg6 and then 20. Qxh5 to demolish the castle completely.
 
18. Rxe4 fxe4   If 18. … Qxe4 then 19. Nxg4 Qxh4 20. Nxh4 wins for White because of Black’s poor K-side pawn structure.


At the end of the 18th moves, the position stands as shown.
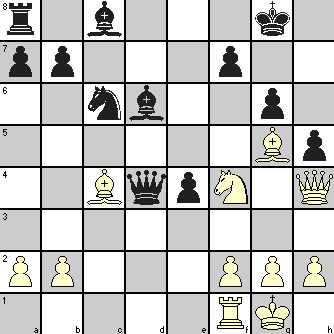
initiating the sacrifice offers

19. Nxh5 gxh5   If 19. … Qxc4 then 20. Nf6 with mate to follow soon.
 
20. Bf6 Qc5   20. … Qxc4 results in 21. Qxh5 followed by 22. Qh8#
 
21. Rd1   The threat of 22. Rd5 creates many possibilities, all bad for Black!
21. … Be7 22. Rd5 Bxf6 23. Qg3+ wins Black Q
21. … Be6 22. Rd5 Qxc4 (21. … Bxd5 22. Qxh5 leads to mate) 23. Qg5+ Kf8 24. Rxd6 wins
21. … Bg4 22. Rd5 Qxc4 23. Qg5+ Kf8 24. Rxd6 wins
21. … Ne7 22. Rxd6 wins for White
21. Kf8  
22. b4 Nxb4   If 22. … Qxc4 then 23. Qxh5 (not 23. Rxd6 as Black wins with 23. …Qc1+) Ke8 24. Rxd6 as 24. …Qc1+ is now met with 25. Rd1
So the Pawn sacrifice diverts the Knight to create the possibility of combination comprising White’s 23rd and 24th move
 
23. Qg3 Bg4   23. … Bxg3 24. Rd8# (would not be possible with Black Knight at c6)
 
24. Rxd6 Nd3   24. … Qxc4 25. Qf4 and Black has no good response to mate threats after 26. Qh6
25. Bxd3 Qc1+  
26. Bf1 Rc8   Black threatens 27. … Qxf1+ 28. Kxf1 29. Rc1+ leading to mate
27. h3 Qxf1+  
28. Kh2 Qc1   28. … Rc1 29. Rd8#
29. hxg4 hxg4  
30. Qxg4 Qh6+  
31. Kg3 Rc3+  
32. f3 Resigns   There is no more hope left now! With Pilnik’s series of sacrifice offers, Najdorf might have had in his mind a precursor to his famous comment* about Tal made nearly 30 years later!


*”When Spassky offers you a piece, you might as well resign then and there. But when Tal offers you a piece, you would do well to keep playing, because then he might offer you another, and then another, and then … who knows?”
 

Middle game tactics: Understand the pawns thoroughly – they cannot move backwards

3
Filed under Chess Strategy
Tagged as , , , , , , , ,

In the game of chess, pawns play a very important role in all stages of the game. It is very important to note that only the pawns – eight of them in total out of the total 16 pieces in the board – have the unique capability of getting promoted to major pieces especially Queen and Rook – and no other piece – even the King or the Queen has this unique capability. Though pawns move in a forward direction in a straight file, when it comes to capturing, they capture only the pieces in diagonals at either of the two squares – one each to his right and left. Of course, the pawns in the wings does not have the left and rights wings as they are clipped for lack of files. In the opening stage, 9 out of 10 times, it is the pawn that opens the game.

According to the classical principles of openings, pawn development in the opening stages should be kept to the barest minimum, just sufficient enough to open up the major and minor pieces for development and control over key squares. As the game progresses in to the middle game stage, where the real game, filled with a series of tactics, strategies, checks, attacks, sacrifices and counter-attacks, unfolds, pawns should be handled very carefully and strategically. Having discussed about the merits of the pawns earlier, let us not forget that pawns have one major disadvantage – yes. They cannot move backwards. So, it is very essential that additional caution and calculations are considered before making pawn movements in the middle game. A wrong move or an unwanted move of the pawn in the middle game might deprive you of vital control over one square and also opens up opportunities for the opponent to exploit this mistake.

Let us try to understand the importance of pawn movement with the help of the following game, played between two grandmasters, where an unwanted pawn move cost the game at the end.

The first few moves of the game in the opening stage are as follows:

1. e4 c5
2. Nf3 d6
3. d4 cxd4
4. Nxd4 Nf6
5. Nc3 a6
6. Be2 e6
7. 0-0 Be7
8. f4 0-0
9. Kh1 Qc7
10. a4 Nc6
11. Nb3 b6
12. Bf3 Bb7
13. Qe1 Rac8
14. Be3 Rfe8
15. Rc1 ….

The game after 15 moves of White is given hereunder. It is the turn of black to make the next move.

chpic1

(Black to move)

A cursory look at the position indicates that the white pieces are fairly developed and spread over the four ranks, with a lot of space to move around. On the contrary, black’s pieces are all lying in the back three ranks, leaving the 5th rank open. However, the set-up of black pieces is very compact and tight enough that it would be a difficult proposition to pierce through the position.

The game continued as follows :

15. …. Nd7 Black decides to move the Knight to the queenside so that its dark squared Bishop can be used effectively, and also at the same time, avoid any threat from the white pawn at g2.
16. g4 …. This is an unwanted and unwarranted moved from White as the black Knight at f3 had moved to Nd7 and there is no worthwhile point in that pawn move at this point of time.
16. …. Na5
17. Nxa5 bxa5

The game after 17 moves is given hereunder:

chpict2

The opening up of the white pawn at g2 has paved way for black to consider the long diagonal a8-h1.

18. Bd2 …. White’s intention of using his g2 pawn did not materialize, and as such, he is back to defensive ways
18. …. Nc5
19. b3 Qb8 Black is planning to exploit the long diagonal a8-h1
20. Qe2 Qa8

The position after 20 moves is given hereunder.

cpict3

(White to move)

White’s decision to move the g2 pawn has opened up the long diagonal for Black to exploit. However, white may feel somewhat happy that his g4 can now be used to thwart black’s intention to move the dark-squared bishop to f6 for threatening the white knight at c3.

21. g5 …. Since the pawn cannot move backwards, this is the only consolation for his earlier mistake of g4.
21. …. d5
22. exd5 exd5
23. Qg2 Ne4
24. Nb1 Nxd2
25. Qxd2 Bb4
26. c3 …. This pawn movement might have been avoided as it paves away for black to open up the diagonal a8-h1.

The position after the 26th move of white is given below:

cpict4

(Black to move)

Black nicely accepts the opportunity presented by White, and obliges with d4.

26. …. d4
27. cxb3 Bxf3+
28. Kg1 …. The absence of pawn at g2 will now be felt by Whit.

Black continues to attack and finally emerges as the winner with the following moves:

28. …. Re2
29. Rxf3 Rxd2
30. Rxc8+ Qxc8
31. Nxd2 Qc1+
32. Nf1 axb4
33. Kg2 Qc2+
34. Kg3 Kf8

0 – 1

A fairly good position at the start of the middle game with a slight advantage has been squandered by White with his unwarranted or unwanted move of the g2 pawn in the 16th move, which ultimately hurt him the most and led to this loss.

It is very essential that the pawns are used effectively and prudently taking into account all possible options and calculations, especially in the middle game stage, so that the actual worth of the pawns, their ability to get promoted, can be used effectively.

Middle game tactics: Moving the worst piece first is a good idea

3
Filed under Chess Strategy
Tagged as , , , , , , ,

The Middle game part in the game of chess is the place where most of the tactics are tried and effectively deployed. This is so because, it is in this stage that the major and minor pieces of both the players would be battling for control over the squares. As you might be aware, tactics are a series of less than three moves at a stretch aimed at a positional advantage and/or thwarting the plans of the opponent. In most of the cases, the tactical moves planned by a player might not fully materialize due to the defensive moves or counter attacking moves of the opponent. So, there would be a series of tactics that might be required to be calculated and assessed by the player before effectively deploying it into action.

It is quite possible in such occasions that one gets caught in a dilemma as to which piece to move or how to initiate a tactical ploy to gain advantage over the opponent. It is in this context that assessing the strengths and weaknesses of the major and minor pieces at work in the board should be assessed, and the least effective piece in the board should be considered as the starting point of a tactical ploy. The process of identifying the weak piece is not a one-time affair in the game. The positions keep changing quite frequently and it is essential that the idea of identifying the relative weakness in the pieces is constantly reviewed and tactics are planned accordingly so that one can have an edge over the opponent.

Let us try to explore this concept a little deeper with the help of a game played in 1995 between two grandmasters, and see how the concept works out.

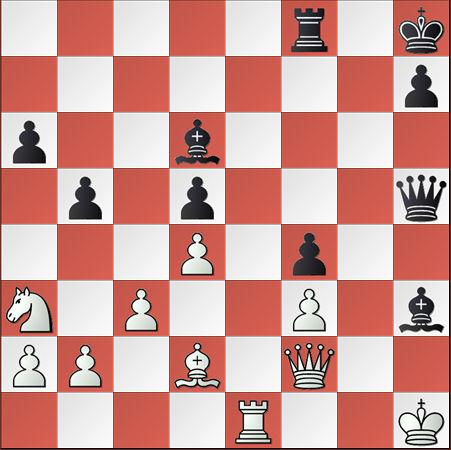
The position of the game after 26 moves by White is given hereunder, and it is the turn of Black to make a move.

pict1

A casual look at the board reveals that the Black has two bishops as against one of White. White, however, has an additional Knight and also one extra pawn. Despite a pawn down, black has a good position on the board, and a fair chance for launching the attack. The light squared bishop is threatening the white knight at a3, and at the same time providing cover for the pawn at f3. Now the dilemma is which is the piece to be moved. It is evident that the rook at f8 is not so effective, and there is not much room for moving any of the pawns.

The game continued as follows with the black preferring to move his weak rook at f8.

26. …. Rg8
27. Rg1 …. Sensing the ploy that blacks light squared bishop might threaten the white king with a check on g2, the rock has been moved for additional cover.
27. …. Rxg1
28. Kxg1 …. Black preferred to exchange his rook

The position in the board after White’s 28th move is given below:

pict2

As has been stated earlier, it is not necessary that the idea of identifying the worst piece should be a one-time affair. It has to be looked for constantly to have better control over the overall board and also an edge over the opponent. Now, we need to once again identify the weak piece or the piece that can be ideally considered for the next move. The light-squared bishop is exerting pressure on the White King restricting his move to only two of the four possible moves, and the dark-squared bishop is protecting the pawn at f3. It is obvious that the queen should be the one to be moved.

A deep look at the squares reveals that the white square d3 is unprotected. This would be better for the black queen to land in to exert more pressure on the white king. Black decides to execute the plan as follows:

28. …. Qg6+
29. Kh1 Qd3 Mission completed for black
30. Be1 …. White tries to activate his Knight at a3 to c2.

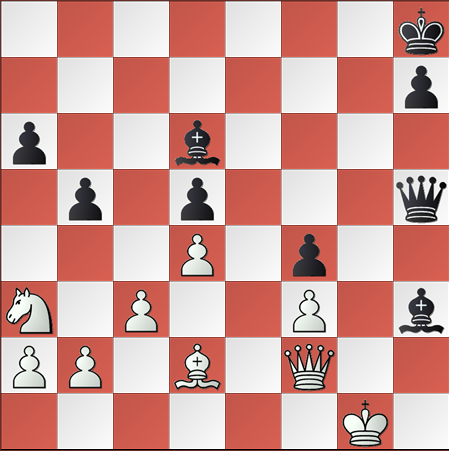
The position after 30 moves of white is given below:

pict3

It is the turn of Black to move now. What should he move now? Again the process of identifying the weak piece or ineffective piece needs to be carried out.

It is clear that after White moved his dark-squared bishop from d2 to e1, the threat for the black pawn at f3 is eliminated, and there is no need for the dark-squared bishop at d6 to provide cover for the f3 pawn. As such, the weak piece or ineffective piece now turns out to be the dark-squared bishop.

30. …. Be7
31. Nc2 Bh4
32. Nb4 Qd1

The game is almost over for White. The decision to move the dark-squared bishop from d6 to e7 and then follow it with a move to h4 (Bh4) is too good for white to handle, and as such lost the initiative. The end game is more of a formality now, with black firmly in control.

Analysis of the positions and the relative strengths and weaknesses should precede any tactical ploys, and this game is a best example for this useful trick, which might turn out to be so handy in the middle game.

Chess Sacrifice as a Chess Tactics: to gain time to attack

3
Filed under Attacking tactics, Chess lessons, Chess tactics
Tagged as , ,

In Chess Sacrifice as Chess Tactics, you have read that gaining tempo or time for attack is one of the chess tactics derived through a sacrifice when such offer cannot be refused without bringing other problems. The move spent in capturing the offered piece loses vital time for the opponent and the player employing the sacrifice uses the time gained to launch his own attack.

The game chosen as an example was played at Dusseldorf in 1908 between Jacques Mieses and Karel Treybal.

Jacques Mieses (1865-1954), a German Jew moved to England to avoid persecution by Nazis and when FIDE brought out the chess title system in 1950, Mieses became the first British Grandmaster. He was an attacking player with many brilliant victories.

You have already read about Karel Treybal in Chess Sacrifice as a Chess Tactics: forcing the King to a path of doom. In that article, we listed a good number of better-known players who were subdued by his attacking flair and Mieses was one of them. Here is a game that illustrates such an occurrence and also demonstrates how a piece is sacrificed to gain momentum for an attack.

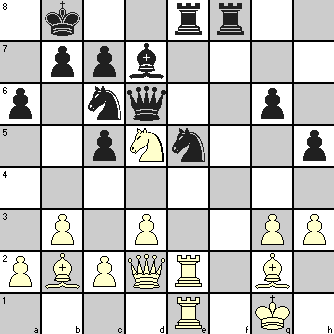
If you play through the game, you can see how both the players, when facing an attack, retaliated with counter-attacks giving rise to a very absorbing tactical game. The position shown in the diagram is after White played 24. Nd5.

sacrifice to gain time

24. Bxh3   25. Bxh3 Nf3+ wins the White Q
25. c4 Bg4  
26. Re3 Nd4   Black is targeting White’s vulnerable f3 square
27. Bxd4 cxd4  
28. Re4 Bf5  
29. c5! Qxd5  
30. Rxe5 Qxe5!   Must have come as a surprise! The Q is exchanged for a Rook and Knight but Black was banking on the open Bishop diagonals and open e-file and f-file for his Rooks to get adequate play as compensation.
31. Rxe5 Rxe5  
32. Qb4 Bc8  
33. Bxb7  


Black seems to be in trouble. If 33. … Bxb7 then 34. c6 Rb5 35. Qxf8+. But White possibly did not anticipate Black’s reply!

33. a5!   Now White is in trouble. If 34. Qb5 then 34. … Bxb7 is possible because of 35. c6 Rxb5
 
34. Qxa5 Bxb7   The RP sacrifice by Black has gained vital tempo for Black
35. g4 Rg5  
36. Kh2 Rxg4  
37. Qb5 Rg2+  
38. Kh3 Rc2!  
39. Kh4 Rf4+  
40. Kg5 Rxc5+  
41. Qxc5 Rf5+  
42. Qxf5 gxf5  
43. Kxh5 Ba6   White resigned as after 44. Bxd3, White cannot stop one of the d-pawn and f-pawn from promotion.


Chess Sacrifice as a Chess Tactics: to open files or lines of attack

3
Filed under Attacking tactics, Chess lessons, Chess tactics
Tagged as , ,

Among the purposes listed for chess sacrifice in Chess Sacrifices as Chess Tactics, this is one of the most frequent of such uses and may occur sometime or other in a majority of chess games. The lines of attacks that are opened are usually diagonals for Bishops or files for Rooks or either type for the Queen. It is also common occurrence to see a sacrifice of a Bishop to open files for Rooks or Queen, and sacrifice of a Rook to open diagonals for Bishops or files for other Rook or Queen. In certain circumstances, even the Queen may be sacrificed if that brings a quicker checkmate by allowing easy passage for other pieces along the opened lines. Of course we are not excluding the sacrifice of pawns or Knights from the ambit of such chess tactics.

You need not think that such an attacking tactics ends with sacrifice of a Bishop or a Rook or something simple like that. There are famous attacking games involving double Bishop sacrifice or double Rook sacrifice or sometimes even more. Cornering the opponent’s King is the ultimate aim, so the attacking player can afford to give up everything that can clear his way to that goal.

The game used as example here shows a double Bishop sacrifice to open lines for Queen and Rook. It was played by Koltanowski against Defosse in the 1936 Belgian Championship match held at Ghent.

Georges Koltanowski (1903-2000) was awarded IM titile in 1950 and honorary GM in 1988. He was a Belgian Champion, but later moved to USA and became the President of USCF from 1975-1978. Marcel Defosse was the pseudonym of Denis Marion (1906-2000) who was noted as a literary person with a passion for chess. He co-authored with Frits van Seters a book titled “Le Jeu d’Echecs. Manuel du Débutant” (The Game of Chess: Guide for Beginners) published in 1945.

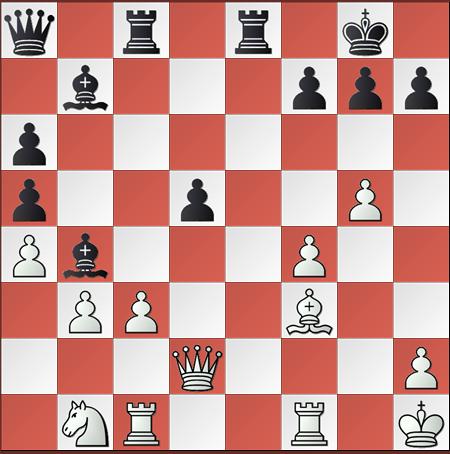
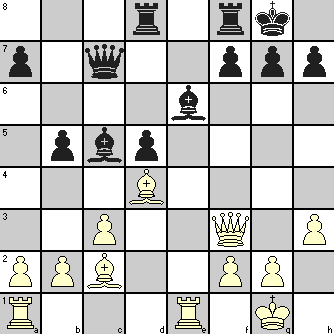
The diagram shows the position at the end of 19 moves.

preparing for double bishop sacrifice

20. Rad1 b4  
21. Be5 Bd6   Purpose of White’s 21st move will be clear, when you see his 26th move!
 
22. Bxh7+! Kxh7   The Bishop sacrifice opens the h-file
23. Qh5+ Kg8  
24. Bxg7! Kxg7   The second Bishop sacrifice opens the g-file.
If 24. … f6 then 25. Qh8+ Kf7 26. Bxf8 Bxf8 (if 26. … Rxf8 then 27. Qh7+ Ke8 28. Rxe6+) 27. Qh5+ Ke7 28. Qh7+ Kd6 29. Rxe6+ wins Black Q
Alternatively 24. … f5 25. Rxe6 Kxg7 26. Qh6+ Kg8 27. Rg6+ Kf7 28. Rg7+ Ke8 29. Rxc7 Bxc7 30. Qe6#
25. Qg5+ Kh7  
26. Rd4 Bh2+   If Black KB had not been diverted from c5 square by White’s 21st move, the 26th move would not be possible!
27. Kh1 Qf4  
28. Rxf4 Bxf4  
29. Qxf4 Rg8  
30. Re5 Resigns   White threatens mate in two.
If 30. … Rg6 then 31. Qh4+ wins the Rook on d8
If 30. … Kg7 then 31. Qg5+ Kh7 32. Qf6 Rg7 33. Rh5+ Kg8 34. Qxd8#


This game and similar others involving such Bishop sacrifice, besides being enjoyable, are also quite instructive. If you can identify the pattern that leads to such sacrifices, you may be able to deploy it in some game where your opponent is not wise to such possibilities!