Tag Archives: middle game tactics

Chess tactics : Importance of controlling the d4 square in middle game

Filed under Chess Strategy
Tagged as , , , , , , ,

In the game of chess, the middle game plays a very important role. It is in this stage that the fate of the game is effectively decided and involves a series of tactics and strategies to attack and counter attack the opponent. A good opening paves for an intriguing contest in the middle game. Many chess players, in their early days of playing chess, ignore the pawns or do not realize the importance of pawns and sacrifice their pawns very cheaply. If one were to improve the skills and graduate himself to higher levels such as International Master or Grand Master in Chess, then he or she should have all-round skills – both positional skills and tactical skills – and should be in a position to evaluate each and every position according to its due merit and capability.

One of the major aspects in an opening is to have a fair control over the center board – any one or all of the four squares in the center – d4, d5, e4 and e5.

It is quite possible that as a result of a kind of opening you might be following, you might end up with an isolated queen pawn while playing black pieces. Isolated Queen Pawn refers to the queen pawn of black located at d5 square with no points in either files to support it. Having such a position might turn out to be very advantageous in some cases and at the same time might also turn out to be a hindrance. But effective tactics can help you reap the benefits of that isolated queen pawn in d5, and also pave way for controlling the all-important d4 square in the board. It is needless to say that one who has effective control over the d4 square can exert more pressure on the white pieces and ensure that with reasonable tactical skills aspire for victory over the opponent.

Let us try to understand the importance of controlling the d4 square with the help of this game played between two grandmasters.

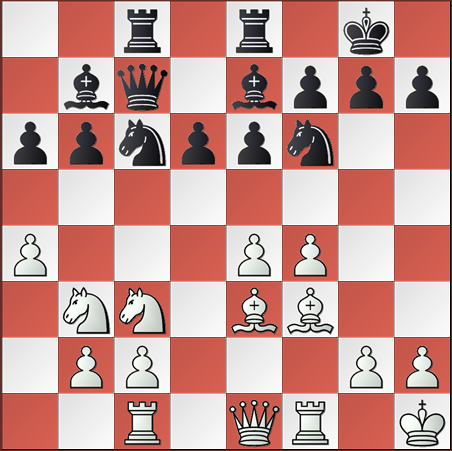
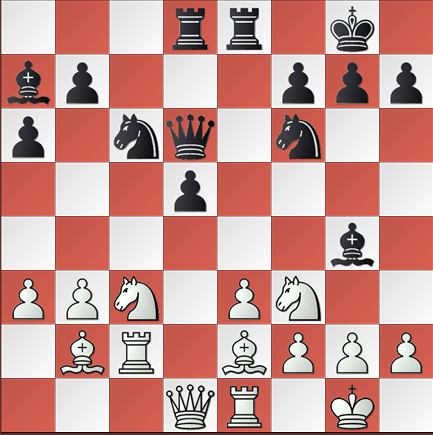
This is the position after 15 moves. It is the turn of white to move now.
chessgraph

(White to move)

The black pawn at d5 is the Isolated Queen Pawn, as it has no pawns in the “c” file and the “e” file. Black pieces are fairly developed and the key d4 square is in the control of the black. Though white’s knight at f3 and pawn at e3 also attack the d4 square, they are pinned by the black light squared bishop at g4 and the rook at e8 respectively.

Realizing the importance of the d4 square, white tried to win back the control, but his attempts proved futile by the smart play of black.

The game continued as follows :

16. Rd2 …. White tried to wrest control over the d4 square. However, some very interesting attacking play by Black nullified the efforts and black takes control over the game as can be seen below
16. …. d4
17. Nxd4 Nxd4
18. exd4 Bxd4
19. Bxg4 Rxe1+
20. Qxe1 Nxg4

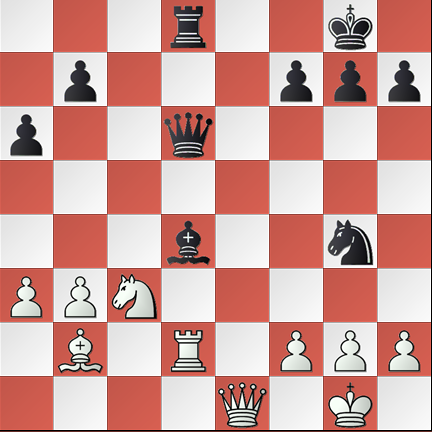
The position after 20 moves is given below:
chessgraph2

(White to move)

As you can see, black has not only wrested control over the vital d4 square, but its pieces have pierced into White’s territory and are very interesting positioned to go for all out attack.

The game proceeded further as detailed below, but the result was never in doubt and it is black which having effective control over the vital d4 square is likely to emerge victorious barring any foolish mistakes on his part.

21. Ne4 Qxh2+
22. Kf1 Qh1+
23. Ke2 Qxg2
24. Kd1 Qf3+
25. Qe2 Qh1+
26. Qe1 Qf3+
27. Qe2 Qxb3+
28. Ke1 Ne5
29. Ng5 Bc3

0 – 1

This is an interesting game underlining the importance of having control over the d4 square, the opportunity for the same being provided by the Isolated Queen Pawn.
Middle game tactics: How to handle the rooks at the back rank?

Filed under Chess Strategy
Tagged as , , , , , , , , , , ,

In the game of chess, the middle game succeeds the opening stage where the pieces are developed from their initial positions in such a way that they are reasonably placed to plan and launch an attack on the opponent’s King. There is no clear-cut rule stipulating that from the 14th move the middle game commences, or from the 25th move the middle game starts or the opening game ends. However, it can be fairly said that the middle game is all set to begin when the players cease to indulge in mere development of pieces but initiate plans or tactics to launch a series of moves aimed at attacking the opponent’s pieces and/or providing additional safeguards to the squares or pieces in his control.

In most of the opening games, it is but natural that the players resort to the wonderful idea of castling such that the king is moved to a safer place and the two rooks are freed for further development. In such a case, one of the rooks will be in a1 or a8 as the case may be and the other one will be either in e1/e8 or d1/d8 as the case may, but mostly in the back ranks only. A dilemma might arise in such conditions as to which of the two rooks should be moved instead of the other. Again, there is no clear-cut rule such that the rook in the “a” file should be moved and brought to the central ranks than occupying the flank and not the other rook. It depends mainly on the position of the game at that point and a better decision taking into consideration the merits of the move should be made, as otherwise, a moving a wrong rook to an inappropriate square might invite problems and eventually might result in loss of advantage over the opponent. This dilemma of the wrong rook factor has been faced by many grandmasters as well.

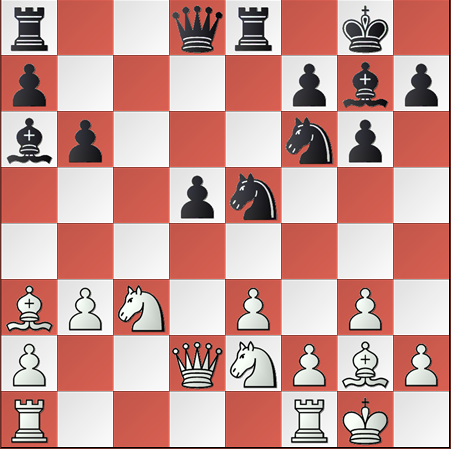
One of the fascinating games highlighting the move of a wrong rook and its consequences are discussed in the following example. This is a game played way back in the 1960s in the USA Championship and the position after 13 moves is given hereunder:

chesspic1

(White to move)

A cursory look at the position indicates that both the players have fairly developed their pieces and are in the early stages of the middle game. Black seems to have a slight advantage with his light-squared bishop at a6 and the knight at e5 threatening to occupy the d3 square. Isolated queen pawn is also there in the vital d5 square. Now it is the turn of the white to make a move, and it is but obvious that he has move one of his rooks at the back rank. Which one to move is the dilemma for white.

14. Rfd1 …. This move by White is questionable as the rook at f1 was covering the pawn at f2 and in its absence, if black were to capture the pawn at f2, it would be the King that should come to rescue by capturing the attacking piece or run for cover. Instead he might have considered moving the other rook at a1 to d1 – Rad1.
14. …. Nd3 As expected, Black’s Knight occupies the d3 square.
15. Qc2 …. White plans to evict the Knight at d3.
15. …. Nxf2 Black pounces on White’s wrong Rook move, drags the King out of the back rank.
16. Kxf2 Ng4+
17. Kg1 Nxw3
18. Qd2 Nxg2 Surprise move by Black, wants to attack the King instead of capturing the Rook at d1.
19. Kxg2 d4
20. Nxd4 Bb7+
21. Kf1 ….

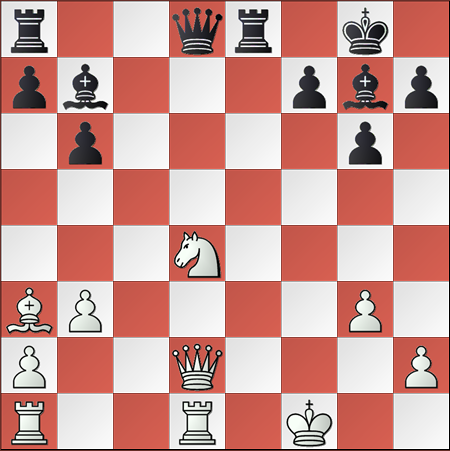
The position after white’s 21st move is given hereunder:

checcpic2

(White to move)

21. …..  Qd7

0-1.

White has resigned the game accepting defeat. The downfall of White at the hands of black Is primarily his wrong choice of rook for providing cover to the d3 square.

This is one of the many interesting aspects one needs to be aware of, especially in the middle game stage, and grab the opportunity when presented by itself.

Middle game tactics: Understand the pawns thoroughly – they cannot move backwards

Filed under Chess Strategy
Tagged as , , , , , , , ,

In the game of chess, pawns play a very important role in all stages of the game. It is very important to note that only the pawns – eight of them in total out of the total 16 pieces in the board – have the unique capability of getting promoted to major pieces especially Queen and Rook – and no other piece – even the King or the Queen has this unique capability. Though pawns move in a forward direction in a straight file, when it comes to capturing, they capture only the pieces in diagonals at either of the two squares – one each to his right and left. Of course, the pawns in the wings does not have the left and rights wings as they are clipped for lack of files. In the opening stage, 9 out of 10 times, it is the pawn that opens the game.

According to the classical principles of openings, pawn development in the opening stages should be kept to the barest minimum, just sufficient enough to open up the major and minor pieces for development and control over key squares. As the game progresses in to the middle game stage, where the real game, filled with a series of tactics, strategies, checks, attacks, sacrifices and counter-attacks, unfolds, pawns should be handled very carefully and strategically. Having discussed about the merits of the pawns earlier, let us not forget that pawns have one major disadvantage – yes. They cannot move backwards. So, it is very essential that additional caution and calculations are considered before making pawn movements in the middle game. A wrong move or an unwanted move of the pawn in the middle game might deprive you of vital control over one square and also opens up opportunities for the opponent to exploit this mistake.

Let us try to understand the importance of pawn movement with the help of the following game, played between two grandmasters, where an unwanted pawn move cost the game at the end.

The first few moves of the game in the opening stage are as follows:

1. e4 c5
2. Nf3 d6
3. d4 cxd4
4. Nxd4 Nf6
5. Nc3 a6
6. Be2 e6
7. 0-0 Be7
8. f4 0-0
9. Kh1 Qc7
10. a4 Nc6
11. Nb3 b6
12. Bf3 Bb7
13. Qe1 Rac8
14. Be3 Rfe8
15. Rc1 ….

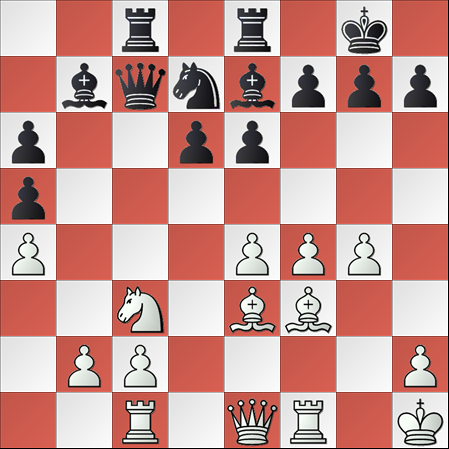
The game after 15 moves of White is given hereunder. It is the turn of black to make the next move.

chpic1

(Black to move)

A cursory look at the position indicates that the white pieces are fairly developed and spread over the four ranks, with a lot of space to move around. On the contrary, black’s pieces are all lying in the back three ranks, leaving the 5th rank open. However, the set-up of black pieces is very compact and tight enough that it would be a difficult proposition to pierce through the position.

The game continued as follows :

15. …. Nd7 Black decides to move the Knight to the queenside so that its dark squared Bishop can be used effectively, and also at the same time, avoid any threat from the white pawn at g2.
16. g4 …. This is an unwanted and unwarranted moved from White as the black Knight at f3 had moved to Nd7 and there is no worthwhile point in that pawn move at this point of time.
16. …. Na5
17. Nxa5 bxa5

The game after 17 moves is given hereunder:

chpict2

The opening up of the white pawn at g2 has paved way for black to consider the long diagonal a8-h1.

18. Bd2 …. White’s intention of using his g2 pawn did not materialize, and as such, he is back to defensive ways
18. …. Nc5
19. b3 Qb8 Black is planning to exploit the long diagonal a8-h1
20. Qe2 Qa8

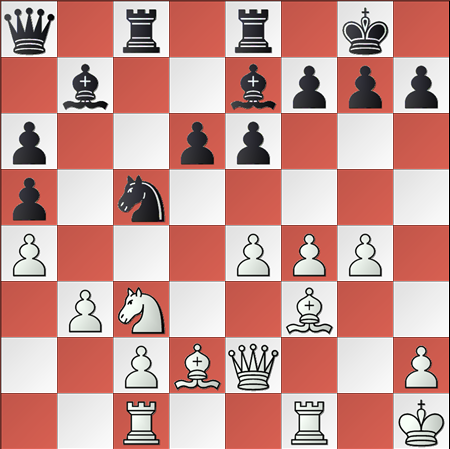
The position after 20 moves is given hereunder.

cpict3

(White to move)

White’s decision to move the g2 pawn has opened up the long diagonal for Black to exploit. However, white may feel somewhat happy that his g4 can now be used to thwart black’s intention to move the dark-squared bishop to f6 for threatening the white knight at c3.

21. g5 …. Since the pawn cannot move backwards, this is the only consolation for his earlier mistake of g4.
21. …. d5
22. exd5 exd5
23. Qg2 Ne4
24. Nb1 Nxd2
25. Qxd2 Bb4
26. c3 …. This pawn movement might have been avoided as it paves away for black to open up the diagonal a8-h1.

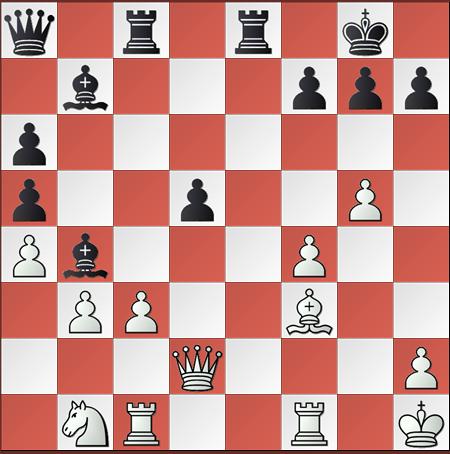
The position after the 26th move of white is given below:

cpict4

(Black to move)

Black nicely accepts the opportunity presented by White, and obliges with d4.

26. …. d4
27. cxb3 Bxf3+
28. Kg1 …. The absence of pawn at g2 will now be felt by Whit.

Black continues to attack and finally emerges as the winner with the following moves:

28. …. Re2
29. Rxf3 Rxd2
30. Rxc8+ Qxc8
31. Nxd2 Qc1+
32. Nf1 axb4
33. Kg2 Qc2+
34. Kg3 Kf8

0 – 1

A fairly good position at the start of the middle game with a slight advantage has been squandered by White with his unwarranted or unwanted move of the g2 pawn in the 16th move, which ultimately hurt him the most and led to this loss.

It is very essential that the pawns are used effectively and prudently taking into account all possible options and calculations, especially in the middle game stage, so that the actual worth of the pawns, their ability to get promoted, can be used effectively.