In telling you about winning chess strategies, we stated that if your bishop can control the long diagonal towards your opponent’s castled position, it can give you considerable leverage in your attack on the king. If you can place both your bishops on two such side by side open diagonals leading to the enemy King’s position, the force multiplier becomes more than double.
If your chess tactics make good use of this power, those can be enough to win the game for you. In many cases, these bishops are sacrificed as battering rams to break open the castle or used as long-range support to enable your other pieces or even pawns to get in and deliver the coup de grace to the enemy King! Many brilliant games owe their eminence to the power of such bishops.
To make you understand how these chess tactics are used, we describe here a game by a player who is often described as the best player never to win the World Championship. Amongst his many brilliant games, this one played by him as Black in 1908 includes two successive moves (22 and 23) both of which can easily find place among the best chess moves ever made! We hope this game shows you what chess tactics are all about.
| 1. | d4 | d5 | ||
| 2. | Nf3 | e6 | ||
| 3. | e3 | c5 | ||
| 4. | c4 | Nc6 | ||
| 5. | Nc3 | Nf6 | ||
| 6. | dxc5 | Bxc5 | ||
| 7. | a3 | a6 | ||
| 8. | b4 | Bd6 | ||
| 9. | Bb2 | 0-0 | ||
| 10. | Qd2 | Qe7 | ||
| 11. | Bd3 | dxc4 | ||
| 12. | Bxc4 | b5 | ||
| 13. | Bd3 | Rd8 | ||
| 14. | Qe2 | Bb7 | ||
| 15. | 0-0 | Ne5 | ||
| 16. | Nxe5 | Bxe5 | You can see how the bishop pair on two long diagonals are taking shape in Black’s game. This should ring an alarm bell for the defender. Instead, the KN which normally can perform an excellent sentry duty as described in basic chess strategies Part 2, has left its post to get exchanged with Black’s QN. |
|
| 17. | f4 | Bc7 | White is planning for a King-side attack, but at the cost of further opening up the Black Bishops’ diagonals. |
|
| 18. | e4 | Rac8 | But do you as yet see any imminent threat? Can you blame White at this point for remaining so blissfully unaware of the brooding storm? |
|
| 19. | e5 | Bb6+ | Seeing that the b8-h2 diagonal is getting blocked, Black KB shifts to the a7-g1 diagonal, opening up the c- and d-files already occupied by Black Rooks. Black’s KN is poised to jump towards the enemy King’s position which will open the lines for Black Queen to join in the fray when necessary. All in all, Black pieces are menacingly poised with plenty of open space for their movements. | |
| 20. | Kh1 | Ng4 | ||
| 21. | Be4 | Qh4 | 21. Qxg4 Rxd3 and Black Rook is ready to occupy the 7th rank. With hindsight, this may have been a relatively better course for White. But he tries to exchange Black’s QB and Black immediately counters it with a mating threat by bringing in his Queen. With so many Black pieces placed so effectively with focus on White King’s position, it is only a matter of time for the fireworks to start! But White probably did not anticipate it to start so fast and in the way it did! |
Position after 21 moves:
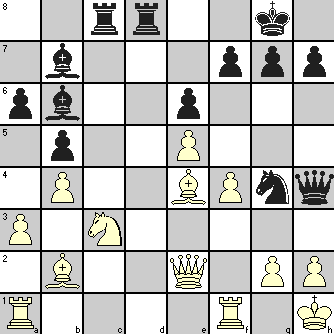
| 22. | g3 | Rxc3 | With his pawn move, White brought support to his KRP while threatening the Black Queen. But Black caught him totally by surprise with his Queen sacrifice. |
|
| 23. | gxh4 | Rd2 | Another deadly surprise to remove White Queen’s support for the KB by creating a threat for checkmate at h2 if the Rook offer was not taken by White. See the way the Black Bishop pair is working as a long-range artillery! | |
| 24. | Qxd2 | Bxe4+ | ||
| 25. | Qg2 | Rh3 | The Queen tries to interpose but it is all too late and Black is in no mood to relent. |
|
| 26. | Resigns | There is no way to stop Black delivering Rxh7 checkmate |
You will hardly ever see such a smooth-flowing attack with ALL the Black pieces participating in such a grand orchestration!


2 Comments
Only for this benefit I love bishop.
@Pit
Thanks for liking the article. But if I may say this, please don’t be in ‘love’ with any piece except for your King (even at the risk of being dubbed a dirty old Royalist)! At least don’t always throw your knights to retain bishops as we tried to show in Chess Strategy and Chess Tactics: how they go hand in hand.
Trackbacks/Pingbacks