In this article, we are presenting examples illustrating the chess tactics of using a sacrifice to drive the enemy King into open where other pieces can target it. You read it in “Chess Sacrifices as Chess Tactics: Think before you leap!” as one of the objectives of a chess sacrifice.
One wonderful example of such a chess tactics has already been shown to you in “Attacking Chess Tactics: Hounding the enemy King” where the diagram position was taken at the end of 23 moves from Kasparov-Topalov game of 1999.
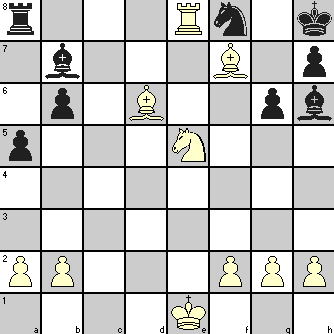
For your easy reference, that position is reproduced below. Try to recollect what sacrifice by White started the process of forcing the Black King out in the open to be attacked by other White pieces and pawns.

You may now remember that White’s 24th move sacrificing his Rook at d4 square followed by his 25th move started the relentless hounding of the Black King.
The following diagram shows a position where White plans to use an exchange sacrifice to drive the Black King into the open for forcing a checkmate by his other pieces.
It should be obvious to you that Black’s position is quite bad. It is only a matter of time before the concentration of White pieces around the Black King will bring about its downfall. To speed up the process by breaking down Black’s resistance, White plans a sacrificial attack which is also in line with another objective of sacrifice viz., to start an attack after enough accumulation of power to sustain it.
| 1. | Re7 | Bxg2 | ||
| 2. | Bc4 | Bg7 | White’s threat was 3. Nf7+ Kg7 4. Be5+ Kg8 5. Nxh6# | |
| 3. | Nf7+ | Kg8 | ||
| 4. | Nd8+ | Kh8 | ||
| 5. | Rxg7 | Kxg7 | The exchange sacrifice which, if not accepted, also results in mate shortly | |
| 6. | Be5+ | Kh6 | ||
| 7. | Nf7+ | Kh5 | ||
| 8. | Be2+ | Kh4 | ||
| 9. | Bg3+ | Kh3 | ||
| 10. | Ng5# |


3 Comments
An interesting subject indeed. This Kasparov game is just fantastic.
@nobi we been mailing you and you never reply to any of the emails why so?
We apologise. Just replied to your last mail.
Trackbacks/Pingbacks