When you consider that White as a player had the highest Elo rating ever achieved while Black reached the next highest spot, you might expect the game to be a close tussle and a long, slow process till one pips the other at the final post. You will therefore wonder at White’s attacking force that made the Black King run all over the chessboard to seek final futile shelter in White King’s domain! It is therefore no wonder that the game ranks as one of the greatest display of attacking chess tactics.
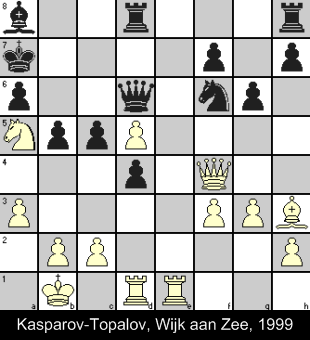
The diagram below shows the position after 23 moves and the next move by White that started it all can surely be considered as one of the best moves ever played on the board! Try to follow the moves with an analytical mind to understand the chess tactics deployed and also the possible alternatives with their consequences. That is the best way for you to learn from great players and raise your own game.

Your initial assessment of the position will show that the Black King is severely hemmed in with very few squares available to it. The White Queen and Bishop are looking along open diagonals to the Black King’s position with the Knight poised menacingly. The only open file is under the control of White Rook. In contrast, none of the Black pieces pose any threat to White King with all of them lying in their own territories. The only weak point in White’s position is the unsupported QP that is under attack by as many as 4 Black pieces (you may know about ‘overprotection’, is this a case of ‘overattack’!?) but Black still needs a move to get rid of this ‘protruding thorn’ to roll forward his united Q-side pawn phalanx!
Now see how it all proceeds in the context of above positional factors.
| 24. | Rxd4 | cxd4 | The Rook sacrifice comes as a rude shock but you may agree that it suddenly turns the formidable pawn phalanx looking like a tattered army, giving Black a weak QP the fall of which will open another diagonal leading to the Black King. |
|
| 25. | Re7+ | Kb6 | 2. … Qxe7 3. Qxd4+ Kb8 4. Qb6+ Bb7 (or Qb7) 5. Nc6# – all Black moves are forced. | |
| 26. | Qxd4+ | Kxa5 | ||
| 27. | b4+ | Ka4 | ||
| 28. | Qc3 | Qxd5 | Black removed the White QP and guarded against the threat of Qb3#. If instead 5. … Bxd5 6. Kb2 Bc4 8. Qb3+ Bxb3 9. cxb3# |
|
| 29. | Ra7 | Bb7 | If 6. Kb2 (with the idea 7. Qb3+ Qxb3+ 8. cxb3#) then 6. … Qd4 forces exchange of Queens | |
| 30. | Rxb7 | Qc4 | ||
| 31. | Qxf6 | Kxa3 | ||
| 32. | Qxa6+ | Kxb4 | ||
| 33. | c3+ | Kxc3 | 10. … Qxc3 11. Rxb5#. It is strange how White throws away all the Pawns guarding his King! |
|
| 34. | Qa1+ | Kd2 | 11. … Kb3 11. Qb2+ Ka4 12. Ra7#. Black will lose his Queen on 10. … Kb4 11. Qb2+ Qb3 12. Rxb5+ or 10. … Kb4 11. Qb2+ Ka5 12. Qa3+ Qa4 13. Ra7 or 10. … Kb4 11. Qb2+ Kc5 12. Rc7+ | |
| 35. | Qb2+ | Kd1 | ||
| 36. | Bf1 | Rd2 | ||
| 37. | Rd7 | Rxd7 | ||
| 38. | Bxc4 | bxc4 | ||
| 39. | Qxh8 | Rd3 | ||
| 40/td> | Qa8 | c3 | ||
| 41. | Qa4+ | Ke1 | ||
| 42. | f4 | f5 | ||
| 43. | Kc1 | Rd2 | ||
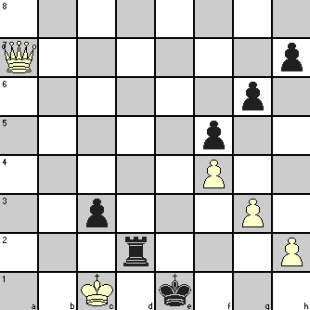
| 44. | Qa7 | Resigns | R.I.P. |


2 Comments
Attack the king like a hound — oh what a pleasant feeling when I do this.
@Matt
If that’s the way you play, I wouldn’t like to face you in a tournament!
Trackbacks/Pingbacks