In most chess games featuring exemplary attacking tactics, like those we have discussed for games by Tal and Alekhine, you will notice one player hogging the limelight by virtue of his attacking display. A game where both players are trying to attack, giving back as much as he gets, is relatively rare and holds great interest for learning chess tactics and also for enjoying the game. Here is a gem in this category.
| 1. | e4 | e5 |
| 2. | Nf3 | Nc6 |
| 3. | Bb5 | a6 |
| 4. | Ba4 | Nf6 |
| 5. | d3 | d6 |
| 6. | c4 | g6 |
| 7. | d4 | exd4 |
| 8. | Nxd4 | Bd7 |
| 9. | Nxc6 | bxc6 |
| 10. | 0-0 | Bg7 |
| 11. | c5 | 0-0 |
| 12. | Nc3 | Qe7 |
| 13. | cxd6 | cxd6 |
| 14. | f3 | d5 |
Black is making a clever plan to utilize his weak center pawns for spearheading an attack!
| 15. | Re1 | d4 |
If White tries 16. Qxd4, Black will reply with 16. … Ng4 and depending on where the White Queen moves, Black will play Qc5+ or Qh4.
| 16. | Ne2 | c5 |
| 17. | Nf4 | Be6 |
| 18. | b3 | Rfd8 |
| 19. | Nd3 | Bd7 |
| 20. | Bxd7 | Nxd7 |
| 21. | Ba3 | Rac8 |
| 22. | Rc1 | Bf8 |
| 23. | Qd2 | Qh4 |
Aware that White is planning to apply more pressure on c5 by playing Qa5 next, Black starts his own counterattack. If 24. Qa5 Bd6 25. e5 Bc7 26. Qxa6 Ra8 27. Qb7 Rxa3 28. Qxc7 Rxa2, Black gets a good position.
| 24. | g3 | Qh5 |
| 25. | Kg2 | c4 |
| 26. | Nf4 | Qe5 |
| 27. | Bxf8 | c3 |
| 28. | Qd3 | Nxf8 |
| 29. | Nd5 | Rxd5 |
White was planning f4 to drive away the Black Queen after which Black would have an inferior position. So banking on his two passed pawns, Black decided on an exchange sacrifice.
| 30. | exd5 | Qxd5 |
| 31. | Red1 | Ne6 |
The Knight move guards against 32. Qxd4 as also denying White Rook the c5 square after 32. Rxc3 Rxc3 33. Qxc3 dxc3 34. Rxd5 c2 so that White cannot stop the pawn from queening!
| 32. | Qxa6 | Ra8 |
| 33. | Qe2 | d3 |
| 34. | Rxd3 | Qg5 |
Black threatens Nf4+ as also Qxc1.
| 35. | Qe3 | Rxa2+ |
| 36. | Kg1 | Qh5 |
| 37. | h4 | Qf5 |
Black is ready for 38. g4 Qf4 39. Qxf4 Nxf4 40. Rdxc3 Ne2+ 41. Kf1 Nxc1 42. Rxc1 Rb2 leading to a draw. White is so keen to win that he takes the risk of mate or loss of both Rooks, should his next move fail.
| 38. | Rdxc3 | Qh3 |
| 39. | Rc8+ | Kg7 |
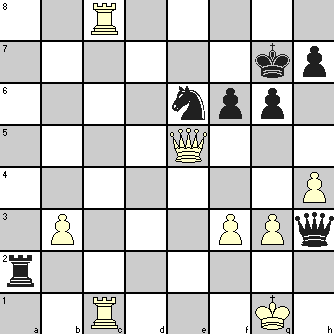
| 40. | Qe5+ | f6 |
Position after Black’s move 40.
| 41. | R1c7+ | Kh6 |
Black avoids the temptation of 41. … Nxc7 which results in 42. Rxc7+ Kh6 43. Qf4+ g5 44. Qxf6+ Kh5 45. Qxg5# or Rxh7#.
| 42. | Qe3+ | g5 |
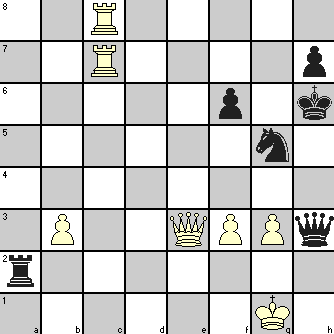
| 43. | hxg5+ | Nxg5 |
Position after Black’s move 43. … Nxg5
You have seen this position in “Two endgame plays …” and you may see there how the game ended in favor of White. So, in the moves below, we examine what other options were available to both the players.
| 43. | … | fxg5 |
| 44. | Qxe6+ | Qxe6 |
| 45. | Rc6 | Ra1+ |
and Black gets a draw by perpetual check as White cannot interpose with 46. Rc1 Rxc1+ 47. Rxc1 Qe3+ which wins for Black!
But White also had some options as shown below.
| 44. | Rc2 | Qxg3+ |
| 45. | Kf1 | Qh3+ |
| 46. | Ke2 |
and White should ultimately win because of his passed QNP!
A really memorable game in all aspects!

