We have already discussed different forms of check that constitute a part of a chess player’s attacking arsenal. We now proceed to discuss the use of Pin as an attacking tactics. Except for checks, this is the most frequently occurring tactics in chess games. So much so that it is incorporated in many chess openings to limit opponent’s move options in the struggle for wresting the control of center.
4. Pin
This chess tactic was discussed briefly in What is a pin in chess. We take it up here more elaborately.
The underlying idea of Pin emanates from the relative values of chess pieces, whereby a player is supposed to gain an advantage if he can exchange a piece of lower value with opponent’s piece of higher value. Naturally, under normal circumstances, no player would like to suffer such a loss and this puts a bind on the defender limiting his options.
The temporary immobility of the “pinned” item to take part in offensive or defensive moves allows a gain in tempo for the attacker and the pinned piece itself becomes susceptible to capture cheaply. Therein lies the value of pin as an attacking tactics.
Any Pin works in a straight (horizontal / vertical / diagonal) line of attack and involves three pieces – one of the attacking player (the attacking piece) and two of the defending player (a target of attack and an interposing piece).
The attacking piece can be Bishop, Rook or Queen (but not a Knight or Pawn), depending on the target and the interposing piece, Of the two pieces of the opponent, the target of attack has to be a piece of higher value than the attacking piece (King facing Queen/Rook/Bishop, Queen facing Rook/Bishop, Rook facing Bishop). There has to be an interposing piece or pawn of the opponent between the attacking piece and the target of attack, preventing immediate capture of the target piece by the attacking piece. Obviously, the interposing item can be any piece or pawn which becomes the “pinned” item and has to be of lower value than the target.
Because of straight line of attack, a Knight cannot be the attacking piece. Neither can be a pawn because of the requirement of an interposing piece. It should also follow that the interposing piece should not be able to capture the attacking piece without suffering a loss, otherwise the pin would not exist!
In a nutshell, a Pin is a situation where the movement of a piece or pawn by a player will expose another of his pieces to attack by a piece of lower value of the opponent.
The defender can remove the pin by
- moving the target from the line of attack
- capturing the attacking piece
- interposing another supported piece (or pawn) in the line of attack
Because of the relative values, a pin works best against opponent’s King as it is the highest in the pecking order. When the King is the target, the pinned piece becomes immobile as the King cannot be exposed to attack (i.e., check).
If the Queen or Rook is the target, the pinned piece can be moved if the defender does not mind his loss of the target piece. In fact, situations which permit the defender to take such action effectively is considered to be a pseudo pin, because such pins do not put a bind on the defender and do not serve their purpose. An attacker must be careful to analyze the defender’s options, otherwise the tables may very well be turned against the attacker. We will see examples of “pseudo pin” later in this lesson.
We now show you diagrams illustrating different types of pins, and you can see how the above principles apply.

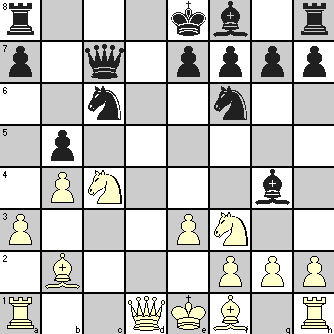
You can see that the Queen cannot move away from the line of attack as it will expose the Black King to check by Rook. If the King moves, Rook will be exchanged with the Queen. If the Queen captures the Rook, then Bishop will capture the Queen. Any way, Black cannot avoid the loss of Queen. Had the Black King been away from the Rook’s line of attack, there would not be any pin and the Queen could move to d4, with a check on White King and then capture the Bishop.
The next figure shows three more examples of Pin to make the idea clear to you.

In the first diagram, Black Rook is pinned against the Queen by the White Bishop. Here the pin is not absolute in the sense that the pinned Rook is free to move and can capture the White Rook, but this will mean losing the Queen to the Bishop – a big loss! The Queen could move away but the Rook is lost.
In the second diagram, the pieces involved in the creation of pin are the same as in the first diagram. Here the White Knight is able to attack the Queen with relative impunity because if the Black Rook captures it, Queen falls to the Bishop. But Black has to take care of the additional threat due to his h7 pawn being pinned by the White Rook at h3. A Knight check at g6 would result in checkmate as h7 pawn will be unable to take the Knight.
The third diagram shows a double pin. If the Black Rook moves along its file, Black Queen gets exposed to attack by White Queen. If the Rook tries to move along its rank, the King comes under check by the White Rook.
Now take a look at the following position.
If it looks familiar, rightly so because this was presented in an earlier article Exercise in assessing the position in a chess game where some more examples of this theme are shown. The apparent pin of the White Knight against the Queen by the Black Bishop is only a “pseudo pin” as White easily refutes it by moving the Knight to expose his Queen. As can be seen in that article, capturing the Queen soon leads to Black’s demise! This “Blackburne Trap” is a celebrated example of false pin and you should be careful about setting such pins!
To round off, we show a position after 10 moves in a game where a series of Checks, Discovered Checks and Pins – or the threats thereof – leads to a quick mate of Black inspite of his being two pieces up!

| 11. | Be3 | Qg7 | 11. … Qxe3+ allows 12. Qxe3 and White Queen cannot be captured by the Pawn because of the Rook’s pin on the Black King |
||
| 12. | Bxf4 | Nf6 | Black tried to block the threat of discovered check that would arise when the Bishop at f4 moved |
||
| 13. | Ne4 | Be7 | 13. … Nxe4 was not possible because 14. Be5 or Bh6 dis. check would lose his Queen |
||
| 14. | Bg5 | Rg8 | White mounts pressure on the knight which is immobile because of the pin | ||
| 15. | Qh5+ | Qg6 | |||
| 16. | Nd6+ | Possible because Black cannot reply 16. … Bxd6 as 17. Rxf6+ would lose Queen which cannot capture the Rook, being pinned by White Queen! |
|||
| 16. | … | Ke6 | 16 … Kg7 17. Bh6+! Qxh6 (17…Kh8 18. Nf7+ loses Queen) 18. Qf7+ Kh8 19. Qxe7 threatening 20. Nf7+ wins. 16. … Kf8 would be better but only to prolong the struggle. | ||
| 17. | Rae1+ | Kxd6 | |||
| 18. | Bf4# | 1-0 |
The above examples should bring out a lesson in basic chess tactics –
Whenever opportunity permits, try to place a piece of lower value with its line of attack towards a piece of higher value of the opponent. Contrarily, scent a danger when your opponent does the same.
In the next lesson, we discuss a variation on Pin known as Skewer, a chess tactic that poses threats in a slightly different way.