3. Double Check
From your basic knowledge on chess, you know that when you give check, your opponent has to leave aside all other plans he may have and immediately take action to evade or neutralize the threat to his King.
There are three ways he can do it:
- moving the King to any of the adjacent squares where it will not be under check
- capturing the attacking piece/pawn that created the check
- interposing one of his pieces/pawns in the line of threat between his King and the attacker
If he cannot do any of these, his King is said to be checkmated.
After a double check, which as the name implies is a check from two sides, the problem your opponent faces is that he needs to tackle both with his single move. This is not possible without shifting his King and the other two options 2 and 3 are not available to him. This means that both your attacking pieces are safe from capture by anything other than the King.
The ability of the pieces to attack with a fair amount of impunity and to force the King to move makes double check a dynamite in chess games and you will hardly ever see anyone recovering from its effect! But it is presumed that like any other chess tactics, this double check is also applied with due thought to the opponent’s alternatives.
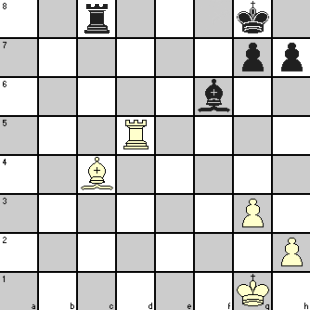
We borrow the first diagram from the previous lesson after a little alteration to show how double check comes about and the effect it can have.
Just like last time, here also White plays 1. Rd8+. But unlike last time when it was only a discovered check of the Bishop, here the Rook also delivers a check to the Black King. So it becomes a double check and though Black’s Rook is in a position to capture both the attackers, he cannot have both in one move. Even if one were taken out, the other would be delivering check and so Black has no other option but to move his King. But where will he go? In the previous leson, he had at least one move and White had to make a second move for checkmate but here it is a checkmate straightaway!
In the last lesson, we have already shown how Philidor’s mate utilizes the power of double check.
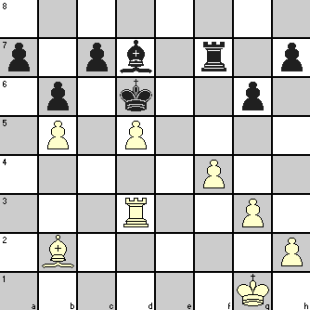
I do not know of any instance, but it is theoretically possible to deliver double check where the piece moved does not give check but exposes the King to attack by another piece (besides the discovered check by the first piece), thereby creating the double check.
This can occur with an en passant pawn capture as shown below.
| 1. | Ba3+ | c5 | Black interposes his QBP to block the Bishop’s check |
||
| 2. | dxc6++ | The ‘en passant’ capture by White’s QP removes the interposing pawn to restore Bishop’s check as also creates the Rook’s check, so that it becomes a double check. Note: To show Double check more explicitly, the symbol ++ is used sometimes. |
You will also appreciate that discovered check through en passant capture is an exception to the general pattern of discovered check by the movement of your own interposing piece as shown in previous lesson.
Here are some examples of double check in master play, the first two being fairly well-known to chess enthusiasts.
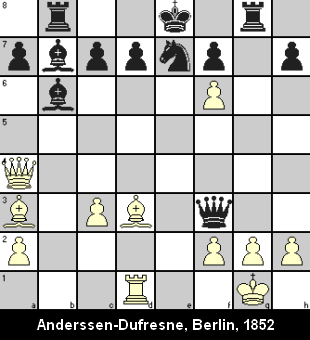
After 20 moves in this reputedly “evergreen game”, the play continued as follows:
| 21. | Qxd7+ | Kxd7 | White made the Queen sacrifice to set up a double check and a quick mate | ||
| 22. | Bf5++ | Ke8 | |||
| 23. | Bd7+ | Kf8 | |||
| 24. | Bxe7# |
The second well-known game in this genre was played at Vienna in 1910 between Reti and Tartakower, two top grandmasters of those times. We will not repeat the play as you can see it in Chess Tactics – some days are really not yours, where White makes a Queen sacrifice at move 9 to set up a double check on the next move. The game ended after another two moves!
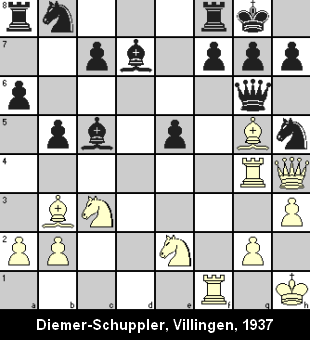
In the next position after 20 moves had been played, White maneuvered to set up a double check preceded by a Queen sacrifice!
The game proceeded as given below.
| 21. | Be7 | Bxe7 | |||
| 22. | Qxe7 | Qd6 | White’s Queen move attacked Black’s Queen and the Bishop and Black defended in the way expected by White. |
||
| 23. | Rxf7 | Qxe7 | White gives up his Queen to get the double check as his Rook at g4 now comes handy! |
||
| 24. | Rfxg7++ | Kh8 | The double check at last! | ||
| 25. | Rg8+ | Rxg8 | |||
| 26. | Rxg8# |
In the next lesson, we will discuss about the use of Pin as a chess tactics.


One Comment
[...] Note: There is a sole exception to this pattern as you will see in next lesson. [...]