Tag Archives: chess endgame

Endgame technique: King and Queen against Pawn on 7th rank with Support of King

1
Filed under Beginner Chess Tips, Chess Basics, Chess Strategy, Chess tactics, Endgame Tactics
Tagged as chess endgame, Chess tactics, Endgame Tactics

King and Queen vs. King and Pawn on seventh rank

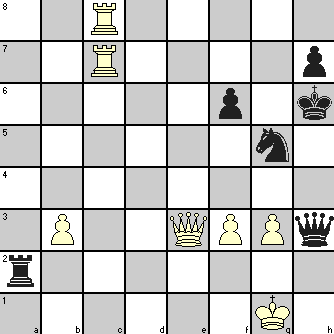
White to play and win.

We have started with White King and Queen quite far removed from Black’s King and Pawn though in actual such situations they may be closer – but the tactics remain the same.

Let us see what strategy White must follow.

  1. Queen must keep Black King in check to stop the pawn promotion except in situation at 6.
  2. Primary aim is to capture the pawn after which checkmate is easy as it becomes a King and Queen vs. King endgame.
  3. Except for giving checks, Queen alone can achieve nothing. To capture the pawn, White King has to occupy one of the three squares on sixth rank that are in contact with the pawn.
  4. To move White King, Queen has to stop moving (i.e., giving check) and this is possible only if Black King can be made to block its own pawn.
  5. To force this on Black, the Queen must be able to give check from a square on Black’s sixth rank which is on a file next to the pawn’s file
  6. When the Black King moves to a square on 7th rank next to the pawn, Queen can take the square on the other side of the pawn.
  7. If the Queen gets an opportunity to move to the promotion square, the fight is over.

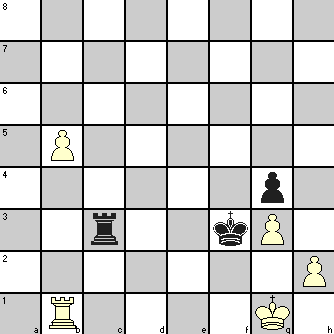
In the position shown, if the Queen can force the Black King to d1 or f1 square, then a check from d3 or f3 respectively will compel the King to move to e1 blocking the pawn. The White King can use this opportunity to advance one square and through this process reach d3 or e3 or f3 square after which the Queen can capture the pawn.

Black’s strategy is not to allow the Queen to move to e1 as that virtually ends the fight. His King should remain within one square of the pawn and avoid moving to e1 square if possible.. Even when it is forced to e1, it should go to f2 or d2 on next move depending on whether the Queen is on d3 or f3. If Black King goes to f1 or d1, the Queen will simply move to f3 or d3 to force the Black King back to e1 and the end will be faster!

Use the following to create a .pgn file and use a program like Winboard to play the moves.

1. Qd7+ Kc2 2. Qc6+ Kd2 3. Qd5+ Ke3 4. Qe5+ Kf2 5. Qf4+ Kg2 6. Qe3 Kf1 7. Qf3+ Ke1 8. Kd7 Kd2 9. Qf4+ Kd1 10. Qd4+ Kc2 11. Qe3 Kd1 12. Qd3+ Ke1 13. Kd6 Kf2 14. Qf5+ Ke3 15. Qg5+ Kd3 16. Qg3+ Kd2 17. Qf2 Kd1 18. Qd4+ Kc2 19. Qe3 Kd1 20. Qd3+ Ke1 21. Kd5 Kf2 22. Qd2 Kf1 23. Qf4+ Kg2 24. Qe3 Kf1 25. Qf3+ Ke1 26. Kd4 Kd2 27. Qd3+ Ke1 28. Ke3 Kf1 29. Qxe2+ 1-0

This technique does not work if the pawn is in bishop or rook file. With a bishop pawn, when the Queen checks Black King at b1 (or g1) from b3 (or g3) square, Black King will move to a1 (or h1) square, as the case may be. If the White King now tries to advance, the pawn gets promoted. The pawn can be left unprotected as it will be stalemate if the Queen captures the pawn!

If it is a rook pawn, Black will shuttle his King among squares a1-b1-b2 or h1-g1-g2. If the Queen delivers check from b3 (or g3), Black King goes to a1 (or h1). On check from c3 (or f3) square, Black King moves to b1 (or g1) so that no baseline check is possible from c1 (or f1) and for check from other baseline squares, the King moves to b2 (or g2). White Queen cannot go to b3 (or g3) with Black King at a1 (or h1) as it becomes a stalemate. So White King does not get any opportunity to advance.

But win is possible in these cases if the White King happens to be much nearer, within two steps of the Black King. The pawn can be allowed to Queen but taking advantage of this interval, the White Queen can deliver checkmate with support from the King. Try it out yourself keeping the strategy in mind.

End game Tactics: Visualizing the moves is key to tactics

0
Filed under Endgame Tactics
Tagged as chess end game strategy, chess end game tips, chess endgame, end game, end game chess, end game tips, endgame

The game of chess involves tactics and only tactics. Tactics need not be employed only in the opening game or the middle game. Even in end games, tactics plays a very vital role. Effective implementation of the tactics is very important. Equally important is the counter-moves. If the tactics is not properly understood and visualized, then the tactics of the opponent succeeds and you will end in the losing side.

Let us discuss an example from the World Championship tournament, which unfolds yet another interesting dimension of tactics, especially at the end game.

Given below is the position at the end of 46 moves:

White to Move

1

As is the case always in our articles on tactics, let us analyze the strengths and weaknesses of the relevant pieces.

Black has two bishops as against two white Knights and they are well centralized. The rook at b2 is also well developed. As this is an end game, bishops stand to have a better advantage than Knight. A closer look of the black pieces would also reveal that the King at c7 is vulnerable. Also the rook at e7 is very weak in that it cannot be moved to any other places other than g7.

The diagram given below depicts the same:

2

Tactics in chess is all about exploiting the vulnerabilities of the opponent, and taking advantage of those vulnerabilities.

It is the turn of the white to move. We have already considered the weaknesses and strengths of the black pieces. The black King at c7 is vulnerable. The White might consider checks and other attacking options, as it is in a weaker position and any slackness on his part might lead the black to take advantage of his bishops.

What are the checking options available to White now?

A check by Rook at d8 is one option. What will happen then?

Option #1

1 R8d7+ RxR
2 Ne6+ Kc8

By this option, nothing concrete can be achieved for by the White to gain positional advantage.

What is the next option available to White now?

A check by Rook at d3 is one more thing worth considering for giving check on Black queen.

Option #2

1 R3d7+ RxR
2 Ne6+ Kb7
(After black’s move, White finds that the black’s bishop at c5 is vulnerable and the White Knight can capture that one and give a check – Nxc5+. By doing so the Black rook at d7 is also forked by Knight)

2. ….. Kb6 (suppose if Black king moves to b6, White can consider check by rook at b8 for which the Black can block by moving the rook from d7 to b7. But White gets an interesting point worth noting. – The black’s rook at b2 might become vulnerable as well.

The two options considered above did provide interesting insights.

Among the other options available for giving check on the black King is the move by Knight to e6.

White precisely did that move, presuming that Black’s rook will capture the Knight and then pave the way for the two black rooks to attack the black queen as planned earlier.

47. Ne6+ Rxe6
48. R3d7+ Kb6
49. Rb8+ Ka6
… and the game went on with finally White winning at the end.

This illustrates the importance of tactics and the need for visualization of the moves and counter-moves, at least the next 2 or 3 moves is very essential. This is the beauty of tactics in chess.

Two plays to enhance your chess endgame ideas

3
Filed under Chess Basics, Chess lessons, Chess tactics, Chess Tutorials, Defensive strategy, Endgame Tactics
Tagged as chess endgame

We have discussed endgame ideas and endgame tactics in earlier articles but those mostly covered the theory aspect of utilizing your pieces and pawns in an effective manner. You have also seen two chess game positions from actual play that explained how you need to think to some depth to convert your slight advantages into a winning position.

When you have a better position in an endgame, all you need is to apply the techniques you have learned to get the win you deserve. But in positions which look nearly equal, you have to proceed differently.

You should first identify the relative strengths and weaknesses of your and your opponent’s position, and try to see the lines that look promising. Then select the best line and this is where you need your calculating skills. These skills will develop through practice and such practice is best possible by analyzing endgame positions from master plays.

Study how the win was achieved, but do not stop there. Check if the losing side had some option that could save the game for him. Check through drawn games and see if either of the players missed some line that could change the result in his/her favor. Such efforts on your part will hone your skills in deep calculations. With practice, you will not find it such a daunting task, particularly as there will not be many pieces on board and only few lines will be worth pursuing.

In this article, we will see two end game positions that demonstrate both offensive and defensive tactics – for forcing a win from near equal position or snatching a draw from a situation all but lost!

endgame attack tactics

You can see that White has a better material position because of two Rooks and three pawns against Rook and Knight with two pawns for Black. It is White’s move now, but all Black needs to win is a single move of Qg2+ and so White cannot afford to waste any move!

White noted that the Black Queen had the Knight to support it but the Knight at the moment was pinned. Black King and Queen were in one line and so the Queen could possibly be ‘skewered’ if the Knight support could be removed! Black’s second move shows that he understood the danger but could not do anything against White’s brilliant sacrifices!

This is how White realized his aim:

1. Rxh7+ Kxh7
2. Qe7+ Kg6
3. Rg8+ Kf5
4. Rxg5+ Resigns


Black cannot avoid losing the Queen. If 4… Kxg5 5. Qg7+ and depending on Black King’s move to h5 or f5, White uses Qh7+ or Qd7+ to capture Black Queen. If 4… fxg5 5. Qd7+ does the same.

You see that after all, there are really not so many options to consider in many positions if you can read the situation and the calculations also are not very difficult always!

endgame defense tactics

Here Black is decidedly in an inferior position with a Rook and Pawn against White’s Rook and three Pawns, one of which is a passed pawn and only a short way from being promoted. White’s Rook is in the ideal position of standing behind the passed pawn and also protecting against a back row check by Black Rook. All that is necessary for White to win is to keep pushing the NP to the eighth rank. Or is it?

Black depended on White’s ‘natural’ move to take a last chance for salvaging the game! This is how it went:

1. Re3
2. b6 Re1+
3. Rxe1 Stalemate


If White were not so confident of his win and tried to understand Black’s move, he would have played Kf1 and that would foil Black’s ploy! This shows that you can never afford to disregard anything that may be happening on the board.

In Two more plays to enhance your chess endgame ideas, we will examine more ideas in chess endgames.