Tag Archives: chess endgame

How to checkmate using King and Rook vs. King

Filed under Endgame Tactics
Tagged as , , , , , , ,

end-game

In this article, let us discuss the ways in which the opponent King can be checkmated using only the King and Rook at your disposal.

The King, as we know, can move only one square either on any of the sides, front, back or on either of the two sides. The rook, on the other hand, is capable of moving any number unoccupied squares either horizontally or vertically, and it cannot move diagonally.

A King and a Rook can always checkmate a lone King of the opponent. For this to happen, both the King and the Rook should work together such that the opponent King is driven to the edge of the board. This can be successfully achieved by cutting of the squares in which the King can effectively move, so that the opponent King has fewer options and finally is forced to move to the corner of the board, such as either “a8”, “a1”, “h8” or “h1”.

Unlike the Queen, the capability of the rook is limited, and the opponent can try to attack the rook and drive away the rook in order to gain more squares to move on. The opponent King can, however, only try to delay the inevitable as it can move only one square at a time. Nevertheless, using the king and the rook might be very tricky as well. The King has a very important role to play as well in this attempt.

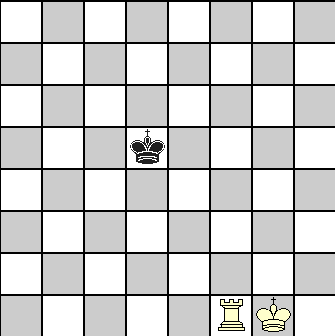
To make the point more clear, let us assume the positions in a chessboard as follows: The opponent King is in “d6”; your king is in “d3” and your rook is in “a1”.

If it is your turn to move, it would be foolish to attack the opponent King by calling check at “a6”. If you do so, the opponent king might move to the centre of the board by moving one rank to “e5”. As your mission in this case would be to drive the king to the nearest corner, which is a8, you can place the rook at “a5” thus restricting the movement of the opponent King to only ranks 6, 7 and 8. As the rook can move only horizontally or vertically and cannot move diagonally, the opponent king might try to attack the rook and move it to “c6”. Your next move in that case should be to move the king to “c4”. The opponent King, in an attempt to drive away the rook, might move to “b6” threatening your rook in “a5”.

Here, you should be careful. You may be tempted to call check by placing the rook at “b5”. If you do, the opponent might move to “c6” and your attempt to pin down the opponent King at “a8” might get delayed. Therefore, it would be wise to move the rook to “c5” and restrict the movement of the opponent King to only the three ranks in two files “a” and “b”. Now, the opponent King has to make the movement only in those six squares and ensuring that no escape route is allowed to the opponent king, the ranks can be closed in such a way that the opponent king is pushed to the corner “a8” and your king is placed at “b6”. Ensuring this, a check by rook at “c8” will be the killer blow and results in a checkmate.
7 endgame positions with endgame tactics for quick checkmate-part 2

Filed under Endgame Tactics
Tagged as , , ,

In Endgame tactics Part 1 of this two part article, we discussed the chess tactics for checkmate with the ‘heavy’ pieces viz., Queen, Rook or a combination of those pieces. Now we will consider the more difficult tasks of creating checkmate with a Bishop pair or a Bishop and Knight.

6. When you have a Bishop pair

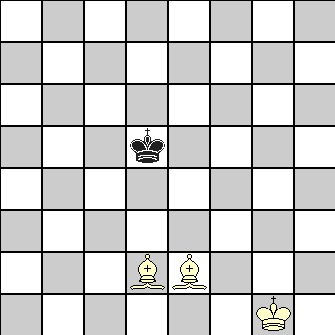
fig14

                               	1. Kf2      Ke5
                               	2. Kf3      Kd5
                              	3. Bc3      Kc5
                         	4. Ke4      Kd6
                              	5. Bc4      Kc6
                             	6. Bd4      Kd6
                             	7. Bd5      Kc7
                              	8. Bc5      Kd7
                          	9. Ke5      Kc7
                        	10.Ke6      Kd8
                           	11.Bb6+     Ke8
                               	12.Bc6+     Kf8
                               	13.Kf6      Kg8
                           	14.Bc5      Kh7
                            	15.Bf8      Kg8
                         	16.Bg7      Kh7
                                17.Be4+     Kg8
                        	18.Bh6      Kh8
                               	19.Kg6      Kg8
                           	20.Bd5+     Kh8
                            	21.Bg7#


You should note that a wrong step could lead to stalemate and draw.

The point you should realize is that the two bishops side by side on a row or file create a double V forcing the enemy King to remain within the wedge-shaped area. The bishops moves should push the V towards the edge to force the Black King to move there. While repositioning Bishops, your own King has to guard against the Black King escaping out of the wedge.

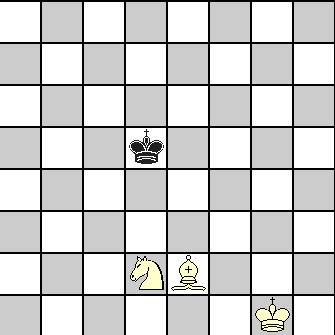
7. When you have a Bishop and Knight

A Bishop and Knight can be used to deliver the checkmate only when the Black King can be pushed into a corner square that is accessible to your Bishop. So, if you have KB (which controls white squares), black King has to be driven to a8 or h1 squares. If it is QB, checkmate will be possible when the black King is in a1 or h8 square. Your game plan has to take this into consideration, otherwise you will be wasting moves.

Depending on the final position reached, the checkmate may be by a Bishop check or a Knight check.

Assuming that your KB is on board, the white squares will be guarded by the Bishop and the black squares by the Knight (or Knight in tandem with King).

Black’s tactics in the above situation will be to avoid going towards a8 or h1 square, so White should guard against this plan of Black.

fig15

                              	1. Kf2 	Kd4	21.Bd3	Kf2
                        	2. Nf3+	Kd5	22.Bc4	Kg2
                             	3. Ke3	Ke6	23.Ne5	Kh3
                        	4. Ke4	Kf6	24.Ng6	Kg2
                           	5. Bc4	Kg7	25.Ke3	Kg3
                             	6. Kf5  Kh8	26.Be6	Kh2
                              	7. Ng5  Kg7	27.Kf3	Kg1
                             	8. Ne6+	Kh6	28.Bh3	Kh2
                             	9. Kf6  Kh7	29.Nf4	Kg1
                              	10.Bd3+	Kh6	30.Bg2	Kh2
                        	11.Ng5	Kh5	31.Nh5	Kg1
                             	12.Nf7	Kg4	32.Ng3	Kh2
                             	13.Ke5	Kh5	33.Bf1	Kg1
                              	14.Bf5	Kh4	34.Bg2	Kh2
                             	15.Kf4	Kh5	35.Nf1+	Kg1
                             	16.Be4	Kh4	36.Bh3	Kh1
                            	17.Bg6	Kh3	37.Kg3	Kg1
                              	18.Ng5+	Kh4	38.Nd2	Kh1
                             	19.Nf3+	Kh3	39.Bg2+	Kg1
                                20.Bf5+	Kg2	40.Nf3#


There are more than half a dozen ways in which the final check would be possible through the Knight or the Bishop. If you understand the general principle of the tactics, you can find your way to win.

The best way to get familiar with the tactics is to play with your chess-playing friend from a set-up position, telling him the tactics you are going to adopt and your friend should try his best to delay the checkmate. Keep a count and record of the moves and see how quickly you can reach your target. With practice, these types of tactics will soon become a part of your arsenal.


7 endgame positions with endgame tactics for quick checkmate-part 1

Filed under Endgame Tactics
Tagged as , , ,

On a journey, if you have clear idea about where you are going, you can choose the shortest way to reach your destination. If the planned route gets blocked somewhere, you will take a detour to come back to your route or to get to the destination without wandering aimlessly.

Same way, if you know that you have enough material for creating checkmate as explained in Ten endgame tactics, you should also know what chessboard position you must create for a checkmate with the pieces at your disposal.

In this article, we are showing the typical positions you have to reach for final attack on the opponent’s King which is presumed to be alone.

As pointed out in Ten endgame tactics, the enemy King has to be at the edge or a corner square of the chessboard depending on the pieces you have for that final check. So we have set the opponent’s King near the center of the chessboard to show how it can be pushed where you want it to be. In every diagram, White is presumed to move first.

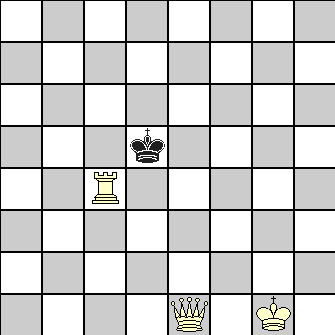
1. When you have Queen and Rook – situation A

fig9

                              	1. Qe4+		Kd6
                               	2. Rc6+		Kd7
                              	3. Qe6+		Kd8
                              	4. Rc8#


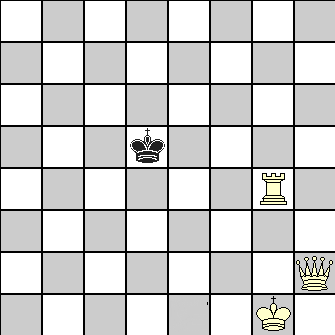
2. When you have Queen and Rook – situation B

fig10

                        	1. Qh5+		Ke6
                        	2. Rg6+		Kf7
                        	3. Qh7+		Kf8
                        	4. Rg8#


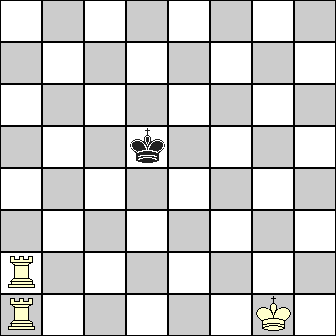
3. When you have the Rook pair

Here it is like the above, but some additional moves may be necessary if the enemy King tries to capture one of the Rooks by approaching it diagonally.

fig11

                        	1. Re1		Kd4
                        	2. Rd2+		Kc3
                        	3. Rd8		Kc2
                         	4. Re7		Kb3
                          	5. Rc7		Ka4
                          	6. Rb8		Ka5
                         	7. Ra7#


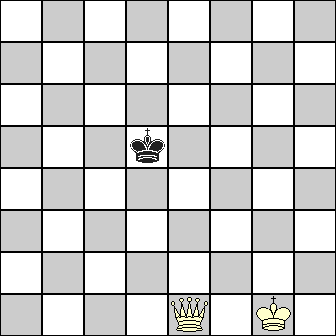
4. When you have the Queen

Here you have to position your Queen in such a way that area of the chessboard available to the enemy King continues to get reduced and then move your King towards the enemy King. The checkmate can be delivered in two ways:

a. With the opponent’s King at the edge of the chessboard, Queen supported by your King delivers check by closing in.

b. With your King getting the ‘opposition’, Queen delivers check along the edge row or file where enemy King is standing.

fig12

                        	1. Qe3		Kd6
                        	2. Qe4		Kc5
                         	3. Kf2		        Kd6
                              	4. Ke3		Kc5
                             	5. Qd4+		Kc6
                        	6. Ke4		Kb5
                        	7. Kd5		Ka6
                              	8. Qb4		Ka7
                        	9. Kc6		Ka6
                              	10.Qb6# (type a above) or 10.Qa4# (type b above)


You have to be on the alert that a stalemate does not arise. For example, with Black King at a8, if you moved your Queen to b6, Black King cannot move anywhere and Black will claim stalemate and draw!

5. When you have the Rook

With a Rook, a supported checkmate like 4a is not possible, it has to be like 4b. Here also, your aim will be to place rook in the row or file next to that where Black King is standing, but of course out of reach of the enemy King. You have to select the Rook’s position that will leave least space to that King. In between Rook’s moves, you have to close in with your King. When the Rook gives check, your King will be guarding the Black King’s escape squares in diagonal or perpendicular direction relative to line of check.

fig13

                           	1. Rf6		        Ke5
                        	2. Ra6		Kd5
                             	3. Kf2		        Kc5
                        	4. Ke3		Kb5
                             	5. Rd6		Kc5
                        	6. Rd4		Kb5
                             	7. Kd3		Kc5
                              	8. Kc3		Kb5
                               	9. Rc4		Kb6
                              	10.Kb4		Kb7
                               	11.Kb5		Ka7
                         	12.Kc6		Kb8
                        	13.Ra4	 	Kc8
                               	14.Ra8#		


Note: The position reached after move 12 is a typical situation and White’s Rook move forces Black King to get into opposition and checkmate. This tactics can be applied with Black King anywhere on the back row and White’s King positioned in the 6th row of adjacent file.
In Endgame tactics Part 2, we will examine the other positions involving the minor pieces.

10 endgame tactics you should remember to decide a win or draw

Filed under Endgame Tactics
Tagged as , , ,

We have earlier shown two endgame positions which exemplified the use of some endgame tactics. In Four endgame situations also, we explained some typical endgame tactics like the concept of ‘the Square’ and the ‘Opposition’. Here are some more that will help you to decide quickly the possible result of the chess game. If you know what endgame situations will work against you or go in your favor, you can start planning your strategy much earlier keeping these positions in perspective for carving a win or snatching a draw depending on situations.

In the following chess tactics, it is presumed that the opponent is left with a solitary King.

1. It is not possible to checkmate the enemy King if you are left with:

  • single Knight
  • single Bishop
  • Knight pair

2. Your King’s support is essential to checkmate opponent’s King with the following:

  • Queen
  • Rook
  • Bishop pair
  • Bishop and Knight

3. King’s help is not needed for checkmate by these combinations:

  • Queen and Rook
  • Rook pair

4. The enemy King has to be pushed into a corner (literally!) to deliver checkmate by:

  • Bishop pair
  • Bishop and Knight

5. The enemy King has to be forced to the edge (row or file) of the chessboard for checkmate by:

  • Queen and Rook
  • Queen
  • Rook pair
  • Rook

6. Memorizing the chess tactics to deliver checkmate in the least number of moves is important (topic for a separate article). Otherwise, even with enough material, you may have to agree to a draw because of the chess game rule which stipulates that checkmate must be achieved within 50 moves from the last pawn move or piece capture.

7. In consideration of above restriction, you have to examine what moves on your part will progressively reduce the chessboard area accessible to enemy King for delivering checkmate as quickly as possible.

For example, if enemy King is on d7 square, a Rook placed on the sixth row will restrict the movement of enemy King to rows 7 and 8 only. If it were at b4, your Rook should be placed in c-file to confine the opponent’s King to a-file and b-file. You get the idea? The same principle will apply when you are using a Bishop pair to ‘corner’ the enemy King.

8. If you are left with a single bishop or a knight pair against enemy pawns, the best you can hope for is a draw by using your King and piece(s) to eliminate opponent’s pawns or to keep them blocked.

9. Gaining ‘Opposition’ by your King is an important part of your tactics for pushing the enemy King to a corner or edge.

10. A defensive tactics to convert a losing position to a draw is creating stalemate situation, when the enemy king is not under check but cannot make the next move without getting under a check. Be aware of this possibility as all it requires is a wrong move on your part.


When you really need to think deep in chess?

Filed under Chess Tutorials
Tagged as , , ,

In an earlier article, I pointed out that in the middle games, you cannot possibly visualize all the positions that can emanate from your next 4-5 moves without having a computer-like memory. Most likely, you will decide on the next move based on your reading of the overall position.

But in the endgame, with few pieces standing on the board, it is possible to make a deeper analysis and this often makes the difference between a win and a draw or loss. But it is easier said than done, as even experienced players sometimes fail to see the right moves available as it is, or fail to identify a bad move from the opponent that could be exploited.

The following two examples will make the point clear and establish the importance of studying endgame tactics. You should also see the 4 endgame tactics given before as some of those themes occur in the following examples also.

endgame2

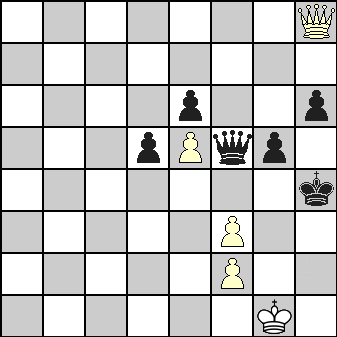
In the position shown, Black seems to have the advantage because of an extra pawn plus the poor pawn structure of White due to doubled pawns. In this position, Black played h5 which was a bad move as it deprives black king of one of the two escape squares at h3 and h5. But White could not utilize this opportunity and ended up a loser.

How could White turn the table after Black’s move? Here is the possible sequence:

1. h5  
2. Qf6 Qh3  


You can see that Black cannot afford to exchange Queens on f5 or f6 square as after that, White’s KP cannot be stopped from ‘queening’.

Even retreat to f4 square does not help as White’s Queen will capture Black’s KP, thus freeing his own KP to advance. Advancing NP by Black to create a counterplay also fails as it allows check by White Queen along d8-h4 diagonal forcing exchange of Queens. In the race for ‘queening’, White KP gets it one move before Black’s QP does and White gets the chance to finish off the game before Black’s promoted Queen can move!

3. Qf7 d4  
4. Qf8 d3  


White is maneuvering to force Black to advance the pawn so that he can strike at the right moment.

5. Qb4+ g4  
6. Qe7#  


endgame1

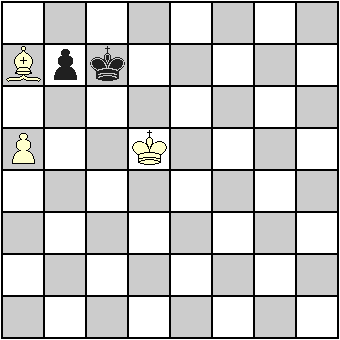
In this position, White has a Bishop and Pawn against Black’s single Pawn. But the Bishop has no control on white squares, so it cannot capture Black’s pawn. So long as black King is hovering around the pawn, White’s King cannot get near the black pawn to capture it. White’s pawn cannot advance past Black’s pawn without getting captured and a King and Bishop are inadequate to deliver a mating attack. Even if White Pawn could proceed to “queening” square (a8), the bishop will not be able to support it. On the other hand, Black also cannot advance the Pawn without handing over the game to White. It looks like an impasse, doesn’t it? So your conclusion will be the same as that of the actual players who agreed to a draw. But is a draw inevitable?

You know what strategy Black has to follow. So, to prevail upon Black, your strategy should be to push the Black King away from the 3×3 square (a8-c8-a6-c6) through Bishop checks. At the same time, your White King should try to gain the opposition to prevent Black King from reentering this square. Black in turn will try to use opposition to block White King’s approach or to take refuge at a8 square. So White has to follow some precise steps as follows.

1. Kd4 Kc6   If White K moves to c5 or c4, Black delivers check by advancing pawn and White has to capture it. Black then proceeds to a8 square to create a stalemate situation.
 
Black in turn cannot advance his pawn or move K to d-file without giving the initiative to White
 
2. Bb6 Kd6   If Black goes to b5, White King can occupy d5 preventing Black King from going back to save his pawn
3. Kc4 Kc6  
4. Kb4 Kd6  
5. Kb5 Kd7  
6. Kc5 Kc8   Other moves of Black King will allow White Bc7 and then Kb6 to keep Black King at bay
7. Ba7 Kc7  
8. Kb5 Kd7  
9. Bb8 Kc8  
10. Bh2 Kd7
(or Kd8)
 
11. Kb6   and White wins as he will soon capture Black’s pawn and promote his pawn unhindered