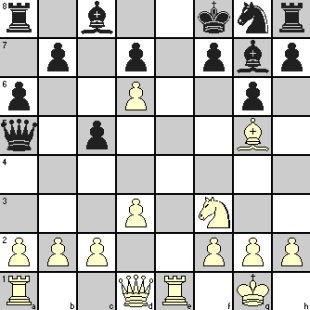
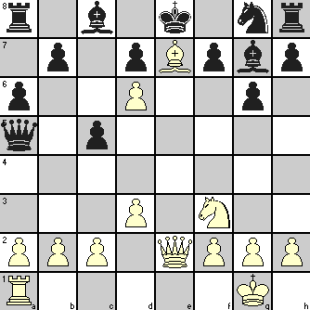
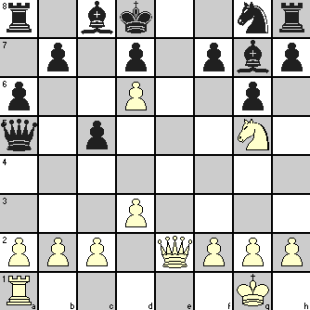
Author Archives: ChessMaster

Chess Combinations: beauties from lesser known masters – 3

Filed under Attacking tactics, Chess lessons, Chess Strategy, Chess tactics, Chess Tutorials
Tagged as , , , , , ,

Please note:

The best way for beginners to get better at chess and learn these ideas is to setup the position on a chessboard and go through the moves instead of trying to picture it. At this stage, understanding the ideas is more important than taking the burden of memorizing the positions.

As you keep gaining in experience, you do need to develop your power of visualization as without that, you won’t be able to work out deep combinations in your actual play.

In fact, in these articles on chess combinations, that is the purpose behind showing the positions after every few moves as the game progresses. Starting from one diagram and noting the moves till you reach the next one, check if your mental picture of the board tallies with that next diagram.

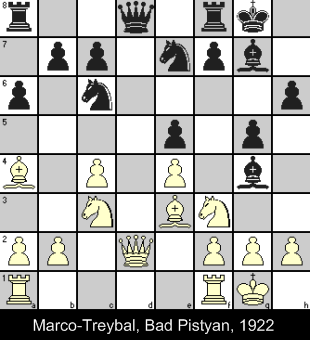
Continuing our theme on creating chess combinations, played out at a tournament at Bad Pistyan in 1922. Black chose the Neo-Steinitz defense which enhances Black’s chances in the Ruy Lopez opening that normally tends to be more in favor of White. But Black went one step further to take up initiative for a King side action based on his center control of e5 and d4 squares. White’s last move 12. Qd2 indicated his intention to bring a Rook to d1 for increasing control on d4. Black intended to undermine it by attacking the White Knight at f3 with 12. … Bg4. The Bishop would also pin the Knight against the Rook when it came to d1. Because if Black’s initial center control and King side pawn actions, White pieces have been somewhat restricted in their movement.

You should examine how Black continues his campaign from this point onwards.

Position after 12. … Bg4:
 
combination3a
 
13. Rfd1 Nd4   The threat is 14 … Bxf3 15. gxf3 Nxf3+ attacking the Queen also.
 
14. Bxd4 exd4  
15. Ne2 c5   Knight retreated as 15. Nxd4 Bxd1 would lose the exchange. Black brought more support for the pawn which further strengthened his hold on the center..
 
16. Ne1 Ng6    
17. f3 Be6   White was able to drive away the irritating Bishop but at the cost of weakening his castle. Black immediately shifted attack from flank to center.
 
18. Rac1 Ne5    
19. Bb3 b5   Black keeps raising the ante!
 
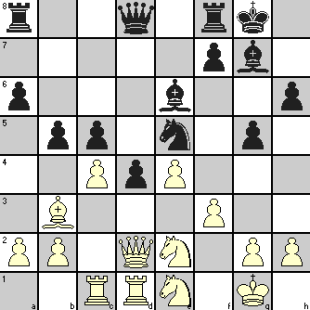
Position after 19. … b5
 
combination3b
 
20. cxb5 c4   Black was not wasting time to restore his pawn balance. He pressed home his attack expanding his center control
 
21. Ba4 Qb6!   Black again used one of his central pawn as bait to create a pin on the King.
 
22. Nxd4 axb5   White obviously could not capture with his Queen because of 22. … Nxf3+ which loses the Queen. Black timed his pawn capture to maintain his tempo though it meant losing another pawn.
 
23. Bxb5 Rfd8   Now Black creates a two-way pin on the Knight! It is an exemplary chess tactics on how to use the center control by pawns to launch attacks and then giving them up to bring the pieces into attack.
 
24. a4 White is still unaware of Black’s plan to exploit the pin.
 
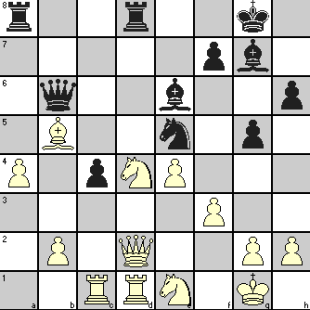
Position after 24. a4
 
combination3c
 
24. Nd3!   With one move, Black cuts off all the support for the Knight at d4. 25. Rxc4 Bxc4 26. Bxc4 Qxd4+ 27. Kf1 (27. Kh1 Rf2+) Qxc4 28. Nxd3 renews two-way pin on Knight and a solid Rook extra for Black
 
25. Bxc4 Qxd4+ 26. Kf1 Bxc4 (27. Nxd3 Bxd3+ 28. Qxd3 Qxd3+ 29. Rxd3 Rxd3) 27. Rxc4 Qxc4 28. Nxd3 gives same position as above
 
25. Nxd3 Qxd4+  
26. Qf2 cxd3  
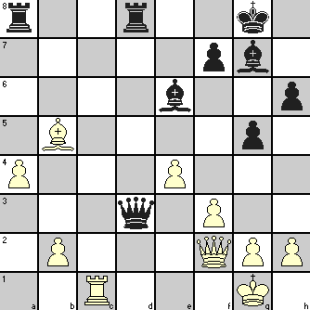
27. Rxd3 Qxd3!   27. … Qxf2+ 28. Kxf2 Rxd3 29. Bxd3 Rxa4 leaves White with two extra pawns against a Bishop – still a fighting chance. But Black’s move takes away a Rook against two extra pawns as shown below and White resigned.
 
28. Bxd3 Bd4 29. Qxd4 Rxd4 30. Bb5 Bb3 loses the a4 pawn also.
 
The position after 27. … Qxd3
 
combination3d


Chess Combinations: beauties from lesser known masters – 2

Filed under Attacking tactics, Chess lessons, Chess tactics, Chess Tutorials
Tagged as , , , ,

Even if you are a very good short distance runner, you probably never dream of running a hundred meter race in less than ten seconds unless you are a Usain Bolt in the making. But in a game of chess, you can always look forward to an opportunity to use various chess tactics for creating a combination which would make Alekhine proud. From a tyro to a virtuoso, the field of memorable chess combinations is open to all.

We harped on this theme in Chess Combinations: beauties from lesser known masters – 1 to encourage you to see how a mundane position transformed into something sublime. In similar vein, we show you another chess game which, without being spectacular, still earned the First Brilliancy Prize in the tournament at Kemeri in 1937. What will probably strike you is that the attack looks like an improvisation rather than the outcome of deep calculations involving complex chess tactics.

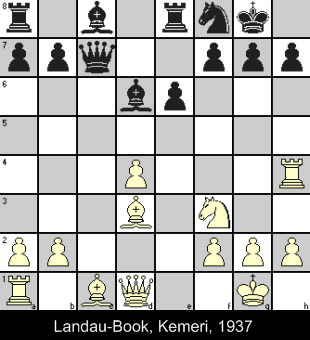
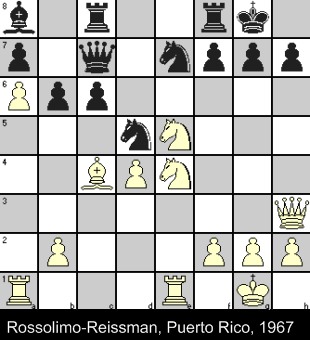
The position, after 13 moves have been played, shows that White has gathered most of his pieces in positions from where a concerted attack can be launched. Both Bishops are lined up towards enemy castle, Knight is ready to jump to the g5 square and the Rook on h-file can do its part in targeting the KRP. Once the Knight moves, White Queen can join the force by moving to g4 or h5 square. As against that, only Black Queen and KB has an attacking line to h2 but need much more than that because of White Rook on h-file. Black’s Knight on f8 is the only defensive force but has reduced the freedom of movement of the Black King.

The game continued as follows.

Position after 13. … Nf8:
combination2a
14. Ng5 h6 The Knight foray was only to provoke the advance of h7 pawn to create a weakness in enemy castle, but Black had to play g6 or h6 because of pressure on h7 pawn.
15. Qh5 e5 White made his expected Queen move and to counter White’s flank action, Black is planning an action in the center – all standard chess strategy.

The Knight at g5 of course could not be taken because of Qh8#, so White could go ahead with his other preparations.

16. Bd2 exd4 The Bishop move was to bring out the Rook to play its role against Black’s center action. In such preparatory stages for attack and counterattack, timing is most important lest the opponent seizes the initiative.
17. Rc1 Qe7 The Rook movement gained a tempo for White in his plans to position the Rook on the 7th rank.
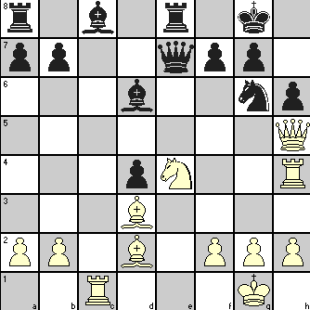
18. Ne4 Ng6 The Knight still had no compulsion to move as explained at move 15, but White was getting ready to spring his surprise! Black’s Knight move was to attack the Rook that was behind all White’s threats and the Rook had nowhere to go without falling victim to Black’s Knight or Bishops.
Position after 18. … Ng6
combination2b
19. Bg5! The surprise! The Bishop attacked the Queen with impunity, forcing it to move away from the 7th rank as other alternatives were not feasible.

19. … hxg5 20. Qh7+ Kf8 21. Qh8+ Nxh8 22. Rxh8#
19. … f6 20. Nxf6+ gxf6 21. Qxg6+ after which Black’s position will not be tenable.

19. Qe5
20. f4 Qd5 White was not giving any respite to the harassed Queen
21. Nf6+! gxf6
22. Bxg6! 22. … fxg6 23. Qxg6+ Kf8 24. Rxh6 wins
22. … fxg5 23. Qxh6! gxh4 24. Bh7+ Kh8 25. Be4+ wins the Queen
22. Bf8
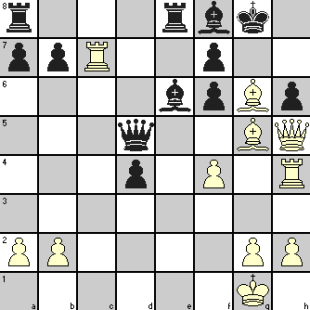
23. Rc7! Be6
Position after 23. … Be6
combination2c
24. Bxf6 The threat is: 25. Bxf7+ Bxf7 26. Rg4+ with a hopeless position for Black
24. Qxh5
25. Bxh5 Rec8 25. … Bg7 26. Bxf7+ Bxf7 27. Rg4 loses for Black
26. Bxf7+ Kh7 The Bishop cannot be taken for reason already explained
27. Rxc8 Bxc8
28. Bxd4 Bf5
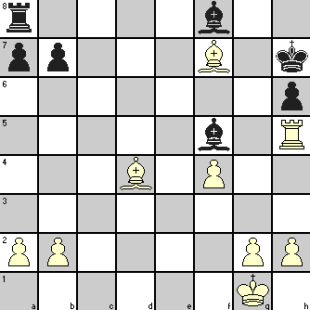
29. Rh5 Resigns With three connected pawns against one on the King side, the win for White is a matter of routine.
The position after 29. Rh5
combination2d

You must also appreciate that brilliant attacks and combinations do not always create a threatened or actual checkmate but leave only a winning advantage. Steady play with standard endgame tactics should be enough to convert these advantages into a win which is the ultimate objective.

Chess Combinations: beauties from lesser known masters – 1

Filed under Attacking tactics, Chess lessons, Chess tactics, Chess Tutorials
Tagged as , , , ,

In Chess Combinations: the eternal beauties of chess, we tried to examine our fascination for beautiful combinations. We also made the point that you do not always have to look at the games by the likes of Morphy, Marshall, Capablanca, Alekhine, Tal, Kasparov and others of their ilk for unearthing such beauties. Even amateurs at local clubs or tournaments are known to have produced brilliancies. In fact, in this series of articles we only want to look at such combinations from games of players whose names may not be universally familiar.

Besides the enjoyment you may derive from such combinations, these may also help you to understand the tactical ideas that gave rise to those surprising moves. Once you get to analyze the situations that produced it, you may be able to create some beauties of your own, who knows?

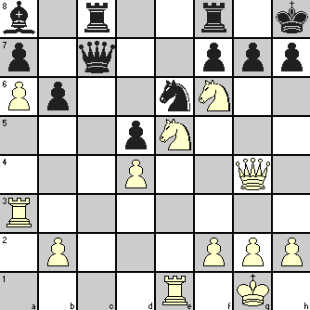
In the position shown below, you do not see any immediate danger for Black King even though White Queen is in readiness to pounce on h7 pawn if his Knight could come to g5. Most of White’s attacking pieces are on the Kingside, and either of White Rooks could come to g-file or h-file via third rank when the opportunity arises. Against this offensive battery, Black’s close defensive pieces are the Knight at e7 and Rook at f8, other pieces being mostly on the Queenside. If Black had a knight on f6 square, it would greatly help the defenses but his Knight at d4 cannot go there now as an exchange attack by White Knight at e4 will break up the castle. Let us see what transpires now.


Position after 18. Qh3:
 
combination1a
 
18. Nf4   An attempt to drive the Queen away and to reposition Knights.
 
19. Qg4 Ned5   White threatened the Knight while shifting focus on g7 pawn and creating a pin on that pawn. Black brings support for his attacked Knight and is ready to advance his KBP to chase away the White Knights.
 
Here is a point on chess strategies. It is not considered a good practice to make the knights support each other except during the process of positioning or where situation precludes other options. Knights play much better when they are side by side (like what can be seen for White Knights) with support from other pieces.
 
20. Ra3 Ne6   White’s intention to bring a Rook to g-file or h-file is clear now. Apprehending a lineup of White Queen and Rook along g-file, Black makes his Knight ready to guard the g-pawn and g5 square against White’s N4. But he missed (or felt that he could tackle) the other threats by the Knight, exploiting the pin on g7 pawn. Black also missed some other defensive resources.
 
21. Bxd5 cxd5   We talked about the value of defensive posting of Knight on f6 square. White takes care to eliminate that scope and the exchange enabled White Knight at e4 to move without any loss of tempo.
 
22. Nf6+! Kh8   Once the King moved, the g7 pawn got unpinned and was ready to capture the Knight which was a threat to Black’s h7 pawn if White’s Rook came to h-file.
 
Position after 22. … Kh8
 
combination1b
 
23. Qg6!   The bolt from the blue! White threatened 24. Qxh7#.
Let us see the possibilities:
23. … fxg6 24. Nxg6+ hxg6 25. Rh3#
23. … hxg6 24. Rh3#
23. … gxf6 24.Qxf6+ Kf8 25. Rg3+ Ng5 26. Rxg5#
23. … gxf6 24.Qxf6+ Ng7 25. Rg3 Rg8 26. Nxf7+ Qxf7 27. Qxf7 wins
23. … Ng5 24. Qxg5 g6 25. Qh6 with mate to follow.
 
23. Qc2   The only option left out!
 
24. Rh3 Resigns   24. … Qxg6 25. Nxg6+ fxg6 26. Rxh7# or
24. … h6 25. Rxh6+ gxh6 26. Qxh6+ Qh7 27. Qxh7# or
24. … Ng5 25. Qxg5 gxf6 26. Qxf6+ Kg8 27. Rg3+ Qg6 28. Nxg6 fxg6 29. Rxg6+ hxg6 30. Qxg6+ Kh8 31. Qh6+ (to guard against … Rc1#) Kg8 32. Re7 Rf7 33. Qg6+ Kh8 34. Qh5+ with mate in two moves.


A very effective demonstration of the power of pin and the mobilization/coordination of pieces.


Chess Combinations: the eternal beauties of chess

Filed under General Chess
Tagged as

Ask any chess player which aspect of chess he/she finds most interesting and it is most likely that chess combinations will have this pride of place! Of course, combinations are nothing but chess tactics of one or more kinds strung together by a series of moves. Why this fascination with chess tactics?

We tried to explore the roles of chess strategy and chess tactics by raising questions on What is chess strategy? Isn’t a chess game all chess tactics?. Here we are trying to examine what lies behind our preoccupation with chess tactics.

Good strategy adds fillip to chess combinations, giving it a direction leading to the ultimate win which is the prime goal of any chess player. But all strategies become meaningful only with the support of appropriate chess tactics. On the other hand, you may be able to produce brilliant combinations without being much aware of the presence or absence of underlying chess strategies.

Also, chess tactics is much more visible than chess strategies. That is why tactical players get much more adulation from the spectators or those who study their games when compared to the positional players. Even the best players fall prey to this temptation and can be seen to go for sacrifices and other tactics to get the win when some prosaic moves could fetch the same result!

All the above may be correct observations but they still do not answer the question on our fascination with combinations. Appreciation of chess-playing public may be an incentive, but not the complete answer. When you are playing with your friend with no one looking, don’t you still look for creating something in the lines of Morphy or Tal? And when you do create one, you will surely like the rest of your world to know about it! Read some other chess blogs and you will know what we mean!

There is part of the answer – ego satisfaction. But this ego is not always a matter of conceit but something much deeper than that, the fulfillment of the superego. It is something akin to the joy of creation felt by anyone in a creative pursuit, be it art, sculpture, literature, music etc. – and I would even like to include sports and games also when some of the top players ultimately compete with themselves to keep raising the bar!

This brings to the fore another aspect – the challenge of it! This is ingrained in our love of puzzles of any kind. But in chess, this puzzle is more refined. Normal puzzles are created by someone and by trying to solve, you are taking up the hidden challenge of the creator. But in chess, complex positions come out of the play without anyone foreseeing it. When these happen, both you and your opponent are trying to find the best way to resolve it. This desire aided by inspiration brings about combinations which give the creator that sweet feeling.

The pleasure of getting recognition is a bonus when some of these chess combinations find their way into chess lore to create wonderment for present and future generations. Chess problems are diverse and so are their solutions, hence there is no dullness of repetition that happens with other types of puzzles. Even where the solution falls into a pattern, the way to it will be different – so every problem and solution appears unique.

The other interesting thing about chess combinations is that they are not the prerogatives of top players unlike in other creative fields where the really good creators climb to the top sooner or later – if not in their lifetime then after it. But the world of chess preserves brilliant combinations which have survived their creators – ordinary players who themselves have passed into obscurity. In Chess Games: Amateurs can also produce gems!, you may read about a case in point.

Accepting that brilliant chess combinations are treated like great works of art by chess aficionados, we will try to show in our next series of articles some chess combinations that we liked in games from lesser known chess masters. We hope you will enjoy those as much as we did!

Center control in Chess makes for a forceful attack

Filed under Attacking tactics, Chess Basics, Chess lessons, Chess Opening, Chess Strategy, Chess tactics, Chess Tutorials
Tagged as , , , , , ,

A vivid example on importance of center control in chess showed you the importance of this aspect of chess openings. At the risk of overstressing the point, here we bring another short game played with Sicilian Defense which is supposed to give Black a good fighting chance against White’s King Pawn opening.

We have already discussed about the theory behind one variation of Sicilian opening in Chess Opening: Control of Center – Part 1 and showed examples in Chess Opening: Sicilian Defense Theory to Practice about the kind of play that can win for White or Black.

Sicilian Defense is the choice of combative players because Black is playing to create advantage, not just to achieve equality. At the same time, Black must realize that by not directly going for the control of center, he may be allowing White an early initiative. Therefore Black has to play carefully so as not to be swept off his feet by a quick attack before his own thrusts have taken effect.

Just adopting Sicilian Defense without this realization is not going to help Black to get the upper hand. He must be prepared to play aggressively but precisely in line with the theories to snatch the initiative, otherwise it could be a recipe for swift demise! That is what happened in the following game played at Bad Gastein in 1948 and we try to identify where Black went wrong and allowed White his brilliant attack.

Nicolas
Rossolimo

 
Ivan
Romanenko
 
1. e4   Aims to control d5 and f5 and create space for King side initiative
 
1. c5    
 
Shows black’s intention to go for Sicilian Defense.
 
This move apparently violates the principle of controlling the central and semi-central squares as it applies pressure only to d4.
 
Unlike moves like …e5 or …Nc6 which challenge center control or develop minor pieces, …c5 does neither. It also needs some more pawn movements like …d6, …e6, …a6 etc., allowing White a lead in development with attacking chances.
 
Then why go for it?
 
On the positive side, it gives Black

  • space advantage on Queenside and further actions on that flank
  • pawn majority at center by exchanging this pawn with White’s d4 pawn when he advances it to get full control of center
  • control of open c-file after the exchange, using his Queen or Rook in that file to facilitate Queenside counterplay
2. Nf3 Nc6   Moves and countermoves to wrest control of d4 and e5 squares
 
3. Bb5  
 
To quote Al Horowitz, this move was ‘actually an idea of Nimzowitsch, who called it one of his little jokes in the opening’. It was Rossolimo who adopted it many times to achieve remarkable success (as in the present game). That is how this line of Sicilian Defense goes under the name of Nimzowitsch-Rossolimo attack (ECO code: B31)
 
The main purpose is to get a rapid development and a strong center with c3 and d4. The struggle for d4 dictates the tactics for both sides and Black must be ready to capture on d4, else White gets great lead in development.
 
3. g6   Black is getting ready to develop his KB to g7 and to apply pressure on d4 and e5 squares.
 
White’s usual intention is to play Bxc6, giving Black doubled pawns. Black’s major responses are 3…g6 preparing …Bg7, 3…d6 preparing …Bd7, and 3…e6 preparing 4…Nge7.
 
4. 0-0 Bg7   White safeguards his King and wants to use KR as part of his attacking plans. Black of course carries on with his development plans.
 
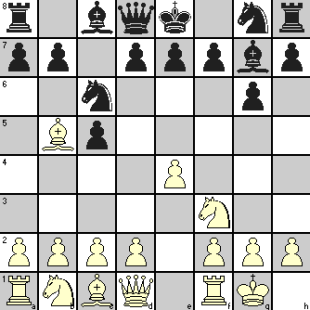
Position after 4 moves
rossolimo_variation1
 
5. Re1   Normal continuation is 5. c3 Qb6 with a struggle for control of d4. The text move was introduced by Gurgenidze for expected line of play along 5. Re1 e5 6. b4
 
5. Nf6   This changes track from control of d4 to attacking e4 pawn and exposed the Knight to an early attack.
 
6. Nc3   White develops his Knight to support his QP as also his KB and adds to the control of d5
 
6. Nd4  
 
In keeping with the strategy discussed against move 3, Black should have gone for 6. … e5 followed later by …Qb6. Other alternatives would be 6 … d6 to enable …Bd7 or to safeguard his King (because of the distant and not so distant pins by White’s Bishop and Rook) by …0-0. The text move was not consistent with any of these ideas and hence a questionable move.
 
7. e5 Ng8   Black’s inhibited play and inconsistencies allow White considerable space in center with tempo through attacks on enemy pieces.
 
8. d3 Nxb5   See how Black is surrendering all initiative to White. While White opens lines for his QB, Black’s QB is still locked in and his King’s Knight has retreated and blocked castling for his King. His center pawns remain immobile. The exchange of Knight and Bishop was originally the intention of White’s 3rd move to reduce Black’s control on d4 and e5. Without being forced, Black Knight has taken the trouble of wasting several moves to give White what he wanted!
 
9. Nxb5 a6   Another questionable move by Black. As subsequent moves show, White’s QN was headed for d6 square, Black’s move just assisted it in taking that step!
 
One of the basic tenets in chess is that you should not force a badly placed enemy piece to move to a better square. By extension of the logic, do not induce your opponent to take a move that he was ready to take. Both these lose tempo for you as you could use that time to make more profitable moves for your own pieces.
 
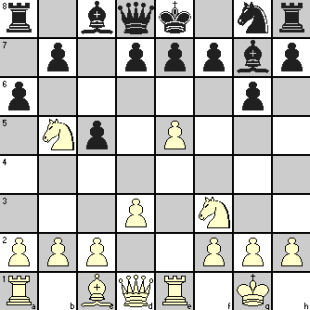
Position after 9 moves
rossolimo_variation2
 
10. Nd6+! exd6?   White knew that the capture of his Knight would give him a fierce attacking opportunity and so his move was an excellent idea. But Black still fell for it, making a bad situation really worse by exposing his King to the possibility of a discovered check. After this, White’s attack through a brilliant combination simply rolls on.
 
11. Bg5!  
 
White has timed his moves to perfection! He held back the discovered check to first drive away the Queen which could come to some help against what White planned. With an immediate discovered check, Black would be able to extricate himself with Ne7.
 
There is a couple of important lessons here. Firstly, you can sometimes get out of a difficult situation by returning the material that was sacrificed by your opponent to gain an attack. By doing this, you are still even on material, but the opponent’s attack may fizzle out. Trying to hold on to the material only adds to your difficulties.
 
Secondly, you need not be in a hurry to execute a move which is there for the taking when you can make some other move that compels your opponent to attend to it first. All good players know this maxim of looking for a better move when a good move has been found.
 
The text move by White takes care of both these possibilities.
 
11. Qa5   11. … Qb6 would not be any better.
 
12. exd6+ Kf8  
 
At this stage, White’s win was only a matter of time and most players would possibly go for the simple 13. Qe2 with one likely line as:
 
13. Qe2 Bf6 14. Qe8+ Kg7 15. Ne5 (threatening 16. Qxf7#) Bxg5 16. Qxf7+ Kh6 17. Qf8+ Kh5 18. g4+ Kh4 19. Qf3 (threatening 20. Qg3#) Bf4 20.Qxf4 Nf6 (or Qb4) 21. Nf3+ Kh3 22. Qg3#
 
But White found a more elegant line.
 
Position after 12 moves
rossolimo_variation3
 
13. Re8+! Kxe8  
14. Qe2+ Kf8  
15. Be7+ Ke8   15. … Nxe7 16. Qxe7+ Kg8 17. Ng5 with Qf7# to follow
 
Position after 15 moves
rossolimo_variation4
 
16. Bd8+! Kxd8  
17. Ng5 Resigns   It is either 18. Nf7# or 17. … Nh6 18. Qe7#
 
The final position:
rossolimo_variation5