Endgame Lessons From Game Twelve of the 2010 Anand-Topalov Match
By Steve Coffee
The recent world championship match between Vishy Anand and Veselin Topalov was certainly dramatic, and ended in dramatic fashion. With the match tied, Anand won the 12th and final game with the Black pieces.
A position near the end of the 12th game provides a little instruction and insight into why one should study endgames … even those boring King and Pawn endings. Topalov, playing with the White pieces for the 12th game, appeared to be pressing strongly for the win. But he pressed a little too hard and Anand got a distinct advantage. After Topalov’s mistake, he was struggling to find a way to draw the game, which would send the match into the rapid chess tiebreaks.
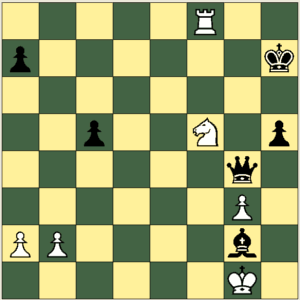
We’re going to examine a position that arose near the end of this titanic struggle. This is the position after 46…Bxg2.
In this position, White played 47.Kxg2. I was watching the game on ICC, enjoying Grandmaster Jon Speelman’s commentary. As the game was winding down to the end (Topalov resigned after move 56), one of the kibitzers asked whether Topalov had missed a draw with 47.Rc7+. The point is that after 47…Kg6 (if 47…Kh8, 48.Rf8+ Kh7 49.Rf7+), 48.Rg7+ Kxf5 49.Rxg4 and after the Bishop and Rook go off the board, material will be even in a simple King and Pawn ending. It’s a draw … right?
Well Grandmaster Speelman answered that yes, White could play this variation if he wanted to enter a dead lost endgame. Speelman answered immediately, without giving even a moment’s thought to the supposedly drawn ending. What did Speelman see so immediately that the kibitzer didn’t see? How did he make his evaluation so quickly? And what does this teach the average chess player?
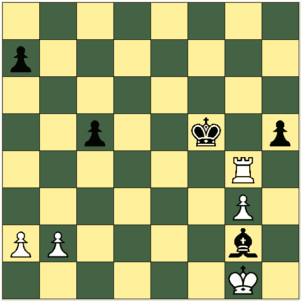
The position after 49.Rxg4 in the proposed line looks like this:
Black obviously must take the Rook. But he has two ways to capture. And this is the first lesson for us. There is often more than one way to accomplish something in a given position. If you see a check, there is often another way to check — sometimes even a second way with the same piece! If a capture is possible, there is often a second way to capture. If you see an attack on a piece or square, there is often a second way to make the attack.
From the position above, Black has two ways to capture the Rook. If he plays 49…Kxg4, the position may well be a draw. But Black has another way to capture; he can play 49…hxg4, and after 50.Kxg2, this is the position Speelman had in mind.
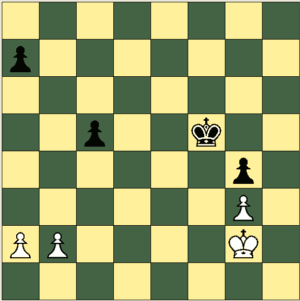
This position is dead lost for White — but why?
Here’s Black’s winning line: 50…Ke4 51.Kf2 Kd3.
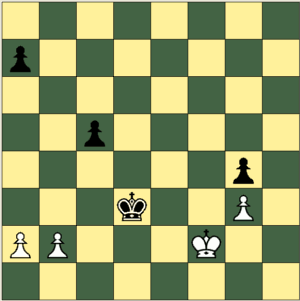
There are a few things to note in this position: first, White’s Q-side Pawns cannot make a passed pawn, so we can ignore them for all practical purposes. The important Pawns are the g-Pawns. Second, the Black King has advanced to a square that is on the same rank as the White g-Pawn. With only two squares between the Black King and the Pawn, White cannot prevent the Black King from sliding along the third rank to eventually capture the White g-Pawn. After 51…Kd3, the play might proceed as follows: 52.b3 Ke7 53.Kf1 Ke3 54.Kg2 Ke2 55.Kg1 Kf3 56.Kh2 Kf2 57.a3 a6 58.a4 a5 and now White’s King must abandon the Pawn: 59.Kh1 Kxg3 60.Kg1.
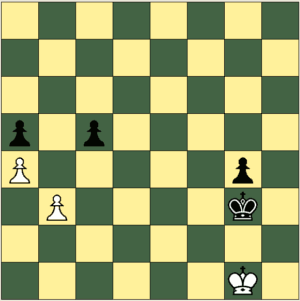
And here’s another important point. When there are blocked pawns (a “ram” as Hans Kmoch called it), if the defender’s Pawn is on the third rank (g3 as here, for example, or g6 if Black were the defender), the attacking King need only be able to capture the defender’s Pawn to have his King on a square from which he will be able to guarantee the promotion of his own Pawn. This is true even if White has the opposition, as he does here.
The play might proceed as follows: 60…Kh3 61.Kh1 g3 (Black gets the opposition) 62.Kg1 g2 63.Kf2 Kh2 and the Pawn promotes.
Here are the lessons I draw from this variation, and why Speelman (and Topalov and Anand) rejected it intuitively, without having to calculate long variations involving moves of Kings and Pawns.
- There is often more than one way to make a capture (or a check or threat). When evaluating the possible “drawing line,” one must see that at Black’s 49th move there are two possible captures, and see the likely consequences of both moves before assessing the variation.
- As Reuben Fine said, the easiest ending to win (or, I would add, lose!) is a pure King and Pawn ending, and often a very small advantage (a better King position as here, for example) is enough to win the game. Don’t assume, as the kibitzer did, that a King and Pawn ending with even material is going to be a draw.
- Study endgames! Grandmasters don’t need to deeply evaluate the King and Pawn ending in the above variation to know how it’s going to turn out. All one need know is that Black can block the g-Pawns and get his king to d3 to see that Black will win this ending.
Steve Coffee is a life-long chess enthusiast. Read Steve’s Chess Strategies Blog.


2 Comments
[...] Just a little news item today. I was privileged to be able to publish an article as a guest author at mychessblog.com. The article is entitled “Endgame Lessons From Game Twelve of the 2010 Anand-Topalov Match.” [...]
[...] Guest Post at mychessblog.com Posted in Chess Games by admin on the November 5, 2010 Tags: Guest, mychessblog.com, Post Just a little news item today. I was privileged to be able to publish an article as a guest author at mychessblog.com. The article is entitled “Endgame Lessons From Game Twelve of the 2010 Anand-Topalov Match.” [...]