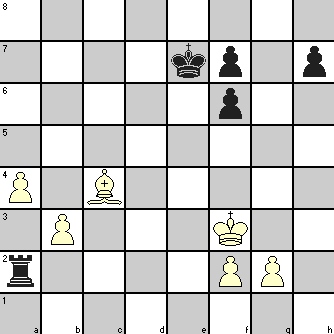
You may sometimes find in your games that if you could place one of your pieces on a particular square, you could have a better game. Unfortunately you find that the square is occupied by your own piece or pawn. If it is a piece, you can plan to move it to some other square, possibly even retreating. But if it is a pawn, you have a problem because pawns cannot retreat and you cannot capture your own pawn!
The only way is to push the pawn forward but the opponent may get wise to your intentions and maneuver his pieces to guard or occupy the vacated square. But if you have the opportunity to create a threat by that pawn move, your opponent may be forced to attend to that threat first. If he can capture the pawn without any exchange, he feels all the better for it! That gives you the opportunity to place your desired piece on the now empty square to set your plan in motion.
You can therefore guess that this kind of chess tactics mostly involves the sacrifice of a pawn. The example from some master game will help you to understand this chess tactics better and to identify when such situations arise in your games.
The game we have chosen is nothing spectacular but it is one of historical importance. Played in the World Championship Match held at Reykjavic in 1972 between reigning champion Boris Spassky and contender Bobby Fischer, win in this game made Fischer the new World Champion. The position has been taken after 29 moves have been completed. Many contend that White’s 30th move was a blunder that handed over the game to Fischer. But in an endgame position, such an error that can be identified after seeing the end result is not always apparent at the point of occurrence and you must remember that Fischer still had to show how to take advantage of the move!

The game continued as follows.
| 30. | g4 | f5 | With the White Bishop of the opponent on the board, Black’s BP and RP would be safer on black squares till they were ready to progress under support. Black sacrificed the forward BP to get rid of his doubled pawn and transferred this problem to White! It also made space for his f7 pawn to the safer f6 square and it blocked both of White’s BP. | |
| 31. | gxf5 | f6 | ||
| 32. | Bg8 | h6 | ||
| 33. | Kg3 | Kd6 | ||
| 34. | Kf3 | Ra1 | ||
| 35. | Kg2 | Ke5 | ||
| 36. | Be6 | Kf4 | ||
| 37. | Bd7 | Rb1 | ||
| 38. | Be6 | Rb2 | ||
| 39. | Bc4 | Ra2 | White tried for a trap. If 39. … Kxf5 then 40. a5 Ra2 41. a6 Ke5 42. b4 after which 42. … Rb2 43. b5 Kd4 44. a7 or 42. … Ra4 43. b5 Rxc4 44. b6 |
|
| 40. | Be6 | h5 | ||
| 41. | Bd7 | White phoned in his resignation after this move. In any case, so long as Black R is on second rank, White’s BP is pinned and White’s K has to remain in touch with f2. Thus 41. … Kg4 42. Kg1 h4 43. Kg2 h3+ 44. Kg1 (if 44. Kxh3 then 44. … Rxf2) Ra1+ 45. Kh2 Rf1 with Rxf2+ to follow |
There is another lesson to learn from this game. In endgame positions with few pieces and some pawns, excepting for the obviously right or wrong moves, your opponent may have many possibilities available each of which needs to be tackled by you in different ways. To save headache in calculating all possibilities and counter-moves, you may play the waiting game (provided you do not lose initiative in the process) by moving your pieces insignificantly to see how your opponent commits himself. You can then decide on your moves till the point where you can repeat the process to know the further direction of the game. This can be an important chess strategy in the end game and an essential ingredient in creating zugzwang for your opponent where the situation is ripe for it.


2 Comments
Nothing excites jaded Grandmasters more than a theoretical novelty, isnt it true?
@Raihan
Sorry, missed the point of your comment, can you please be more explicit?