7. Attacking along the back rank or the seventh rank
Though possibility of such attacking tactics may arise in middle game also, these opportuities are more frequently possible during the end of middle game when many of the pieces and pawns have been taken off the board. In such situations, the heavy pieces (Queen and Rooks) have more freedom of movement and can combine to deliver winning attack along the seventh and eighth ranks (opponent’s base rank and second rank).
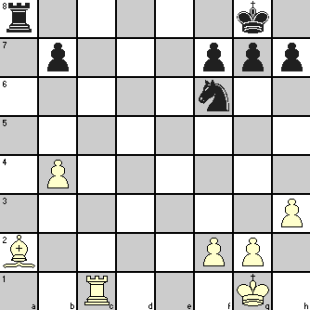
A situation which frequently occurs and is fraught with danger when the King stands at its Knight’s square with three pawns (BP, NP and RP) in front of it. The following diagram shows such a position for Black.
This defensive formation is strong in middle games in the sense that attacks from various directions can be met by advancing one of these pawns. But in the end game with opponent’s Rook or Queen present, the King risks mate by a Rook or Queen check along the base rank. In the position shown above, White could play Rc7 to win Black’s KBP or QNP. If Black tried to capture White’e Bishop with his Rook, Rc8+ leads to mate!
Such mating attacks are often initiated through some sacrifices to get opponent’s defensive pieces away for getting the way clear for a base rank check. From a defensive point of view, it may be prudent to keep an escape hole for the King by advancing one of these pawns, usually the NP or RP. to avoid such bolts from the blue!
But one has to think carefully before creating an escape hole as suggested above. In the following position, had the NP been advanced, White would be safe but the hole at h2 did not serve its purpose.
Black played 1… Bd6 and White had to resign. If White played 2. Qxc6, Black can mate by 2… Rxe1# whereas 2. Qxe8 makes him lose his Queen.
In the following situation, White tried to gain control of the seventh rank by his Queen move. This move backfired because of his failure to see the weakness in his King’s position.
It went as follows:
| 27. | Qd7? | Rd8! | |||
| 28. | Qxd8+ | Nxd8 | White had to lose his Queen or face checkmate. |
White gave up the unequal fight after another 7 moves.
The King standing in the corner (Rook’s square) is even more susceptible as only the NP and RP in front can hem it in. Even a player of the caliber of Karpov failed to see the vulnerability of his King’s position and the move by Black to exploit the situation.
Position after 36 moves
| 37. | b6 | Ra1 | |||
| 38. | Rb1 | Ng3+ | 38. Qe2 only helps to prolong the fight but with ultimate win for Black e.g. 38. Qe2 Qc5 39. b7 Qc2 40. Qa6 Rxf1+ 41. Qxf1 Qxb3 after which Black should win with his Q and N against White’s Q. | ||
| 39. | hxg3 | Ra8 | |||
| 40. | Resigns | There is no way to avoid 40. … Rh8# |
Opportunity for attack along the seventh rank (opponent’s second rank) does not occur frequently as the opponent will try to spoil your attempts immediately if he can realize what you are up to. Such attack involves positioning two or more heavy pieces on the seventh rank and you will appreciate that such a line up can act as a battering ram against your opponent’s castle to expose the King to a mating attack.
In the position shown below, White makes a sacrifice as a prelude to penetrate Black’s second rank by his Rooks and the power of two Rooks on the seventh rank is demonstrated amply thereafter. No comments are felt necessary as these recently concluded World Championship games have been analyzed by experts to the maximum extent possible!
Position after 23 moves in the first game:
| 24. | Nxf6 | Kxf6 | |||
| 25. | Rh3 | Rg8 | |||
| 26. | Rh6+ | Kf7 | |||
| 27. | Rh7+ | Ke8 | |||
| 28. | Rcc7 | Kd8 | |||
| 29. | Bb5 | Qxe4 | |||
| 30. | Rxc8+ | Resigns |


2 Comments
[...] for quick gain of material. In the next position, White plans to exploit Black’s back rank (another tactical element to be explained later) but needs to remove the defensive support of Black’s Rook at c8. He [...]
In the Reshevsky-Euwe match, why couldn’t white leave the queen in d7 without facing checkmate?