In English, a “baker’s dozen” means 13 and not 12, originating from an old practice of bakers giving one loaf extra when someone bought a dozen! Borrowing the idea in a converse sense, I am writing ten articles to cover the 12 chess tactics. Earlier, we devoted one article for each tactics to avoid cluttering up the lessons. But in this one, we have covered the remaining three tactics. The reason for this will be clear from what I have explained below.
10. Zugzwang
This tactic has already been discussed at length in two earlier articles viz. Chess Tactics: should some of them be prohibited? and Chess Tactics: Some more applications of Zugzwang. We have included the topic here only for bringing the different tactics within one series. If you take the trouble of going through the articles mentioned, you will get a fair idea of what this tactic involves.
11. Zwischenzug
What has been said above applies here also. We will request you to take a look at our earlier articles Chess Tactics: Catching Opponent on Wrong Foot and Chess Tactics: more on Zwischenzug where we tried to explain what this “mouthful” tactic means and how it is applied.
12. Stalemate
Unlike all the previous 11 chess tactics which are used to attack the opponent’s position, this one is a defensive tactics. A stalemate arises when the player with the move is unable to make any legal move while his King is not under check. Had the King been under check, this situation would mean a checkmate and defeat for the player so constrained. But a stalemate means a draw and many a clever player has been able to salvage a draw in a hopeless position by maneuvering to create a stalemate condition for himself!
On the other hand, particularly when you have undisputed and even overwhelming superiority in a position, you should be especially careful about this defensive resource. You should move the pieces carefully and be wary of picking up pawns or pieces apparently left unguarded by the defender, if such move does not render a check. Otherwise you may be left to rue for missing a sure win!
Let us first look at some positions to find how the stalemate came about.
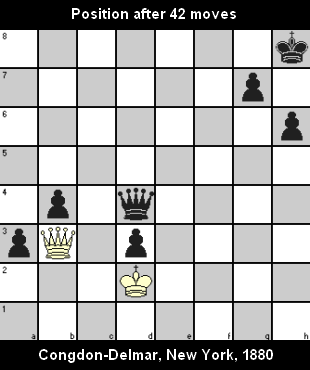
You can see that Black has an obviously superior position. Once he can get the Queens exchanged (and even otherwise), it is a matter of time that the connected King-side passed pawns will win for him. How does he play his winning hand?
| 43. | Kd1 | Qc3 | Almost any move other than this one would give Black a win! |
||
| 44. | Qg8+ | Kxg8 | White accepted the lifeline with both hands and Black had to accept the Queen offer. White is now in stalemate – game drawn. |
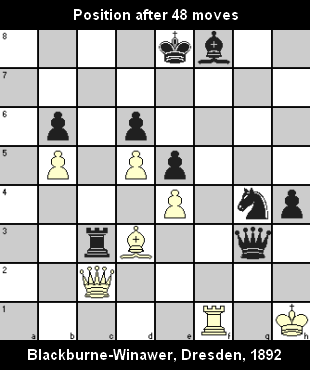
Black is a piece up and has a passed RP. He is ready for attack on the cornered White King. He should expect that White would try to find some escape route from a sure defeat.
| 49. | Qd2 | Rxd3 | Black is still in grabbing mood, otherwise he could have played 49. … Qh3+ and then bring out his Bishop via h6. | ||
| 50. | Rxf8+ | Kxf8 | |||
| 51. | Qh6+ | drawn | If Black captured the Queen, it would be stalemate. If he moved his King, the White Queen could continue giving checks, sitting by the side of Black King if necessary! Black had to accept the draw. |
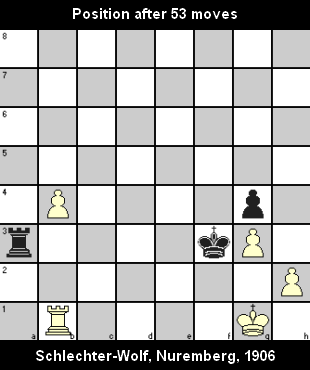
Black is in a losing situation as he cannot stop the White QNP from promotion without giving up his Rook. So he found the way to a stalemate for snatching a draw!
| 54. | b5 | Re3 | |||
| 55. | b6 | Re1+ | White had eye only for promoting his pawn as quickly as possible, so he failed to see through Black’s plan! | ||
| 56. | Rxe1 | drawn |
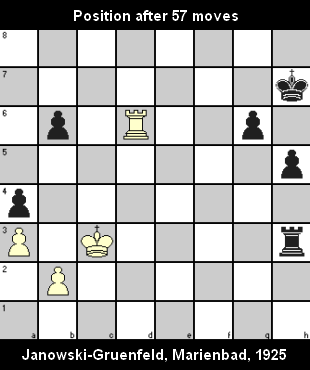
Because of his King-side connected passed pawns, Black’s win seems certain. But some inaccurate moves by him gave White the opportunity to a stalemate and it is quite amusing to see the White Rook’s antics!
| 58. | Kb4 | Rb3+ | |||
| 59. | Kxa4 | Rxb2 | Now White has been able to put his King in a walled space from where it cannot come out. So he has a merry time making his Rook jump around to chase the Black King, challenging a capture! | ||
| 60. | Rd7+ | Kh6 | |||
| 61. | Rh7+ | Kg5 | |||
| 62. | Rxh5+ | Kf6 | |||
| 63. | Rf5+ | Kg7 | |||
| 64. | Rf7+ | Kh6 | |||
| 65. | Rh7+ | Kg5 | |||
| 66. | Rh5+ | gxh5 | Black had enough of this circus and accepted the draw! |
In the next two examples, the games ended in decisive results only because the losers missed (and obviously the winners also overlooked) the moves that could give a draw through stalemate.
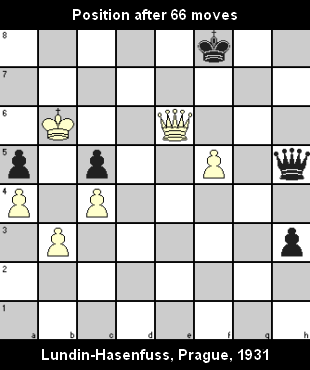
Black obviously is in poor shape and though White still has to keep an eye on Black’s RP, his KBP is also nearing promotion and more importantly, he is in a position to deliver checkmate soon.
| 67. | f6 | Qe8 | |||
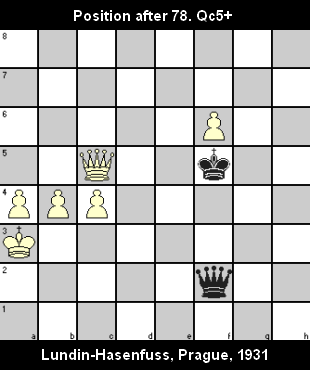
| 68. | Qxh3 | Qb8+ | Black missed his opportunity here. If instead he played 68. … Qe6+, White would be forced to reply 69. Qxe6 and Black would not have any move i.e., stalemate and draw. With the text move, Black resigned after another nine moves when the following position was reached (78. Qc5+) |
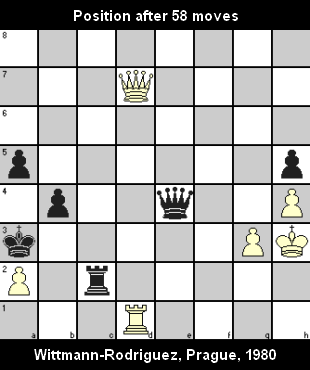
Our final example shows the position just before the last moves. After Black played 59. … b3, White resigned possibly considering the mating threats by Black Queen from any of g2, g4 and h1 squares. Neither of the players realized that Black’s last move created the opportunity for White to get a draw through stalemate.
| 59. | Rd3+ | b3 | Black could have played 59. … Rc3 and White would have to surrender sooner or later. But now the game could have continued:
60. Rxb3+ Kxa2 61. Ra3+ Kb2 (61. … Kxa3 62. Qa4+ or Qd3+ would force exchange of Queens by Black, leaving White with no move) 62. Qb5+ Kxa3 (if the King moved to c1, White would get a winning position!) 63. Qd3+ forcing a stalemate. |
There are examples galore in chess annals for stalemate or missed stalemate as these samples spanning a century from 1880 to 1980 amply demonstrate. When all seems lost, be on the lookout for a stalemate possibility and you need not feel like a swindler because stalemate is a legitimate rule of chess!


4 Comments
Stalemate isn’t really a Tactic … Stalemate is when the game ends in a Draw, from which both you and your opponent receive 1/2 a point (instead of 1 point for a Win).
You aim for Stalemate if winning the game is no longer possible.
Tactics are maneuvers that take advantage of short-term opportunities … Aiming for a Stalemate can sometimes take a lot of effort; you still need to fight for it, just as you’d fight for victory.
Fantastic blog. I like solving chess problems, so I hope to come back here soon. All the best!
[...] 12 chess tactics and how to use those to gain advantage – Part 10, 11 and 12 In English, a “baker’s dozen” means 13 and not 12,… [...]
this is the most admired website by me
congrats
keep it up
i want new tactics