Monthly Archives: July 2009

Chess Tactics: more on Zwischenzug

1
Filed under Chess lessons, Chess tactics
Tagged as

In Chess Tactics: Catching Opponent on Wrong Foot, you were introduced to zwischenzug and were shown how the failure on the part of a reigning World Champion to consider this tactics by his opponent resulted in his defeat.

Another example of the application of this tactics will make it very clear to you. Note how a future World Champion interposes an unexpected move (zwischenzug) to surprise his opponent and bring a quick finish to the game.

The game was played between Bobby Fischer and Pal Benko in 1963 at New York during US Chess Championship tournament.

Bobby Fischer does not need any introduction and the formality was done in the article on Chess Strategy and Chess Tactics: Balancing Act?

Pal Benko (b.1928), a Hungarian born in France, became champion of his native country in 1948 and an IM in 1950. In 1957, he moved to USA and won the GM title in 1958. He was eight times winner of US Open Chess Championship.

For the uninitiated, though both US Open Chess Championship and US Chess Championship are conducted by USCF, the former is an open tournament (participants have numbered more than 500 in recent past) with entry fee, and gives out cash rewards to winners and place-holders, whereas the latter is an invitational tournament to determine the National Champion.

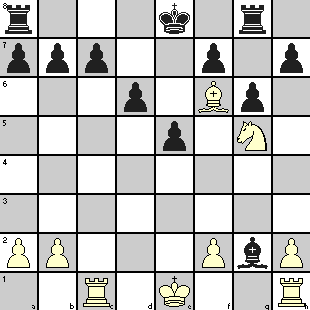
The diagram shows the position after 16 moves have been played.
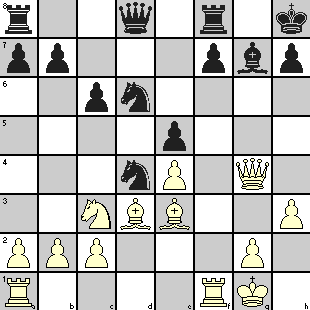
a zwischenzug difficult to see

17. Qh5 Qe8   White threatened 18. Bxd4 exd4 19. e5 with attack on h7 square. But Black missed White’s 19th move, otherwise he would have tried 17. … Ne6 or 17. … f5
18. Bxd4 exd4  
19. Rf6!   The zwischenzug! Black had expected 19. e5 f5
 
19. Kg8   If 19. … Bxf6 (or dxc3), then 20. e5 forces mate
20. e5 h6  
21. Ne2 Resigns   If 21. Rxd6 then 21. … Qxe5 gives a fighting chance. But after the actual move, Black cannot avoid losing the Knight.
For example
21. … Nb5 22. Qf5 wins
21. … Bxf6 22. Qxh6 forces mate


Finally, a simple but a powerful example to drive home the importance of zwischenzug as a chess tactics.
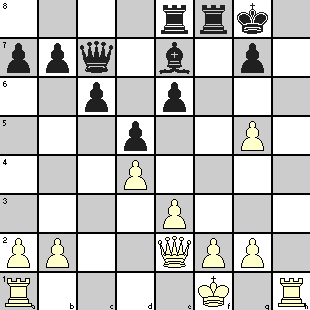
a forceful zwischenzug

From your understanding of the article series on the chess tactics of Bishop sacrifice at h7, you can guess that the position has been derived from such type of play by White. The question is on how to continue the attack on the Black King after the castle has been broken.

Black expected that White would now try to line up the Queen and Rook along the h-file to carry out his mating threats. So, in response to 1. Qh5, he planned for 1. … Bxg5 which would give the King an escape route, whether or not the Bishop was captured by the Queen.

But White’s zwischenzug was to play 1. Rh8+ which resulted in:

1. Kxh8   If 1. … Kf7 then 2. Qh5+ g6 3. Qh7#
2. Qh5+ Kg8  
3 g6   and mate follows


This kind of change in the order of moves is easy to overlook and you should be alert to such possibilities both in attacking and defending.
 

Good Game

0
Filed under Offtopic
Tagged as

Very interesting game.

Chess Tactics: Catching Opponent on Wrong Foot

3
Filed under Chess lessons, Chess tactics
Tagged as ,

If you are like me with next to nothing knowledge of German, this seems to be the season to do something about the weakness! You know that zug means ‘move’ from the chess tactics of zugzwang and now you can add zwischen (which means ‘between’) to your vocabulary. So zwischenzug literally stands for ‘between move’ or, to use a better translation, an ‘intermediate move’.

How can an intermediate move be a chess tactics? It can be when it puts the opponent on the wrong foot! After careful analysis of a combination, you may think that the opponent has to respond with a certain sequence of moves based on the threats posed by you, assuming he knows how to respond logically.

But then you find that the opponent has apparently disregarded your threats and interposed a move or changed the sequence of moves whereby you first need to tackle his move before continuing in your planned lines. In the process, you may find that your ‘beautiful’ combination is turning out to be a disadvantage rather than a winning line. This is how your opponent’s zwischenzug works against you! In a different scenario, it is you who may be able to frustrate your opponent by a similar tactics.

This chess tactics will be clear from the game played between Carl Schlechter and Emanuel Lasker at Cambridge Springs in 1904.

Carl Schlechter (1974-1918) was one of the strongest players of his time and earned the sobriquet of “drawing master” as his contemporaries found it extremely difficult to win against him and many of his games ended in draws. He was a World Championship contender against reigning champion Lasker in 1910. Going into the last game with 1-point lead, he only needed a draw to become the new champion. But he declined to settle for a draw and ultimately lost the game. Both players having equal points, the match was a draw and Lasker retained his crown.

Emanuel Lasker (1868-1941) was one of the greatest players in chess history and became the second official World Champion after defeating Wilhelm Steinitz in 1894. He remained champion for 27 years, the longest for any World Champion, before he lost the title to Capablanca in 1921. He made many contributions to chess theory including Lasker Defense for QGD opening.

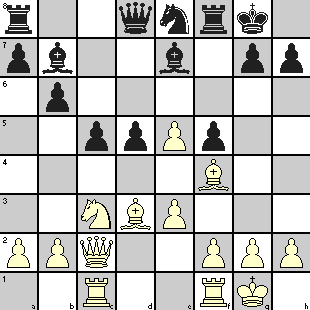
The diagram below shows the position after White’s 14th move.

unprepared for a zwischenzug

Lasker thought that he could win a piece by his planned combination but missed the zwischenzug by Schlechter at move 16.

From the position shown, we give you the moves as expected by Lasker and the moves as actually played over the board.

As Planned As Happened
14. g5   14. g5  
15. Bg3 f4   15. Bg3 f4  
16. exf4 gxf4   16. Bxh7+ Kh8   White’s zwischenzug, playing a move earlier than expected
17. Bxh7+ Kh8   17. Qg6 Nf6  
18. Qg6 Bc8   18. exf6 Rxf6  
19. Qh6 Bg5   19. Qh5 Kg7  
20. Qh5 Ng7   20. Qxg5+ Kxh7  
21. Qd1 Black now wins one of the Bishops 21. Bxf4   Not only that Black did not gain but he is now in a worse situation


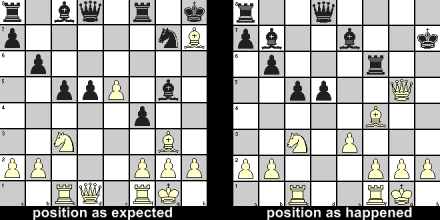
The diagram below shows position as expected vs as happened after above moves have been played.

result of missing a zwischenzug

Black resigned after playing another 16 moves after this position (on the right).


Chess Tactics: Some more applications of Zugzwang

2
Filed under Attacking tactics, Chess Basics, Chess lessons, Chess tactics, Endgame Tactics
Tagged as , ,

On the principle of ‘practice makes perfect’, after you have learned about zugzwang and its application in Chess Tactics: should some of them be prohibited?, we bring you two more examples, one an endgame study and the other from actual play.

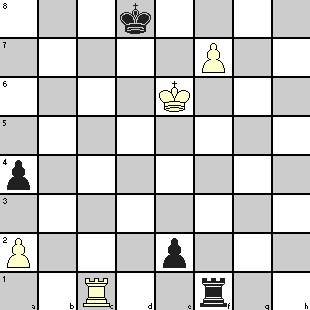
The following diagram shows a study which is slightly more elaborate than the previous examples in the sense of having both pieces and pawns.

endgame study showing zugzwang

White to play and win.

You can see that both White’s KBP and Black’s KP are one step away from promotion. But White’s first move apparently does not give any benefit because of following problems:

  • 1. f8=Q Rxf8 2. Re1 Re8+ after which White Rook’s attempt to capture Black’s KP (with support from the King of course) will result in exchange of Rooks and a draw.
  • 1. Rxf1 exf1=Q and it is Black who will win!
  • If White Rook leaves 1st rank, Black Pawn will promote
  • 1. Rb1 e1=Q+ 2. Rxe1 Rxe1+ and Black wins again

Well, you have now probably guessed the move after above options have been ruled out.

The solution is:

1. Re1 Rf2   On 1. … Rxe1 2. f8=Q+ Kc7 3. Qc5+ Kd8 4. Qa5+ (3. … Kb7 4. Qb4+), Black loses Rook
 
2. a3   This blocking move takes away Black’s options and puts him under zugzwang!
2. Rf1  
3. Rxe2 Rf3  
4. Rd2+ Kc8  
5. Rd5 Kc7  
6. Rf5 Re3+  
7. Kf6   The Pawn will promote on next move.


We now give you an example from actual play that took place in a 1953 Danish tournament between A. Kupferstich and J. Andreassen.

Nothing much could be found about A. Kupferstich except that he was part of Danish team in 9th Chess Olympiad held at Dubrovnik in 1950 and also represented Denmark in several friendly matches during 1947-1955. Except that J. Andreassen was a player from Denmark, I could find nothing more about him.

The diagram shows the position after 20 moves.

getting to a zugzwang

Though White has an extra Knight, he has four pawns less and his Kingside pawns are isolated. His Rook is under attack and it is natural to expect him to play 21. Rg1 after which Black would play 21. … Bc6 protecting his weak c7 pawn. But White possibly felt that he would have a much better attacking prospect with his Knight and Bishop close to enemy King if he could position his Rook on the 7th rank by capturing the c7 pawn instead of trying to protect his Rook at h1!

This is how the game rolled on.

21. Rxc7! Bxh1  
22. Nxf7 Bd5   Black tried to guard f7 square because of 23. Nxd6+ Kf8 24. Rf7#
23. Nxd6+ Kf8  
24. Bg5 Rh8   Black tried to create an escape hole against 25. Bh6+ with mate to follow.
25. Bh6+ Kg8  
26. Rg7+ Kf8  
27. Rc7+ Kg8   Poor Black King had no other go! White could have reduced his agony somewhat by playing 27. Rxb7+ straightaway, unless he was running slow on his clock!
 
28. Nc8 Bc6   Of course 28. … Rxc8 29. Rxc8+ Kf7 30. Rxh8 leaves Black a solid Rook down.
29. Rg7+ Kf8  
30. Rxb7+ Kg8  
31. Rg7+ Kf8  
32. Rxa7+ Kg8   All these moves can be taken as a demonstration of the power of discovered checks!
33. Rxa8 Bxa8  
34. Nd6! Resigns   The ‘zugzwang’ move!


The Knight and Bishop totally immobilizes the Black King and Rook. Black has to helplessly wait for an execution by a final Knight check at e7 or f6.

Even in this position, the game holds interest as White’s task is not easy. He still has to deliver checkmate as stated above but cannot afford to move the Knight till his King is positioned at e6 or f6 or e7 to prevent Black King’s escape when the Knight is moved.

Black’s strategy will be to push his pawns forward till those get captured at e3 and g3. Then he will use the Bishop to prevent White from carrying out his Knight maneuver and also try to capture both White pawns if they try for promotion. If White captures the Bishop, Black can claim stalemate.

What should White do? He should capture Black’s e- and g-pawns and move his King to e6 or f6 or e7. The Knight can then deliver check via (e4-f6 or e8-f6) or (c8-e7 or f5-e7).

Black knows that if White King is at e7, only (e4-f6 or e8-f6) is possible for Knight and Bishop positioned at c6 blocks these moves. If White King is f6, only (c8-e7 or f5-e7) is available to the Knight and Bishop can go to any square on c8-h3 diagonal to block those. Only if the King is at e6, all four options become available, but Bishop can check from d7 or d5 (remember that the Bishop is taboo!) to force White King to f6 or e7.

Assume that White King has reached f6. The Bishop has to be at d7 to guard c8 and f5 and to keep eye on White pawns. So White keeps pushing one of the pawns forcing the Bishop to leave its post to capture the pawn which otherwise gets promoted. The Knight can then move to c8 or f5 to deliver checkmate on next move.

It is possible to win even if White did not have those pawns, but that is another story!

No discussion on zugzwang is complete without reference to “The Immortal Zugzwang Game” between Friedrich Samisch and Aron Nimzowitsch played at Copenhagen in 1923. You have to play it yourself to see its beauty.


Chess Tactics: should some of them be prohibited?

5
Filed under Attacking tactics, Chess Basics, Chess lessons, Chess Strategy, Chess tactics, Endgame Tactics
Tagged as , ,

Though I said ‘some’ but actually I meant one that goes under a German name and seems to have been in use in German chess literature since since early ninteenth century. It is supposed to have been introduced in English chess literature in early twentieth century by Emanuel Lasker, himself a German!

The word I have in mind is zugzwang. I understand that ‘zug’ means move and ‘zwang’ means ‘compulsion’, so the combined word means ‘compulsion to move’. Essentially, a player is said to be under zugzwang when any move that he makes will make his position worse and not to move would be the best move. But chess rules do not permit a player to skip move and the affected player under compulsion to move is committing a kind of ‘suicide’ by his move! Are you getting my point now? Suicide goes against the laws in most countries of the world and forcing another man to commit it is still more heinous! Shouldn’t therefore be a law against zugzwang (and wouldn’t the victims agree)?

Enough of chatter, can we see some example you will say. Though this is a potent weapon in chess endgames, it can occur at any time.

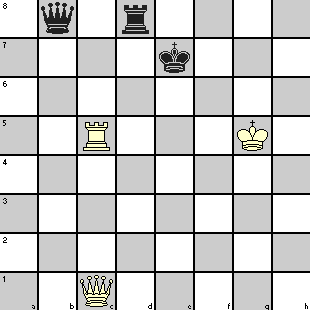
We first see an endgame problem that, though a very simple one, teaches you what zugzwang is and was created by French composer Henri Rinck (1870-1952) who was arguably the World’s Greatest Composer of chess problems.

a simple zugzwang

White has to play and win in the position shown. The moves are:

1. Rc7+ Rd7  
2. Qc5+ Kd8   2. … Ke6 3. Qf5+ loses the Rook
3. Kh6  


Black has the move and he is in zugzwang as any move makes him lose. Let us see what some of his options are:

King moves:
3. … Ke8 4. Qe5+ Kf7 5. Rxd7+ Kf8 (or Kg8) 6. Qxb8#

Rook moves:
3. … Rxc7 4. Qf8+ Kd7 5. Qxb8 wins.
If Black’s Rook leaves his second rank without any check, White will play 4. Qe7#

Queen moves:
3. … Qxc7 4. Qf8#.

Black Queen cannot deliver any viable check and trying to remain in contact with c8 square only enables its capture by White. If it loses contact with c8 square, White plays 4. Rc8#.

There are many other options available to Black and we have left it to you to find how the correct move (very important) by White in all the situations result in his winning the Black Rook or Queen or both, or delivering checkmate to the King.

You will notice that putting opponent in zugzwang is preceded by an idle (sometimes blocking) move by the attacker that forces the defender’s hand. In above example, 3. Kh6 was such a move.

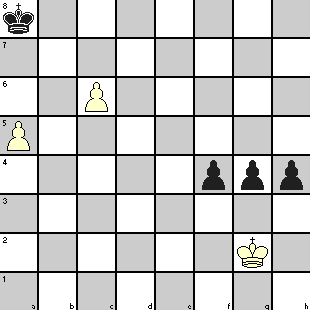
Now that you have seen a simple one, here is another problem which is slightly more complex. This is a very old problem but quite instructive as similar position may arise in one of your endgames also. White is to play and win.

a little more complex zugzwang

With two isolated pawns against three connected pawns, White may appear to be at a disadvantage but White’s winning line is as follows:

1. a6 Kb8   Black King had to move to prevent 2. c7
 
2. Kg1 f3   The idle move Kg1 to wait and watch is the only move that wins for White by creating zugzwang on Black
 
3. Kf2   White’s strategy is simple: move the King to face whichever Black Pawn has advanced. Once that Pawn gets blocked, Black has to move another Pawn. In the meanwhile, Black King cannot move either way without allowing the other White Pawn to promote! You may try with other Pawn moves to verify the tactics.
3. h3  
4. Kg3 h2  
5. Kxh2 f2  
6. Kg2 g3  
7. Kf1  
7. g2+  
8. Kxf2 g1=Q+  
9. Kxg1 Kc7   With no more pawn to move, Black King is forced to take the move it was trying to avoid.
10. a7 Kxc6  
11. a8=Q+   White wins.


Because of its unusual nature, it is a popular theme for chess compositions and Susan Polgar’s blog of July 1 has a problem on this topic.

In Chess Tactics: Some more applications of Zugzwang, you will see a third problem and a game where this tactics was used.