On a journey, if you have clear idea about where you are going, you can choose the shortest way to reach your destination. If the planned route gets blocked somewhere, you will take a detour to come back to your route or to get to the destination without wandering aimlessly.
Same way, if you know that you have enough material for creating checkmate as explained in Ten endgame tactics, you should also know what chessboard position you must create for a checkmate with the pieces at your disposal.
In this article, we are showing the typical positions you have to reach for final attack on the opponent’s King which is presumed to be alone.
As pointed out in Ten endgame tactics, the enemy King has to be at the edge or a corner square of the chessboard depending on the pieces you have for that final check. So we have set the opponent’s King near the center of the chessboard to show how it can be pushed where you want it to be. In every diagram, White is presumed to move first.
1. When you have Queen and Rook - situation A
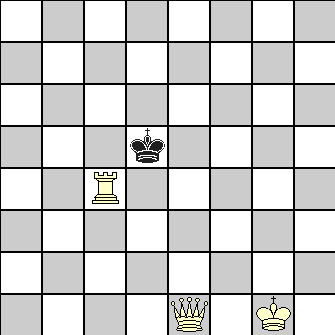
	1. Qe4+		Kd6
	2. Rc6+		Kd7
	3. Qe6+		Kd8
	4. Rc8#
2. When you have Queen and Rook - situation B
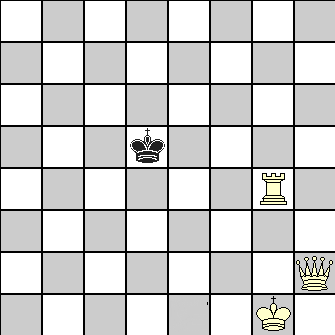
	1. Qh5+		Ke6
	2. Rg6+		Kf7
	3. Qh7+		Kf8
	4. Rg8#
3. When you have the Rook pair
Here it is like the above, but some additional moves may be necessary if the enemy King tries to capture one of the Rooks by approaching it diagonally.
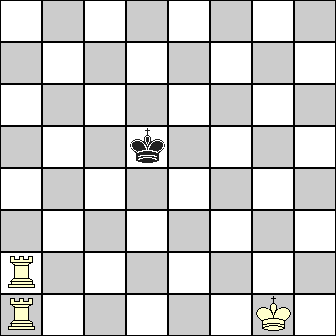
	1. Re1		Kd4
	2. Rd2+		Kc3
	3. Rd8		Kc2
	4. Re7		Kb3
	5. Rc7		Ka4
	6. Rb8		Ka5
	7. Ra7#
4. When you have the Queen
Here you have to position your Queen in such a way that area of the chessboard available to the enemy King continues to get reduced and then move your King towards the enemy King. The checkmate can be delivered in two ways:
a. With the opponent’s King at the edge of the chessboard, Queen supported by your King delivers check by closing in.
b. With your King getting the ‘opposition’, Queen delivers check along the edge row or file where enemy King is standing.
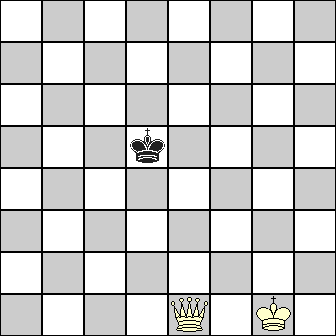
	1. Qe3		Kd6
	2. Qe4		Kc5
	3. Kf2		Kd6
	4. Ke3		Kc5
	5. Qd4+		Kc6
	6. Ke4		Kb5
	7. Kd5		Ka6
	8. Qb4		Ka7
	9. Kc6		Ka6
	10.Qb6# (type a above) or 10.Qa4# (type b above)
You have to be on the alert that a stalemate does not arise. For example, with Black King at a8, if you moved your Queen to b6, Black King cannot move anywhere and Black will claim stalemate and draw!
5. When you have the Rook
With a Rook, a supported checkmate like 4a is not possible, it has to be like 4b. Here also, your aim will be to place rook in the row or file next to that where Black King is standing, but of course out of reach of the enemy King. You have to select the Rook’s position that will leave least space to that King. In between Rook’s moves, you have to close in with your King. When the Rook gives check, your King will be guarding the Black King’s escape squares in diagonal or perpendicular direction relative to line of check.
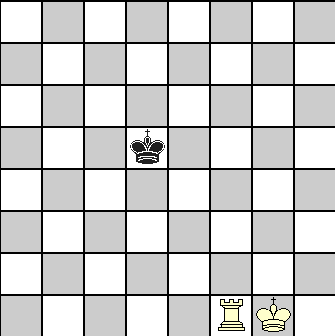
	1. Rf6		Ke5
	2. Ra6		Kd5
	3. Kf2		Kc5
	4. Ke3		Kb5
	5. Rd6		Kc5
	6. Rd4		Kb5
	7. Kd3		Kc5
	8. Kc3		Kb5
	9. Rc4		Kb6
	10.Kb4		Kb7
	11.Kb5		Ka7
	12.Kc6		Kb8
	13.Ra4	 	Kc8
	14.Ra8#

Note: The position reached after move 12 is a typical situation and White's Rook move forces Black King to get into opposition and checkmate. This tactics can be applied with Black King anywhere on the back row and White's King positioned in the 6th row of adjacent file.
In Part 2, we will examine the other positions involving the minor pieces.
Other Interesting Related Posts you should read:


One Comment
[...] under Endgame Tactics Tagged as chess endgame, endgam tactics, endgame strategy, endgame tips In Part 1 of this two part article, we discussed the tactics of checkmate with the ‘heavy’ pieces [...]