In the first article on Chess Tactics: Method Approach to Calculating Combinationson, we shared our ideas on how to proceed systematically for analyzing a situation for its inherent possibilities. The subsequent step is to work out our next sequence of moves which comprises a chess combination. The whole game of chess is expected to consist of many such nodal points where each node is planned (hopefully!) to yield some advantage, however microscopic it may be. In accumulating these advantages as we proceed from node to node, we expect at some stage to have enough to give us a win – well, that is the general idea!
While describing some suggested methods, we showed a simple example on how to put the ideas into practice. Continuing on the theme in Looking to find the best chess combination in a middle game position, we took up two slightly more complex positions and tried to apply the method for finding out the actual moves that were played over the board.
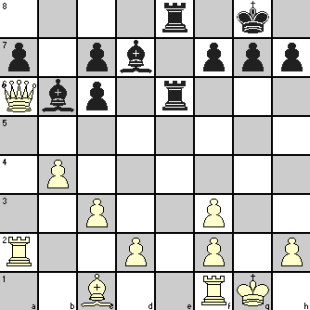
We will now examine another position and see how far our methods can help to reach the goals we seek. In the position shown below, Black has the move and we will try to figure out his best course of action.

You notice that in terms of material, White has a huge advantage because of his Queen against a Bishop. But look where the Queen is! Excepting for a support to the Rook at f1, a defensive role, it serves no useful purpose and could as well be not there on the board! White QB has become a bad Bishop, being blocked in by the White pawns in front and the QR position is no better. Only the KR has scope of some activity but, for now, it has taken away one escape square for the totally exposed White King in case of a Rook check from g6 along the open g-file. In such event, the King perforce has to move to h1.
You also realize that Black’s Rook at e8 can freely move to e1 when necessary to attack the White King on its base rank, provided the White Rook can be made to leave its present rank. Black’s KB can also join the battle any time by capturing the f2 pawn under certain situations. In a nutshell, Black should be able to force White’s surrender – all it needs is to find the sequence of moves!
When White is forced to move his King by Kh1 because of Black’s Rg6+, a check by Black’s QB from g2 (i.e., Bg2+) would force White to play Kg1. The Bishop then captures the f3 pawn (i.e., Bxf3) to deliver a discovered check from the Rook at g6 and White King has nowhere to go (assuming his Rook remaining at f1).
To enable Bg2+, Black needs to play Bh3 after White’s Kh1 and this, inter alia, attacks the Rook at f1 also. White has only two options:
(i) play Rg1 for capturing the Black Bishop when it comes to g2, or
(ii) play Rd1 to vacate the f1 square for the King’s escape from the discovered check.
We can disregard White’s move like Qd3 to attack the Rook at g3, as it can easily be nullified by Black playing f4 (White could still try Qc4+ but Black’s Kh8 puts an end to it), and then Black can continue with original plans.
If we probe further, we can see that if White plays Rg1, Black could still play Bg2+. This is because, as we noted earlier, the move Rxg2 makes the Rook leave the base rank allowing Black to play Re8+ which becomes decisive!
So the first option (Rg1) is ruled out and we have to consider White’s Rook move to d1. Black can go ahead as before but now White King can move to f1. In this position, Rook at g6 can move to g2 for playing Rxf2+ on next move. White King cannot go to e1, so it has to go back to g1. Black then plays Rg2+ which creates double check by Rook and Bishop and irrespective of King’s move to f1 or h1, it is checkmate by Rg1#.
But what if White plays Qxb6 to stall White’s Rxf2+? No problem, Black captures Rxh2 and White cannot prevent the coming Rh1#.
We can now write down the moves:
1. … Rg6+
2. Kh1 Bh3
3. Rd1 Bg2+
4. Kg1 Bxf3+
5. Kf1 Rg2
6. Qd3 Rxf2+ (6. Qxb6 Rxh2 7. any Rh1#)
7. Kg1 Rg2++
8. Kf1 Rg1#
See how you could work out a combination comprising 8 moves! Only thing is that the actual player of Black pieces did not have to think this long to work it out. I am quite sure of it, seeing that he was none other than Paul Morphy! I come nowhere near Morphy, so I can be excused! However, Morphy played the moves a little differently and you can play through the game at any online archive to see how he did it.
Louis Paulsen, who played as White and was among the top five players of that period, propounded the idea that any brilliant attack would fail against correct defense. This idea found acceptance with Steinitz, a future World Champion. But the curious point is that Paulsen failed to prove his idea in this game played at New York in 1857!


Trackbacks/Pingbacks