Tag Archives: chess tactic

Chess Tactics: How simple tactics helped to improve the location of pieces?

0
Filed under Chess tactics
Tagged as , , , , , ,

In the game of Chess, tactics can be used for anything and everything that will ultimately lead to a favorable position in the short term and help us in finally achieving the goal of saying checkmate to the opponent. In this series of articles, we have been looking at the different aspects of tactics.

Tactics, in most cases, is required in almost all types of situations. More so in circumstances where the position is very bleak and unfavorable. Tactics sometimes has to be employed out of despair to overcome the unfavorable position.

Let us try to explore the effectiveness of tactics that was carried out out of desperation.

Take a look at the following diagram depicting the position after 42 moves of white and Black to make the move.

Black to Move
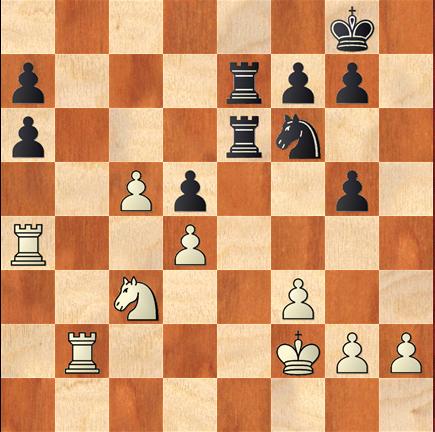
image1

A quick look at the positions of the pieces reveals the following :

  • The pawn structure of White pieces is well developed while the black pawns have weaknesses
  • The passed pawn at c5 is well placed and the rooks at a4 and b2 will exert pressure on black’s double pawn structure at a6 and a7, if Black takes no efforts.
  • White Knight at c3 is unduly exerting pressure on black pawn at d5
  • Additionally, the black knight at f6 is passively supporting the pawn at d5, in that it cannot move from that place.

The following diagram can best explain this situation:
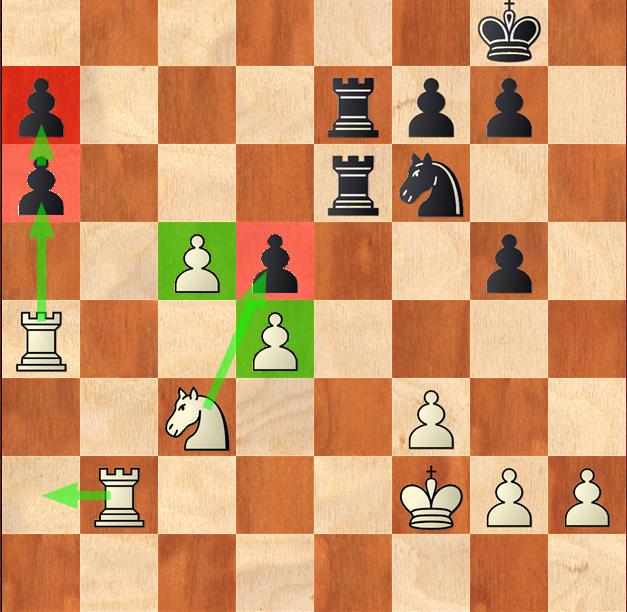
image2

This is one ideal situation where the Black, placed in a highly precarious situation, need to come up with some sort of tactics to change the position and do something that will help him gain an upper hand over the opponent.

What are the options available for Black at this position?

Take a closer look at the white pieces once again. The White king is placed at f2. All the other major and minor pieces are placed on the Queenside. So, if any move is made to attack the King, then it will be difficult for the White o react as most of its pieces are on the Queenside.

Now, what can Black do now? It can either move the pawn at g5 to g4 to disturb the pawn structure and open the “f” file, if white pawn at f3 captures black pawn at g4. What are the other options available? A check on White King using Knight at f6 is one possibility.

What will happen if black gives the check by moving the Knight to g4 – Ng4+?

The white pawn at f3 can capture the Knight at g4 – fxg4. If that happens, the Black’s game is opened up and it might think of giving a check by moving the Rook at e6 to f6. Then White King has two options – either move to g3 or g1. If King moves to g3, the second rook at e7 can be moved to e3 to give a check to King on g3. What does this move do? The White’s Knight is pinned. See that how the things begin to happen. In case White king moves to g1 instead of g3, the position will be much easier for Black – a Check by rook at e7 to e1 would be curtains for White. Can you visualize how the things unfold out of nothing by a single move? This is what tactics is all about.

Having evaluated all these possible options, Black decided to move the Knight, to g4 to give a check on White King at f2.

42. ….. Ng4+

In response to the Black Knight’s threat with a check, the White, having evaluated all the possible options, decided to move the King to g3.

43. Kg3 ……

What should the Black do now? By moving the Knight, which is passively defending the black pawn at d5, the pawn at d5 is exposed. The Knight is also at threat now from white pawn at f3 and King at g3. There is no possibility for giving check on White King.

The Black moved the Knight at g4 to e3

43. …. Ne3

And the position at the end of the 43rd move is as follows:
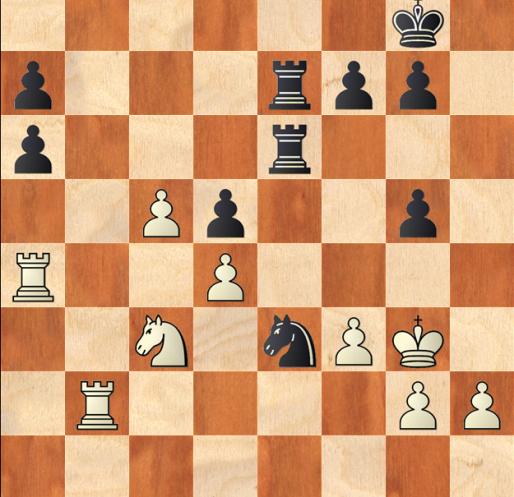
image3

This is a tactic employed by Black, which helped it to convert its weak position to one of strength. Can you visualize how it has been achieved?

Look at the following diagram:
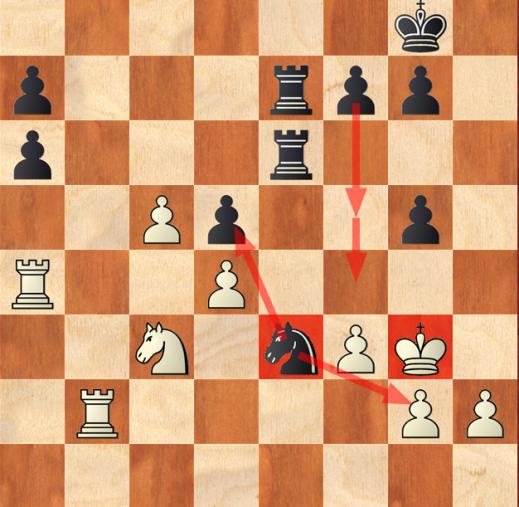
image4

The Black Knight, which was passively defending the pawn at d5 from f6 is now at e3, at a very active state, while at the same time supporting the pawn at d5. The black can move the pawn at f7 to f5 and then f4 to harass the White King. The Knight at e3 can also harass the White King by capturing the white pawn at g2. This is what tactics is all about. It need not be a grand plan. But a series of small moves, two or three that alters the course of the game.

In this case, the weak location of the black pieces has been transformed to one of strength by a simple tactical move.

By the way, the Black went on to win the game after a series of moves, as given hereunder.

44. h3 f5
45. Kf2 f4
46. Rab4 Kf7
47. Rb8 a5
48. R8b7 a4
49. Rxe7+ Rxe7
50. Ra2 Rb7
51. Ke2 Rb3
52. Nxa4 Nf5
53. Kf2 Nxd4
54. Rd2 Rb4
55. Nc3 Ke6
56. Ne2 Nb3
57. Rc2 Rc4
58. Ra2 a5

White resigned accepting the defeat.
Chess Tactics: How tactics helped convert a losing position to a winning one?

0
Filed under Chess tactics
Tagged as , , , , , ,

Tactics play a vital role in the game of chess. Tactics is everything in chess. Chess, as you all know, is a fair game with no room for chance or luck whatsoever to either of the players. The players ultimately decide the fate of their result in the game. A slight lapse of concentration, a slight miscalculation or a little oversight is just sufficient to allow your opponent to say checkmate to you.

Tactics might just involve distracting the opponent’s pieces, sacrificing pieces to achieve a broader goal, mating threats, checks, and all such other things.

Let me explain the role of tactics by way of an example where a literally losing position for the black pieces has not only been avoided, but the black went on to win the game in the next 3-4 moves.

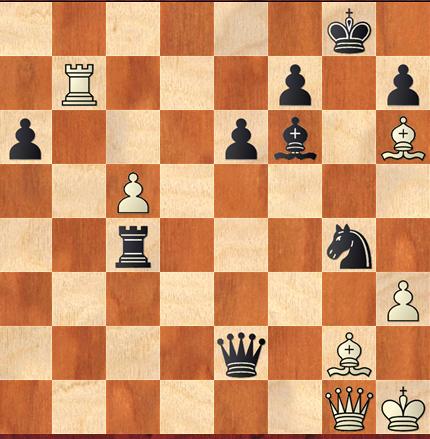
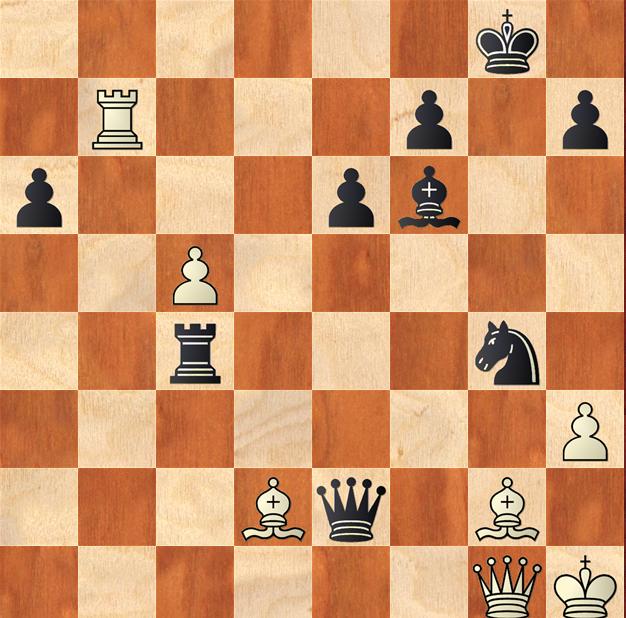
This is the position after 38 moves, and white has to move next:

White to Move

whitetomove_1
Black to Move

A closer look at the position shows that White is in a stronger position with more possibilities for winning.

The Black king at g8 is vulnerable, in that if White rook at b7 gives a check from b8, then black king has no option but to move to g7.  One tactic here for white might be to arrest the movement of Black King to g7, which would then result in a checkmate.  White’s bishop at d2 can be moved to h6 for this purpose.

It is essential that a chess player visualizes at least 2-3 moves in advance and plans his moves taking into consideration all other possible alternatives, such that his goal or tactics succeeds.

Before jumping into the move straightaway, let us see what would be the possible response from black for this move.  Black, visualizing the threat of mate if no action is taken, might have no other alternative but to capture the white bishop at h6 using the Knight at g4.  What will happen if Black Knight at g4 takes the bishop at h6?

One may also notice that the Black queen at e2 and black rook at c4 are in a single diagonal. White might think of moving the bishop at g2 to f1, which will result in a discovered check by Queen. At the same time, the Black Queen can be captured at ease by White bishop making it simpler for White to say checkmate.

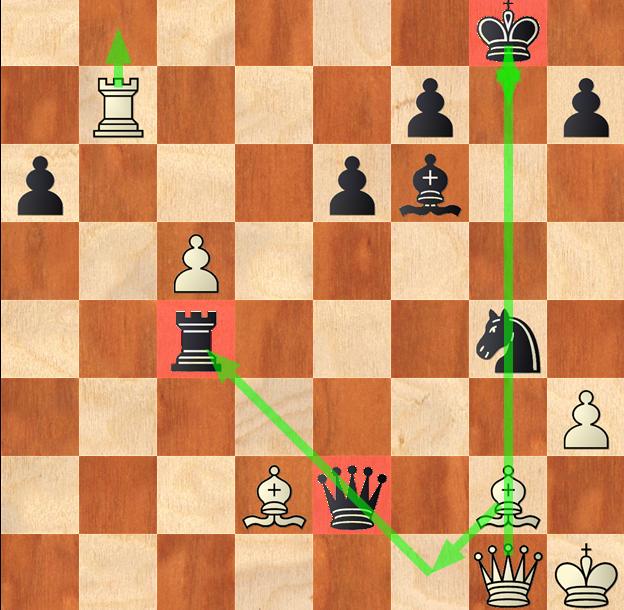
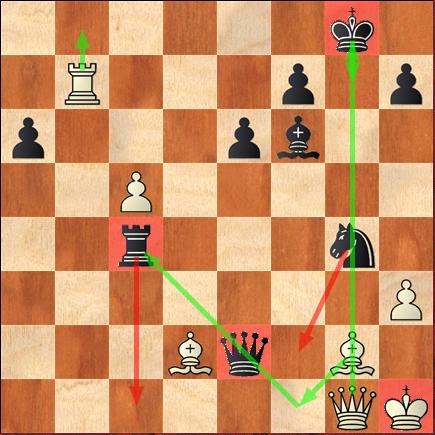
The vulnerability of Black’s position and the advantages or possible moves for White, which is to move now, is depicted in the following diagram.

whitetomove_2

So, the White, considering all possible options, has taken the right decision of moving the bishop at d2 to h6, harassing the Black King at g2.  Now the position would be as follows :

white_tomove3

Black is facing a potential checkmate now as the next move by White, moving the rook at b7 to b8 will be a checkmate.

Let us look at the position closely from the black’s point of view.  What are the possible options available to Black to thwart the White’s move.  One thing is he can consider moving the black bishop at f6 to e5 to thwart the White rook’s move to b8. White may then move the bishop at g2 to f1as the black queen and black rook are in a single diagonal.  This move by white’s bishop will also block the Black knight at g4.

What might be the other possibility for Black now?

whitetomove_4

The white King at h1 is also not very safe.  It is equally vulnerable as is the Black king in g8.  One possible option for Black might be to threaten the White king with a check. The Black knight at g4 is at a good position to threaten with a check by moving to f2.  The response from White for that check from Black knight would be either to move the King to h2 or capture the Knight at f2 by Queen.

If the King is moved to h2, then Black can move the bishop at f6 to e5 and the check would be the final nail in the coffin for white, leading to checkmate.  If the White queen captures the black knight at f2, then Black rook at c4 can be moved to c1 for giving check at White king. Now white has no other option but to use his bishop at h6 to capture the black rook at c1.  By this move, Black has successfully thwarted the threat of mate from White and also is in a great position to capture the White queen placed at f2.  This will be a great opportunity for black to win.

The game concluded as follows :
39.    Bh6    Nf2+
40.    Qxf2    Rc1+

And, White resigned the game conceding the defeat. This is what tactics is all about.

Increase Your Tactical Skills by Learning These Important Three Steps

0
Filed under Guest Posts
Tagged as , , , , ,

tips-and-tricks

It is common knowledge in the game of chess that a “tactic” is a series of short term maneuvers which have specific goals in mind. All players, beginners to grand masters, need and use different types of tactics that will help them win the game. Typical tactics will fall into patterns you can recognize in many different varying positions. The three basic types of tactics you need to learn are the fork, pin, and skewer. These three tactics are for everyone to use, especially the beginning chess player, as these three prove to be the most useful. Once you learn and understand these three basic tactics, you will be able to easily see and anticipate them from your opponent—you will be able to use them to your advantage.

The “fork” tactic is when a single chess piece of yours is able to attack two chess pieces of your opponent at the same time. For example, one pawn piece of yours can either attack one of the two opponent’s pieces within the pawn’s attack range. Also, when an attack is against two enemy pieces at the same time by two of your pieces, it is called a “double attack”.

The next of the three tactics you need to learn is the “pin” tactic. The “pin” tactic is when you attack an opponent’s piece, and that targeted piece cannot move without revealing another piece behind it to capture. You essentially are “pinning” the first piece to the piece behind it. The only pieces that can pin other pieces are the rook, bishop, and queen. However, if you are ever a victim of a “pin” from your opponent, follow these four tips to escape the “pin”.

1.Block the pin by moving another piece of yours between the piece being pinned and the pinning piece.

2.Move the piece that is being pinned by your opponent’s pinning piece.

3.Capture the piece that is doing the pinning.

4.Attack the opponent’s piece to force your opponent to move it away.

The “skewer” is very similar to the “pin” tactic but this time, you attack your opponent by forcing the targeted opponent’s piece to move away in order for you to capture the more valuable piece behind the “skewered” piece. To some chess players, this is also known as the “bully move,” where you have your piece bully its way on the board to make your opponent decide which piece they will need to give up to you.

Continue to practice to recognize and memorize these tactics in order to win your opponents pieces that you target during the game and eventually the “checkmate”. The key to becoming a better chess player is to understand these aforementioned tactics. The beginning chess player should always remember that the back row of your pieces are critical in winning the game, so by moving them out at a first chance is critical. The quicker those pieces in the back row have been moved out, the quicker you can apply your own tactics and strategies that will help you gain a checkmate against your opponent.