Tag Archives: chess games

Middle game tactics: Dilemma over the choice of rooks to move

10
Filed under Chess Strategy
Tagged as , , , , , ,

One of the important set of pieces with unique advantages of moving forward and backward only on verticals and horizontals and not otherwise is the rooks. The importance of the rooks can be assessed by the fact that the value of two rooks is more than the value of the Queen. No other combination of the major and minor pieces gives a value more than the value of the queen in the game of chess. The rooks are basically stationed at the flanks at the start of the game. As part of the opening strategy, it is imperative that the players try to bring these two rooks into play by preferring to castle and prepare the rooks for further development.

At the start of a typical middle game stage, one could invariably find both the rooks occupying the back ranks while all other minor pieces leave that first rank and take interesting positions in the other ranks. Most of the time even the Queen moves out of the back rank, but the rooks will be stationed there before preparing for the development.

It is imperative that which of the two rooks should be moved as part of the development or defence should be correctly assessed, based on the evaluation of the position of the board, and a wise decision is taken. The choice of the wrong rook for movement will not only complicate the position, it might give away the advantage to the opponent to pounce on the weakness.

To emphasize this important fact, let us look at a part of the game played in German Bundesliga by two grandmasters, where a wrong decision by white has forced him to part with the control over the board and ultimately after great defending and futile attacking, had to settle for a draw.

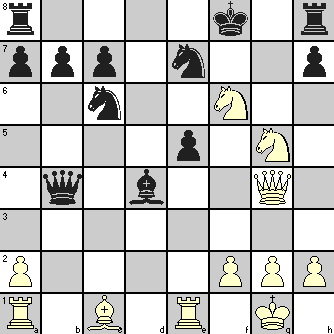
This is the position of the game after 15 moves, and it is the turn of the White to make a move.

picta1

(White to move)

A cursory look at the position indicates that both the players have developed their pieces fairly well, and are in the midst of an intriguing middle game. It is obvious that White would want to move his rook to the e1 square to share the advantage of the open e file. Here comes the dilemma as to which of the two rooks – rook at c1 or the rook at f1 – that should be moved to the e1 square – is the problem.

The merits of moving the rook at f1 to e1 include – having two rooks at each side – queenside and the kingside – and exercising control over the “c” file and the “e” file. On the contrary, moving the rook at c1 to e1 means the rook at f1 is blocked.

White decided to go ahead with the second option of moving the rook at c1 to e1.

The moves are as follows:

16. Rce1 Qd6
17. Re3 …. White anticipated that an exchange of Rooks as:

1. ….. Rxe3

2. fxe3 ….. would strengthen his position with the Rook at f1

17. …. Bg7 Black did not accept the invitation for exchange

The game continued further and after another 30 moves or more, both the players agreed for a draw.

This is a nice example, which emphasizes that every move, especially the wrong ones such as this one by white, should be judged on its merits.

Middle game tactics: Moving the worst piece first is a good idea

3
Filed under Chess Strategy
Tagged as , , , , , , ,

The Middle game part in the game of chess is the place where most of the tactics are tried and effectively deployed. This is so because, it is in this stage that the major and minor pieces of both the players would be battling for control over the squares. As you might be aware, tactics are a series of less than three moves at a stretch aimed at a positional advantage and/or thwarting the plans of the opponent. In most of the cases, the tactical moves planned by a player might not fully materialize due to the defensive moves or counter attacking moves of the opponent. So, there would be a series of tactics that might be required to be calculated and assessed by the player before effectively deploying it into action.

It is quite possible in such occasions that one gets caught in a dilemma as to which piece to move or how to initiate a tactical ploy to gain advantage over the opponent. It is in this context that assessing the strengths and weaknesses of the major and minor pieces at work in the board should be assessed, and the least effective piece in the board should be considered as the starting point of a tactical ploy. The process of identifying the weak piece is not a one-time affair in the game. The positions keep changing quite frequently and it is essential that the idea of identifying the relative weakness in the pieces is constantly reviewed and tactics are planned accordingly so that one can have an edge over the opponent.

Let us try to explore this concept a little deeper with the help of a game played in 1995 between two grandmasters, and see how the concept works out.

The position of the game after 26 moves by White is given hereunder, and it is the turn of Black to make a move.

pict1

A casual look at the board reveals that the Black has two bishops as against one of White. White, however, has an additional Knight and also one extra pawn. Despite a pawn down, black has a good position on the board, and a fair chance for launching the attack. The light squared bishop is threatening the white knight at a3, and at the same time providing cover for the pawn at f3. Now the dilemma is which is the piece to be moved. It is evident that the rook at f8 is not so effective, and there is not much room for moving any of the pawns.

The game continued as follows with the black preferring to move his weak rook at f8.

26. …. Rg8
27. Rg1 …. Sensing the ploy that blacks light squared bishop might threaten the white king with a check on g2, the rock has been moved for additional cover.
27. …. Rxg1
28. Kxg1 …. Black preferred to exchange his rook

The position in the board after White’s 28th move is given below:

pict2

As has been stated earlier, it is not necessary that the idea of identifying the worst piece should be a one-time affair. It has to be looked for constantly to have better control over the overall board and also an edge over the opponent. Now, we need to once again identify the weak piece or the piece that can be ideally considered for the next move. The light-squared bishop is exerting pressure on the White King restricting his move to only two of the four possible moves, and the dark-squared bishop is protecting the pawn at f3. It is obvious that the queen should be the one to be moved.

A deep look at the squares reveals that the white square d3 is unprotected. This would be better for the black queen to land in to exert more pressure on the white king. Black decides to execute the plan as follows:

28. …. Qg6+
29. Kh1 Qd3 Mission completed for black
30. Be1 …. White tries to activate his Knight at a3 to c2.

The position after 30 moves of white is given below:

pict3

It is the turn of Black to move now. What should he move now? Again the process of identifying the weak piece or ineffective piece needs to be carried out.

It is clear that after White moved his dark-squared bishop from d2 to e1, the threat for the black pawn at f3 is eliminated, and there is no need for the dark-squared bishop at d6 to provide cover for the f3 pawn. As such, the weak piece or ineffective piece now turns out to be the dark-squared bishop.

30. …. Be7
31. Nc2 Bh4
32. Nb4 Qd1

The game is almost over for White. The decision to move the dark-squared bishop from d6 to e7 and then follow it with a move to h4 (Bh4) is too good for white to handle, and as such lost the initiative. The end game is more of a formality now, with black firmly in control.

Analysis of the positions and the relative strengths and weaknesses should precede any tactical ploys, and this game is a best example for this useful trick, which might turn out to be so handy in the middle game.

Chess Games: Amateurs can also produce gems!

1
Filed under Attacking tactics, Chess Opening, Chess Tutorials, Chess lessons, Chess tactics
Tagged as , ,

Captain W. Evans, a player of moderate skills, introduced a gambit in 1824 where White sacrificed a pawn to get a strong center. This gambit obviously came to be known as Evans Gambit! In 1838, he played his gambit against Alexander MacDonnell, the greatest English player of his time, and managed to win the game and the gambit drew a lot of public attention. Subsequently, players of much greater standing like Morphy, Anderssen and Chigorin created gems with this gambit.

But with the progress in the theory of the game, this gambit went out of vogue and appears rarely in modern games as defenders are now well aware of the variations and how to handle those.

The opening moves go something like this:

1. e4 e5  
2. Nf3 Nc6  
3. Bc4 Bc5  
4. b4   This offer of QNP constitute the gambit. White follows it up by c3 and d4


Our idea of telling all these is not to sell you Evans Gambit but only to create a background! You can take it as one of the many interesting stories behind chess games that make chess and chess history so fascinating! But what we intend to show is that given any set up, brilliant ideas are not the prerogatives of chess masters. Even amateurs like you can have a flight of imagination to produce little gems like the following one, incidentally produced with Evans Gambit in a game played in 1862 between two amateur players (White was 16 year old)!

1. e4 e5  
2. Nf3 Nc6  
3. Bc4 Bc5  
4. b4 Bxb4  
5. c3 Bc5  
6. d4 exd4  
7. cxd4 Bb6  
8. 0-0 d6  
9. Nc3 Bd7   9. … Na5 or 9. … Bg4 is better
10. e5 dxe5  
11. Re1 Nge7  
12. Ng5 Be6   12. … 0-0 would be disastrous after 13. Qh5
13. Bxe6 fxe6  
14. Nxe6 Qd6  
15. Nxg7+ Kf8  
16. Qg4 Bxd4  
17. Ne4 Qb4   Attacking the other White Rook and threat of checkmate may look good but 17. … Qg6 was needed for defense
18. Ne6+ Ke8   Most players would play 18. Bd2 to neutralize Black’s threats, but White saw better possibilities in this position
19. Nf6+ Kf7  
20. Ng5+ Kf8   These were the possibilities:
20. … Kxf6 21. Qe6+ Kg7 22. Qf7+ Kh6 23. Ne4+ with mate to follow
20. … Kg6 21. Qh5+ Kf5 22. g4+ Kxf6 23. Qf7#
20. … Kg7 21. Nh5+ Kf8 22. Qf3+ Ke8 23. Nf6+ Kd8
(if 23. … Kc8 24. Nd5+ wins Black’s Q)
24. Nf7+ Kc8 25. Qh3+ Kb8 26. Nd7+ Kc8 27. Nb6+ Kb8 28. Qc8+ Rxc8 29. Nd7#


Position after move 20

exasperating knights

21. Ba3 Qxa3   White moved QB to clear the mating threat. If Black tries 21. … Qc4 to prevent Qe6 by White, then 22. Rc1 drives away the Q and makes Qe6 possible
22. Qe6 Nd8   22. … Kg7 23. Nh5+ Kf8 24. Qf7#
23. Qf7+ Nxf7  
24. Ne6#  


You have to go a long, long way to see a more beautiful checkmate! Do you have any hesitation in calling this a masterpiece though produced as ‘amateurpiece’!?

This game gives an excellent example of tactical play using a Knight pair!

If you needed some convincing to follow our advice for raising your game, in particular the necessity to keep records, this game should be an incentive for you to do that! You never know when a future chess historian will discover a gold nugget in the archives of the games you played!