We showed you a game to illustrate how chess strategy and chess tactics are to be tied together to secure a win in a game of chess. In that game, you saw the strategies adopted by each player and the tactics deployed to fulfill those strategies. But the superlative skill of Capablanca found ways and means to exploit the slight weaknesses in opponent’s position to carve out a win.
To reinforce your understanding of the importance and inter-relationship between chess strategy and chess tactics, we are analyzing below another game where the first part is all about strategy and the next part shows the tactics that went with it.
The game is interesting because of the way Black continued to fight and tried to come up with his tactical ripostes. But the way White kept on coming up with tactical attacks one after another, leaving his pieces including Queen en prise, makes this game one of the best examples of chess combinations!
| 1. | d4 | Nf6 | ||
| 2. | c4 | g6 | ||
| 3. | g3 | Bg7 | ||
| 4. | Bg2 | d5 | ||
| 5. | cxd5 | Nxd5 | ||
| 6. | Nc3 | Nxc3 | Going by the principles of chess strategy, Black’s Knight makes one move too many and after making three moves, gets exchanged with White’s Knight that has taken its first move! This retarded Black’s development while permitting White to bring more support to d-pawn, making his development faster. As shown in following moves, further support could be brought in, making the d-pawn well-protected. | |
| 7. | bxc3 | c5 | ||
| 8. | e3 | 0-0 | ||
| 9. | Ne2 | Nc6 | ||
| 10. | 0-0 | cxd4 | ||
| 11. | cxd4 | e5 | Black’s effort to challenge White’s control of center misfires as White’s next move gives him more space and restricts Black’s pieces | |
| 12. | d5 | Ne7 | ||
| 13. | Ba3 | Re8 | ||
| 14. | Nc3 | Qa5 | ||
| 15. | Qb3 | e4 | You can see the greater development of White pieces and that enables White to meet Black’s attempts to wrest control of center. | |
| 16. | Nxe4 | Nxd5 | If 16. … Bxa1 17. Rxa1 Nxd5 18. Rd1 and if the Black Knight moves, White can play Nf6+. Moreover, exchange of Black’s KB makes his King’s position vulnerable. | |
| 17. | Rac1 | Be6 | ||
| 18. | Rc5 | Qb6 | If 18. … Qd8 19. Rd1 results in material gain for White | |
| 19. | Rb5 | Qa6 | ||
| 20. | Nc5 | Nxe3 | 20. … Qd6 21. Nxe6 or 20. … Qc6 21. Nxe6 fxe6 22. Rxd5 exd5 23. Bxd5+ wins the Queen. So Black decides to counterattack! 21. Nxa6 Bxb3 22. fxe3 Bc4 23. Nc7 Bxb5 24. Nxb5 Rxe3 gives Black an equal position | |
| 21. | Nxe6 | Nxf1 | Against White’s 22. Nc7 Black is ready to reply 22. … Nd2 | |
| 22. | Ng5 | Nd2 |
Position after Black’s move 22
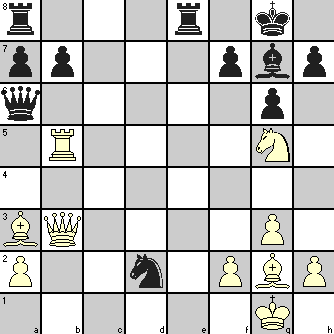
| 23. | Qxf7+ | Kh8 | ||
| 24. | Bd5 | h6 | Do you recognize ‘Philidor’s Legacy’ in the position after White’s 24th move? White was threatening 25. Qg8+ Rxg8 26. Nf7#, hence Black created a retreat for his King | |
| 25. | Bb2 | Rg8 | White’s Rook and Knight are en prise, but Black has no time to look at those because of other threats posed by White! | |
| 26. | Qd7 | Qa4 | 26. … hxg5 27. Qh3# or 26. … Qxb5 27. Nf7+ and 28. Qxb5 with all White pieces protected. With the text move, Black threatens 27. … Qd1+ 28. Kg2 Qf1# | |
| 27. | Bb3 | Nxb3 | ||
| 28. | Nf7+ | Kh7 |
Position after Black’s move 28
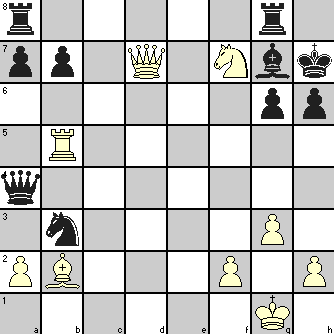
| 29. | Rh5 | Qa5 | 29. … gxh5 30. Qf5# or 29. … Qxd7 30. Ng5+ Kh8 31. Rxh6# or 29. … Bxb2 30. Ng5+ Kh8 31. Qh7# or Rxh6#. Black probably hoped to lure the White Rook away with the offer of his Queen! | |
| 30. | Rxh6+ | Resigns | 30. … Bxh6 31. Ng5# |
Other Interesting Related Posts you should read: