Category Archives: Chess Tutorials

Chess Openings: the most popular ones

0
Filed under Beginner Chess Tips, Chess lessons, Chess Opening, Chess Tutorials, General Chess
Tagged as , , ,

As all chess games start with a first move by White and then Black has to decide on his response. It is not surprising that the most common questions from beginners are related to the openings they should adopt when playing as White and the appropriate responses when playing as Black.

In 10 steps to raise your game, we discussed about the general issues that should be considered in taking such decision. You should also be familiar with the principles of good chess strategies as the opening moves lay the foundation of the kind of game you are likely to have with its advantages and disadvantages.

All chess openings aim to achieve certain strategic targets as have been discussed in Chess
Strategy and Chess Tactics in a nutshell
as also in Classical Opening Principles in Chess. But as your opponent also has his targets which will try to nullify yours, it is not possible to achieve all the ideal strategic goals unless your opponent is playing badly! Normally, you gain advantages in some areas while conceding some to your opponent. The theoretical ideas behind the openings from both White’s and Black’s sides try to balance these gains and losses.

When playing as White, you will naturally try to play the opening moves that give you a decided advantage. But if your opponent is as good as you are, he will obviously not allow you to follow those lines and choose his moves to take you to areas that give him at least equality at the end of the opening phase. So whatever you may adopt as the opening of your choice, learn the underlying ideas and play to fulfill those to the extent possible. The same goes for you playing as Black in preparing the responses against White’s moves.

After saying all these, we are now giving a list of the most popular opening moves by White and corresponding responses by Black as per the basic data available at Wikipedia but spread over its different pages. What we have done is to make a gist by combining those data to give you a kind of ready reckoner for the most popular combination of first moves by White and Black and the ECO codes that relate to those first moves. We have included only those first moves which are estimated to occur in at least 2% of the games used by Wikipedia to prepare the statistical data. It appears that the following set of first moves cover 86% of the games.

White’s 1st move Black’s response Frequency ECO codes Nature of Game
e4 c5 18% B20-B99 Semi-open
e4 e5 11% C20-C99 Open
e4 e6 6% C00-C19 Semi-open
e4 c6 3% B10-B19 Semi-open
e4 d6 2% B07-B09 Semi-open
e4 d5 2% B01 Semi-open
d4 Nf6 20% A45-A79, D70-D99, E00-E99 Semi-closed
d4 d5 10% D00-D69 Closed
d4 e6 2% D31-D49 Semi-closed
Nf3 Nf6 5% A05 Flank opening
Nf3 d5 3% A06-A09 Flank opening
c4 Nf6 2% A15-A19 Flank opening
c4 e5 2% A21-A29 Flank opening


You can understand that after these first moves, the subsequent moves can take you to a wide variety of openings as apparent from the number of ECO codes shown against each set of first moves. The nature of game that may arise is only a broad indication. From the applicable ECO codes, you may choose one or several lines of play that most suit your personal preferences.


Revisiting some old chess strategies: Utilizing ‘the Square’

0
Filed under Chess Basics, Chess Strategy, Chess tactics, Chess Tutorials
Tagged as , , ,

We are quite sure that all of you studied basic geometry in your school days. Among the first few theorems you studied, there was one that said: sum of any two sides of a triangle is greater than the third. You believed it to be universally true, didn’t you? Well, let me prove that it is not true for some parts of your chessboard!

two sides equal one

Let us consider the triangle formed by the squares a1, d4 and a7. If your King is sitting on a1, how many steps does it need to reach a7 walking along the a-file? Let us count: a2-a3-a4-a5-a6-a7, total 6 steps. Now let it go along the other two sides, a1-d4 and d4-a7, and count: b2-c3-d4-c5-b6-a7, total 6 steps again! Have I proved my point?

Some of you must be wondering what the point is in all this and others may be downright annoyed about such a silly proposition. But if you bear with us, we can tell you that keeping the above in mind can help you to tackle successfully many chess problems involving King and Pawn endings, either for a win or for a draw.

Take the simplest chess endings with a King and Pawn for both sides but positioned near opposite edges of the chessboard. You may have to follow a strategy of keeping options open for your King to move to either edge depending on the tactical plan of your opponent. The chess tactics for you will be to maintain a middle path till your opponent makes that critical move disclosing his plan and you can accordingly move your King to the required side.

middle of the road keeps options open

The above diagram shows the principle behind such tactics. The square a7 can be reached in same number of steps from either a4 or d4 but if you need to move midway to the other edge, you can move to h4 in three steps from d4 against seven steps from a4. We hope you understand the merit of such tactics. If you think carefully, you will realize that the concept of the square lies behind this chess tactics.

To make it clear with an example, we draw your attention to the endgame position described in Chess tactics in end games. For easy reference, the position is reproduced below where White with first move can snatch an ‘impossible’ draw!

White to move and draw

You can see the comments against the moves in the referred article – here we only show how the ‘square’ boundary changes with each move by Black Pawn. We also show how the White King’s area of effective influence ultimately comes in contact with his own pawn and intersects the ‘square’ of the Black pawn (indicating the possibility of capture) after his 3rd move (Fig. 3).

figure1   figure2
figure3   figure4
figure5   figure6

The triggering action was Black’s 3rd move (Fig. 4). This move disclosed Black’s intention to promote his pawn, so White King veered towards his own pawn (Fig. 5) to promote it likewise. Had Black captured the White pawn at this stage (3. … Kxc6) leaving his own pawn at h4, White King would move towards the Black pawn. White King would be able to step into the Square (refer Fig. 3) by playing 4. Kf4 and it would also be able to capture the Black pawn. White’s strategy ensured a draw either way.

Remember that the above chess tactics can be applied in many other endgame positions, not necessarily only the King and Pawn types. You only have to remember this type of chess tactics of moving the King along a diagonal.


Analyzing a position to create combinations

0
Filed under Attacking tactics, Chess lessons, Chess tactics, Chess Tutorials
Tagged as , , , , ,

In Working out Chess Combinations, you could work out an eight-move combination by identifying the strengths and weaknesses of both sides and to some extent worked your way backwards to find the moves that created the winning combination. But in the previous examples, there were quite a few pieces on board and the mobility, at least for some pieces, was restricted so that you could eliminate a good number of possibilities.

In the problem that we are posing now, there are only a few pawns and some heavy pieces on the board which is open to both sides for moving respective Queen and Rook. In fact, many beginners get daunted by such positions because they think that there are too many moves possible for their Queen and Rook and taken together with the responses from opponent’s Queen and Rook, the number of combinations may be overwhelming! Let us now examine if we risk getting bogged up in the maze of moves!

finding combination in an open game

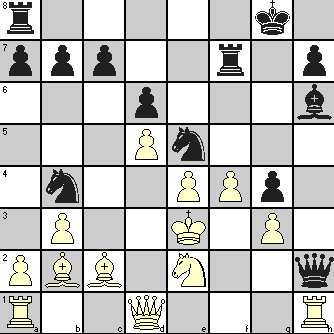
I do not have to say who has got the move because if it were White, this discussion would not be necessary. With Queen and Rook on the seventh rank, it is only a matter of two checks by the Queen to checkmate the Black King. But Black having the move, you have to be acutely aware that Black cannot let go of checks if aforesaid action by White has to be stalled. You should also note that in absence of Black Queen and Rook from their base rank, Rb8+ by White is enough to checkmate Black King.

If you consider Qc4+, you know that White Queen cannot interpose by Qe2 as in that case Rd1+ mates the White King (the Queen being pinned cannot capture the Rook). So only option for White is to move the King and e1 is the only escape square available for that. But then Black’s only move is Rd1+ and after Kxd1, he can try Qd3+. Of course White cannot play Kc1 (you work that out), but Ke1 allows still one more check by Qd2+. The White King has to move to f1 but further check by Black at d1 or d3 allows White to interpose with his Queen (by Qe1 or Qe2). After this, Black soon runs out of checks and that puts paid to further resistance by Black. So this line is not tenable.

That leaves Black with only Rd1+ when White’s only option is Ke2. If Black now tries Rd2+, White King can retreat to previous position and Black has nothing left but a draw by repetition of moves. But will you be that desperate for a draw before exploring other options?

You can see that Qg4+ supports the Rook and allows White only two options:
(i) move King to e3 (i.e., Ke3)
(ii) interpose with pawn by f3

It may look that Ke3 is not viable as Black can play Re1+ to capture White Queen. But can Black do that? As soon as Black plays a non-forcing move like Rxe7, White’s Rb8+ leads to checkmate of Black King!

On Ke3 by White, Qd4+ forces the King to move to f3, as Ke2 allows Qd3# mate by Black. With King at f3, Black’s Rd3+ forces King to e2 (you should think why interposition by White Queen at e3 is now futile) but next check by Rd2+ brings King back to f3. Now Black’s Qxf2+ drives the King into the wide open and it should be possible for you to keep checks going with Queen and Rook for a checkmate if King remains on e-file, but if it moves towards g-file, a pawn check at appropriate time ends the White King’s journey!

What about the other option of interposing by pawn move f3? Trying to guard the diagonal, White exposes the King along rank 2 and Black can play Qxg2+! White cannot take the Rook as that would allow checkmate by Qd2#. So the only move for White is Ke3. On Qd2+, the King is forced into the open by its only move Ke4. Black keeps pressure on by Qd4+ and King is driven into the hands of the Black pawns and Black Rook can also attack by Rg1+ when King moves to g-file. You can certainly work out the rest.

So you are now sure that after Black’s first move of Rd1+ in the diagram position, White King cannot avoid checkmate whatever it may do.

In the actual game, played between Heinrich Wolf and Jacques Mieses at Monte Carlo in 1902, White chose the option (ii) at his 30th move and Black delivered checkmate after another 5 moves.

So far as this and the examples in related previous articles on chess combination are concerned, we could find the way by following a methodical approach. But I also told you that such system may not work universally. Situations where a combination came out of the sheer brilliance of a mind and could not be seen even by a Grandmaster opponent, such analysis may not show the way beyond a certain step. This is particularly true where a move makes sense only when seen in context of subsequent moves and the brilliancy is realized by taking all these moves together. The following example is a case in point.

a famous combination

The position shows that Black has one Bishop less but he has two passed pawns extra, one being only two moves away from promotion. Black Rook at a5 is in a position to capture the Bishop at e5 and also to move to a1 for capturing the Queen. Obviously, it is White’s move now and he has to tackle these threats, possible only by forcing moves on Black King to retain a tempo. On the plus side, White has Rook and Queen lined up on f-file and if the line can be opened, he can plan his assault on Black King, possibly with help from his Bishop attacking the g7 pawn and the Rook at c3 moving up to 7th or 8th rank when it can do so. But while working out the attacking plans, White cannot afford to lose a tempo, otherwise Black will launch his counter-attack as described above.

It is easy to see that White can play Ng6+ creating a fork on the Queen and White will be obliged to capture the Knight with f-pawn. White in turn can play fxg3 thereby opening the f-file and the discovered check retains tempo with White. It is apparent that Black cannot play Ke8 (because of White’s Rf8+ and Qf7#) or Ke7 (due to White’s Rf7+ / Qf5+ / Bg3+ / Qd3#). So the only possible move by Black that does not lose immediately is Kg1.

If White plays Rf7 with intention to play Rxg7 leading to mate, Black can counter this by capturing the Bishop with Rxe5 and threatening Re1 next, when White’s plans fall through. Were White’s Rook not standing in his Queen’s way, Qf7+ would be possible but as it stands now, White cannot afford to lose tempo by playing Rf7.

This far could be analyzed through a systematic approach, but can White take his initiative forward beyond this point? It is very difficult to imagine and needed real brilliance by White to make this a famous combination because of his next two moves!

You may give it a try before going through the following moves.

From the diagram position, the game proceeded as follows:

1. Ng6+ fxg6  
2. fxg6+ Kg8  
3. Rc8! Rxc8   The move by White together with his next move were difficult to anticipate
 
4. Rxc2! Rf8   White’s move cleared f-file for Queen while retaining the tempo.
White’s Rook cannot be captured because of the threat Qf7+ leading to mate.
 
5. Rc8 Qe7   White keeps attacking the f7 and f8 squares and Black tried to counter these threats
 
6. Qc4+ Kh8   6. Bd6 can be countered by 6. … Ra1+
 
7. Qh4 Ra1+   Black has nothing better to do as 7. … Qxh4 allows Rxf8#
 
8. Bxa1 Qe3+   desperation!
 
9. Kh1 Rxc8   While starting on his combination, White must have seen that Black has no more check after his King moved to h1.
10. Qxh5+ Kg8  
11. Qh7+ Kf8  
12. Qxg7+ Ke8  
13. Qf7+ Kd8  
14. Bf6+ 1-0   Checkmate is inevitable on White’s next move


Working out Chess Combinations

0
Filed under Attacking tactics, Chess lessons, Chess tactics, Chess Tutorials
Tagged as , , , ,

In the first article on Chess Tactics: Method Approach to Calculating Combinationson, we shared our ideas on how to proceed systematically for analyzing a situation for its inherent possibilities. The subsequent step is to work out our next sequence of moves which comprises a chess combination. The whole game of chess is expected to consist of many such nodal points where each node is planned (hopefully!) to yield some advantage, however microscopic it may be. In accumulating these advantages as we proceed from node to node, we expect at some stage to have enough to give us a win – well, that is the general idea!

While describing some suggested methods, we showed a simple example on how to put the ideas into practice. Continuing on the theme in Looking to find the best chess combination in a middle game position, we took up two slightly more complex positions and tried to apply the method for finding out the actual moves that were played over the board.

We will now examine another position and see how far our methods can help to reach the goals we seek. In the position shown below, Black has the move and we will try to figure out his best course of action.

a Morphy combination

You notice that in terms of material, White has a huge advantage because of his Queen against a Bishop. But look where the Queen is! Excepting for a support to the Rook at f1, a defensive role, it serves no useful purpose and could as well be not there on the board! White QB has become a bad Bishop, being blocked in by the White pawns in front and the QR position is no better. Only the KR has scope of some activity but, for now, it has taken away one escape square for the totally exposed White King in case of a Rook check from g6 along the open g-file. In such event, the King perforce has to move to h1.

You also realize that Black’s Rook at e8 can freely move to e1 when necessary to attack the White King on its base rank, provided the White Rook can be made to leave its present rank. Black’s KB can also join the battle any time by capturing the f2 pawn under certain situations. In a nutshell, Black should be able to force White’s surrender – all it needs is to find the sequence of moves!

When White is forced to move his King by Kh1 because of Black’s Rg6+, a check by Black’s QB from g2 (i.e., Bg2+) would force White to play Kg1. The Bishop then captures the f3 pawn (i.e., Bxf3) to deliver a discovered check from the Rook at g6 and White King has nowhere to go (assuming his Rook remaining at f1).

To enable Bg2+, Black needs to play Bh3 after White’s Kh1 and this, inter alia, attacks the Rook at f1 also. White has only two options:
(i) play Rg1 for capturing the Black Bishop when it comes to g2, or
(ii) play Rd1 to vacate the f1 square for the King’s escape from the discovered check.

We can disregard White’s move like Qd3 to attack the Rook at g3, as it can easily be nullified by Black playing f4 (White could still try Qc4+ but Black’s Kh8 puts an end to it), and then Black can continue with original plans.

If we probe further, we can see that if White plays Rg1, Black could still play Bg2+. This is because, as we noted earlier, the move Rxg2 makes the Rook leave the base rank allowing Black to play Re8+ which becomes decisive!

So the first option (Rg1) is ruled out and we have to consider White’s Rook move to d1. Black can go ahead as before but now White King can move to f1. In this position, Rook at g6 can move to g2 for playing Rxf2+ on next move. White King cannot go to e1, so it has to go back to g1. Black then plays Rg2+ which creates double check by Rook and Bishop and irrespective of King’s move to f1 or h1, it is checkmate by Rg1#.

But what if White plays Qxb6 to stall White’s Rxf2+? No problem, Black captures Rxh2 and White cannot prevent the coming Rh1#.

We can now write down the moves:


1. …        Rg6+
2. Kh1     Bh3
3. Rd1     Bg2+
4. Kg1     Bxf3+
5. Kf1      Rg2
6. Qd3     Rxf2+     (6. Qxb6   Rxh2   7. any   Rh1#)
7. Kg1     Rg2++
8. Kf1      Rg1#

See how you could work out a combination comprising 8 moves! Only thing is that the actual player of Black pieces did not have to think this long to work it out. I am quite sure of it, seeing that he was none other than Paul Morphy! I come nowhere near Morphy, so I can be excused! However, Morphy played the moves a little differently and you can play through the game at any online archive to see how he did it.

Louis Paulsen, who played as White and was among the top five players of that period, propounded the idea that any brilliant attack would fail against correct defense. This idea found acceptance with Steinitz, a future World Champion. But the curious point is that Paulsen failed to prove his idea in this game played at New York in 1857!


Looking to find the best chess combination in a middle game position

2
Filed under Attacking tactics, Beginner Chess Tips, Chess lessons, Chess tactics, Chess Tutorials
Tagged as , , ,

In my view, all chess players get some inspirational ideas from time to time enabling them to produce that game of a lifetime! But since you will like to win on other days also, you cannot solely depend on that stroke of imaginative tactical ideas. You have to find some ways to make your perception work for you to produce, if not a brilliancy, at least a good combination or chess tactics whereby you get an upper hand over your opponent. In Chess Tactics: Method Approach to Calculating Combinations, we presented some methodical approach to find chess tactics that can yield better results on an average.

Lest you come to a wrong conclusion of this being a surefire way to create your combinations, we again stress that the method approach to chess tactics may not be possible for all situations by average players. In several earlier discussions, we have shown where even top Grandmasters could not find the winning move in a particular situation. You may go through Chess Tactics: The role of memory to see how Smyslov failed to find the move that enabled Chigorin to win in a similar situation 40 years earlier.

One of the reasons of failing to see some combinations is our mental block on certain possibilities. A Queen is such an important piece that we automatically assume that when the Queen is under attack by a Pawn/Knight/Bishop/Rook, the defender will try to protect it. That the Queen may have been marked for a sacrifice generally escapes our mind.

Let us see if the method approach would enable us to find the combination employed by Nezhmetdinov against Polugayevsky in the diagram position that was discussed in Importance of chess strategy – Part 2.

preparing for a Queen sacrifice

In the referred article, you have seen how the game proceeded after White had accepted the Queen sacrifice. Let us see if we can find what prompted Black to make the sacrifice.

Using the system we discussed in Chess Tactics: Method Approach to Calculating Combinations, what can you see in the above position? What are the escape squares for White King? Only d2 and d4, but d2 will not be available if the White Knight moved, which can be induced by an attack on the f4 pawn in the firing line of Black’s Bishop and Rook. Once the Knight moves, Black King loses the escape hole at d2 and now a check by Nxc2+ will take away d4 also. So the King gets checkmated unless White Queen is forced to capture the Knight by Qxc2, and that means losing the Queen because of Black’s Qxc2 with mate threat still looming large!

Therefore, you would expect White to capture the Queen, may be just because it is available (!) or because of seeing through aforesaid combination. After Black plays Rxf4, White has to decide between capturing Black Queen or Black Rook! We have seen how capturing the Rook affects White (he may resist moving the Knight by playing gxf4 but then Bxf4+ leaves no alternative!) and so we would bank on White’s Rxh2. We need not break our head on further analysis as Nezhmetdinov showed the way! (Refer Importance of chess strategy – Part 2)

Are we getting somewhere in using this type of method approach? Let us take up another example to see if it helps there also.

finding a mating combination

On previous move, White QB captured a pawn at f4, forcing Black to move his Queen from h6 to e6. It is White’s turn now. It will be apparent that Black is not posing any worthwhile threat. Black King has only three escape holes at f7, h7 and h8 in case of a check along g-file, possible by Rxg7 and then by Rg1 (after the King captures the Rook). White Queen can move to h5 square with check to deny all those three squares to Black King if it moves to f7 and Black’s Queen and other pieces are unable to prevent it. If the King tries to move to f6 instead of f7, White Bishop can move to e5 to deliver double check and that is the end of it. So the moves are clear:


1. Rxg7+     Kxg7
2. Rg1+       Kf7
3. Qh5+       Kf6
4. Qg6#

In the actual game played between Lasker and Teichmann at St. Petersburg in 1909, Teichmann resigned after White’s Rxg7+ as he could see what was coming.