Category Archives: Chess Strategy

Chess Opening: Control of Center – Part 1

2
Filed under Beginner Chess Tips, Chess Basics, Chess lessons, Chess Opening, Chess Strategy
Tagged as , , ,

The theory behind all chess openings is to control the center comprising the squares d4, e4, d5 and e5, and the development of pieces that goes with it. Control of the center by one player helps him to position his pieces more effectively while thwarting the development of opponent’s pieces. You can easily imagine that such a control with its associated benefits can facilitate your win to a great extent.

This control can be achieved in three ways:

  • Firstly, by occupying those squares with your pawns and pieces.
  • Secondly, allowing your opponent to occupy the center and then attacking and undermining the position.
  • Lastly, exerting control from a distance by means of pieces like Knights and Bishops without directly occupying those center squares.

This control of a square is also known as ‘applying pressure’ on the square by threatening to capture any enemy pawn or piece that may venture to occupy the square.

In Chess Openings: the most popular ones, we tried to show you the most common first moves at the start of a chess game. But you must have noticed that the baker’s dozen of most popular types can ultimately lead to hundreds of different openings, going by the ECO codes that incorporate those opening moves. If you examine any of these openings through the moves that follow, the theme of center control will become apparent by the use of one of the three opening tactics described above.

To see how the different chess openings aim to achieve center control and their pros and cons, let us check four types which are related to the most frequent first moves described in Chess Openings: the most popular ones. Incidentally, two of these openings start with pushing the KP (1. e4) and the other two with QP (1. d4), so a fair representation is made!

We will examine with reference to the following openings:

1. e4-c5 (Sicilian Defense)
2. e4-e5 (Ruy Lopez)
3. d4-Nf6 (Nimzo-Indian Defense)
4. d4-d5 (QGD or Queen’s Gambit Declined)

However, since Ruy Lopez has been discussed earlier in Chess Opening basics: Ruy Lopez, we will examine the other three in this and the next article.

Sicilian Defense:
It has become the most popular choice at master level as it eminently suits a fighting player with Black pieces. As can be seen from the number of ECO codes, there are many variations possible, but here we will consider the Najdorf variation which has become very popular with players like Fischer and Kasparov going for it in a big way.
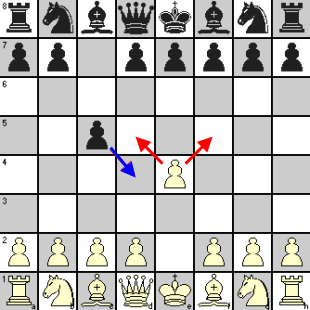
sicilian1
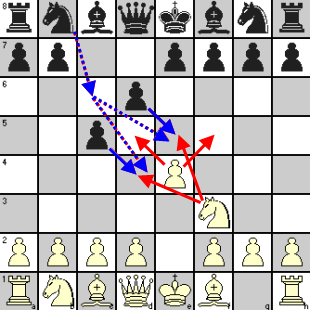
1. e4 c5   White wants to control the central square d5. Black in turn applies pressure on d4 against advance of White’s QP.
 
sicilian2
2. Nf3 d6   White creates his own pressure on d4 and also on e5. Black’s pawn move opposes this pressure on e5. Here, Black could also play Nc6 which would counter the White KN’s influence. Retaining a control on d5 is a key theme for Black in Sicilian defense in order to free his position by moving his QP to d5.
 
3. d4 cxd4   White does not want to lose initiative, so goes ahead with his QP advance and Black immediately captures the pawn to deny White the hold on the center squares.
 
sicilian3
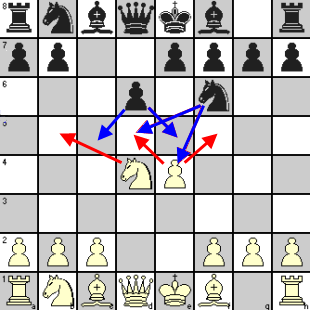
4. Nxd4 Nf6   White recaptures and positions his KN on a center square. White gets control of half-open d-file while Black gets half-open c-file as also a pawn majority at center. Black now develops his KN threatening White’s KP and exerting pressure on d5.
 
sicilian4
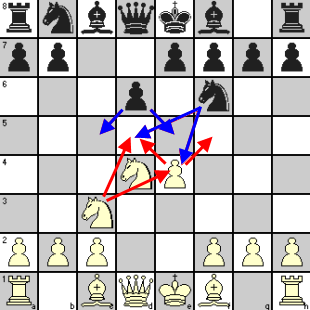
5. Nc3   White counters Black’s plans by bringing out his QN which gives support to his e4 pawn and bolsters his hold on d5.
 
sicilian5
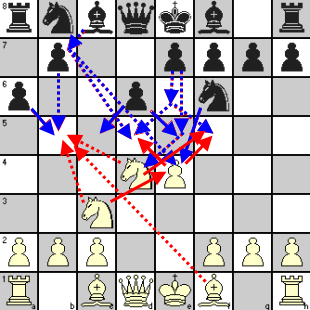
5. a6  


For the first time, Black seems to have deviated from the struggle for the center through this defining move for Najdorf variation of Sicilian Defense. What is the idea behind this apparent deviation?

By this move, Black denies b5 square to White‘s Knights and KB. It also prepares for Black’s pawn move to b5 to start a Queenside action and positioning his QB to b7 from where it can bring pressure on d5 square and White’s e4 pawn.

After this, White may generally choose from the sharpest line with 6. Bg5 to quieter, positional games with 6. Be2, and others lying in between like 6. Be3, 6. f3, and 6. Bc4. But further analysis of all those moves will take us into a full discussion of Sicilian Defense, which was not the idea behind this article. We only wanted to show how any opening theory tries to achieve center control and if you understand the means and follow the principles, you will be in the right lines without a need to memorize too many moves!

In next two parts of Chess Opening: Control of Center, we will see how this is achieved in two popular QP openings viz. Nimzo-Indian Defense and Queen’s Gambit Declined.
Revisiting some old chess strategies: Utilizing ‘the Square’

0
Filed under Chess Basics, Chess Strategy, Chess tactics, Chess Tutorials
Tagged as , , ,

We are quite sure that all of you studied basic geometry in your school days. Among the first few theorems you studied, there was one that said: sum of any two sides of a triangle is greater than the third. You believed it to be universally true, didn’t you? Well, let me prove that it is not true for some parts of your chessboard!

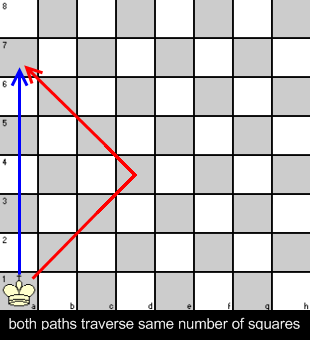
two sides equal one

Let us consider the triangle formed by the squares a1, d4 and a7. If your King is sitting on a1, how many steps does it need to reach a7 walking along the a-file? Let us count: a2-a3-a4-a5-a6-a7, total 6 steps. Now let it go along the other two sides, a1-d4 and d4-a7, and count: b2-c3-d4-c5-b6-a7, total 6 steps again! Have I proved my point?

Some of you must be wondering what the point is in all this and others may be downright annoyed about such a silly proposition. But if you bear with us, we can tell you that keeping the above in mind can help you to tackle successfully many chess problems involving King and Pawn endings, either for a win or for a draw.

Take the simplest chess endings with a King and Pawn for both sides but positioned near opposite edges of the chessboard. You may have to follow a strategy of keeping options open for your King to move to either edge depending on the tactical plan of your opponent. The chess tactics for you will be to maintain a middle path till your opponent makes that critical move disclosing his plan and you can accordingly move your King to the required side.

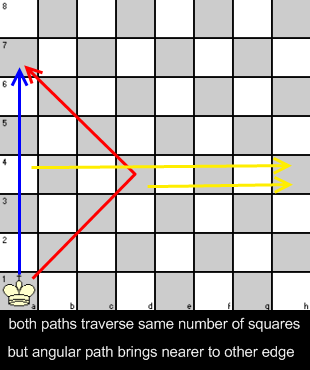
middle of the road keeps options open

The above diagram shows the principle behind such tactics. The square a7 can be reached in same number of steps from either a4 or d4 but if you need to move midway to the other edge, you can move to h4 in three steps from d4 against seven steps from a4. We hope you understand the merit of such tactics. If you think carefully, you will realize that the concept of the square lies behind this chess tactics.

To make it clear with an example, we draw your attention to the endgame position described in Chess tactics in end games. For easy reference, the position is reproduced below where White with first move can snatch an ‘impossible’ draw!

White to move and draw

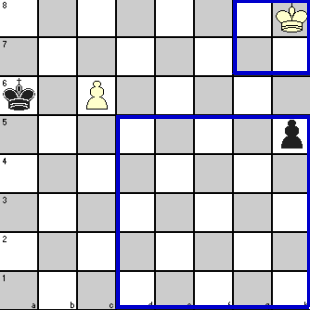
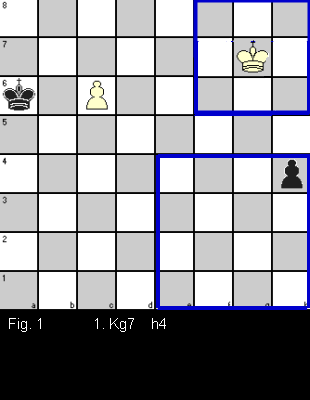
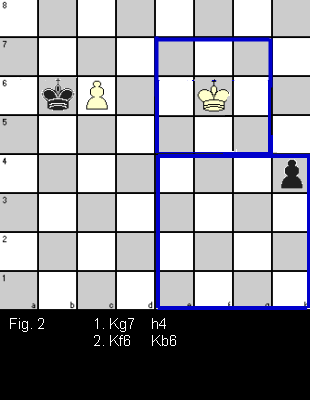
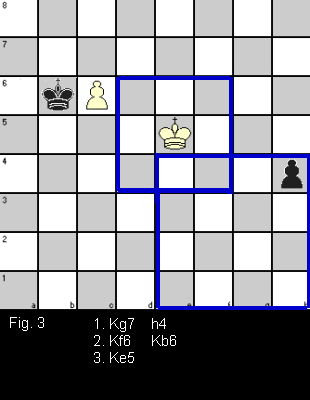
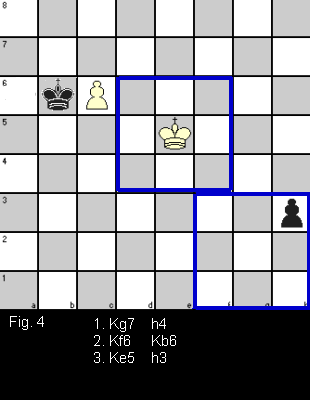
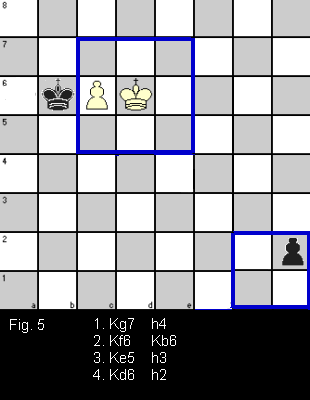
You can see the comments against the moves in the referred article – here we only show how the ‘square’ boundary changes with each move by Black Pawn. We also show how the White King’s area of effective influence ultimately comes in contact with his own pawn and intersects the ‘square’ of the Black pawn (indicating the possibility of capture) after his 3rd move (Fig. 3).

figure1   figure2
figure3   figure4
figure5   figure6

The triggering action was Black’s 3rd move (Fig. 4). This move disclosed Black’s intention to promote his pawn, so White King veered towards his own pawn (Fig. 5) to promote it likewise. Had Black captured the White pawn at this stage (3. … Kxc6) leaving his own pawn at h4, White King would move towards the Black pawn. White King would be able to step into the Square (refer Fig. 3) by playing 4. Kf4 and it would also be able to capture the Black pawn. White’s strategy ensured a draw either way.

Remember that the above chess tactics can be applied in many other endgame positions, not necessarily only the King and Pawn types. You only have to remember this type of chess tactics of moving the King along a diagonal.


Chess Tactics: should some of them be prohibited?

2
Filed under Attacking tactics, Chess Basics, Chess lessons, Chess Strategy, Chess tactics, Endgame Tactics
Tagged as , ,

Though I said ‘some’ but actually I meant one that goes under a German name and seems to have been in use in German chess literature since since early ninteenth century. It is supposed to have been introduced in English chess literature in early twentieth century by Emanuel Lasker, himself a German!

The word I have in mind is zugzwang. I understand that ‘zug’ means move and ‘zwang’ means ‘compulsion’, so the combined word means ‘compulsion to move’. Essentially, a player is said to be under zugzwang when any move that he makes will make his position worse and not to move would be the best move. But chess rules do not permit a player to skip move and the affected player under compulsion to move is committing a kind of ‘suicide’ by his move! Are you getting my point now? Suicide goes against the laws in most countries of the world and forcing another man to commit it is still more heinous! Shouldn’t therefore be a law against zugzwang (and wouldn’t the victims agree)?

Enough of chatter, can we see some example you will say. Though this is a potent weapon in chess endgames, it can occur at any time.

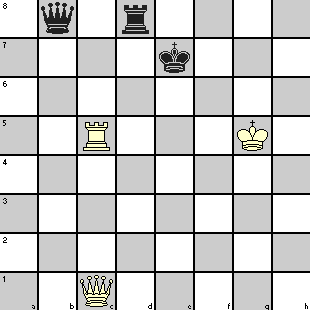
We first see an endgame problem that, though a very simple one, teaches you what zugzwang is and was created by French composer Henri Rinck (1870-1952) who was arguably the World’s Greatest Composer of chess problems.

a simple zugzwang

White has to play and win in the position shown. The moves are:

1. Rc7+ Rd7  
2. Qc5+ Kd8   2. … Ke6 3. Qf5+ loses the Rook
3. Kh6  


Black has the move and he is in zugzwang as any move makes him lose. Let us see what some of his options are:

King moves:
3. … Ke8 4. Qe5+ Kf7 5. Rxd7+ Kf8 (or Kg8) 6. Qxb8#

Rook moves:
3. … Rxc7 4. Qf8+ Kd7 5. Qxb8 wins.
If Black’s Rook leaves his second rank without any check, White will play 4. Qe7#

Queen moves:
3. … Qxc7 4. Qf8#.

Black Queen cannot deliver any viable check and trying to remain in contact with c8 square only enables its capture by White. If it loses contact with c8 square, White plays 4. Rc8#.

There are many other options available to Black and we have left it to you to find how the correct move (very important) by White in all the situations result in his winning the Black Rook or Queen or both, or delivering checkmate to the King.

You will notice that putting opponent in zugzwang is preceded by an idle (sometimes blocking) move by the attacker that forces the defender’s hand. In above example, 3. Kh6 was such a move.

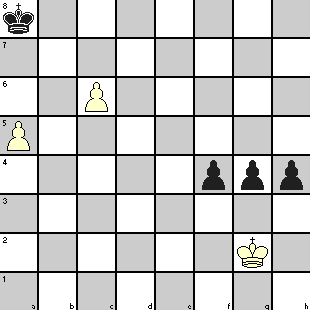
Now that you have seen a simple one, here is another problem which is slightly more complex. This is a very old problem but quite instructive as similar position may arise in one of your endgames also. White is to play and win.

a little more complex zugzwang

With two isolated pawns against three connected pawns, White may appear to be at a disadvantage but White’s winning line is as follows:

1. a6 Kb8   Black King had to move to prevent 2. c7
 
2. Kg1 f3   The idle move Kg1 to wait and watch is the only move that wins for White by creating zugzwang on Black
 
3. Kf2   White’s strategy is simple: move the King to face whichever Black Pawn has advanced. Once that Pawn gets blocked, Black has to move another Pawn. In the meanwhile, Black King cannot move either way without allowing the other White Pawn to promote! You may try with other Pawn moves to verify the tactics.
3. h3  
4. Kg3 h2  
5. Kxh2 f2  
6. Kg2 g3  
7. Kf1  
7. g2+  
8. Kxf2 g1=Q+  
9. Kxg1 Kc7   With no more pawn to move, Black King is forced to take the move it was trying to avoid.
10. a7 Kxc6  
11. a8=Q+   White wins.


Because of its unusual nature, it is a popular theme for chess compositions and Susan Polgar’s blog of July 1 has a problem on this topic.

In Chess Tactics: Some more applications of Zugzwang, you will see a third problem and a game where this tactics was used.


Chess Tactics: Attacking castled King with the classic Bishop sacrifice Part 4

0
Filed under Attacking tactics, Chess Strategy, Chess tactics, Featured Chess Tips
Tagged as , , , , , , , , , , , ,

Position of white pieces

Before considering the sacrifice of light squared white bishop, it has to be ensured that:

  • the light squared white bishop is in the diagonal b1-h7 and there should not be any pieces hindering the movement of the bishop to h7 – if this is not fulfilled, there is no possibility for this attack at all in the first instance
  • There is no necessity that the bishop should capture the pawn at h7 – I mean there is no compulsion that the pawn should be there in h7. It is not even a necessity that the bishop should give a check on the black King. In other words, the King may not be at g8 square in some occasional cases.
  • the white knight should have been placed within the easy reach of the g5 square to give check on the black King when it captures the light-squared white bishop; in other words, the white knight should be either in f3 or h3 or in e4
  • The White queen should be capable of reaching h5 square, if possible, or else should be able to move to the “h” file

Position of black pieces

The position of the black pieces should meet the following guidelines:

  • Pieces should be there in the f7 and g7 squares.  In most cases, it would be only the pawns; but in certain cases, the dark-squared black bishop might be In g7
  • If the black queen and the rook occupy the d8 and f8 squares, then it would be ideal and the probability of attack on castled king sacrificing the bishop at h7 will be successful
  • It has to be ensured that the Black Knight is not anywhere near the f6 square and cannot be moved to that square instantly.
  • There should not be any threat for the b1-h7 diagonal from black’s Queen or light-squared bishop.

White has to ensure that the above conditions are completely met before embarking on this attack on the black King by sacrificing the light squared bishop.

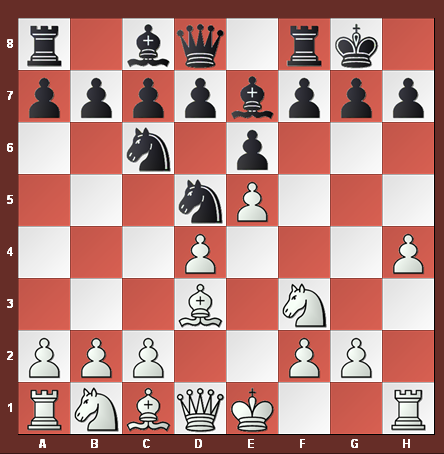
Lastly one of the variations you might be interested in looking at with reference to following diagram seen in Part 1 of this series:

1stsacimage

(White to move)

7. Bxh7+ Kh8  
8. Ng5 g6 White needs to move Knight to open d1-h5 line. 8…g6 tries to prevent White’s 9.Qh5
 
9. h5 Bxg5 Hoping for 10.Bxg5 Qxg5 11.hxg6 Nf4
 
10. hxg6 Nf4 Trying to prevent 11.Qh5
11. Bxf4 Bxf4  
12. Bg8+ Kxg8 12… Kg7 gives same result
 
13. Qh5 1 – 0 Checkmate on next move 14. Qh7# or 14.Qh8# depending on Black’s 13th move

Chess Tactics: Attacking castled King with the classic Bishop sacrifice Part 2

0
Filed under Attacking tactics, Chess Strategy, Chess tactics, Featured Chess Tips
Tagged as , , , , , , , , , , , ,

In Part 1 of Chess Tactics: Attacking castled King with the classic Bishop sacrifice, we looked at the main variation of the bishop sacrifice in Part 2 we will look at some of the possible variations.

Variation #1 – Capturing the Knight by dark squared black Bishop

bishopcapture

7. Bxh7+ Kxh7
8. Ng5+ Bxg5
9. hxg5+ Kg6
10. Qh5+ Kf5
11. Qh3+ Kg6
12. Qh7# 1 – 0

 
Variation #2 – Moving the King to h6

kingh6

7. Bxh7+ Kxh7
8. Ng5+ Kh6
9. Nxe6+ …. Here the black Queen is lost following a discovered check from Bishop at c1

 
Variation #3 – moving the king to g6

kingg6

7. Bxh7+ Kxh7
8. Ng5+ Kg6
9. h5+ Kh6
10. Nxe6+ …. Discovered check and threat on black Queen

 
Variation #4 – moving the king to f5 after g6

kf5move

7. Bxh7+ Kxh7
8. Ng5+ Kg6
9. h5+ Kf5
10. g4# 1 – 0

 
All the variations lead to one conclusion – victory to white led by the sacrifice of the light-squared bishop at h7. The attacking prowess of the bishop is unleashed at its entirety in the attacking of the castled king.

Ironically, the Greco’s sacrifice of the classic bishop sacrifice, which was recorded as early as 1619 in Greco’s handbook, was systematically reviewed and in 1911 by E. Vollemy. Since then, this classic bishop sacrifice is occasionally used as an attacking option, especially by the player playing white pieces.

Continue reading Part 3 of Classical Bishop Sacrifice….