Tag Archives: Attacking tactics

Chess Sacrifice as a Chess Tactics: to gain time to attack

Filed under Attacking tactics, Chess lessons, Chess tactics
Tagged as , ,

In Chess Sacrifice as Chess Tactics, you have read that gaining tempo or time for attack is one of the chess tactics derived through a sacrifice when such offer cannot be refused without bringing other problems. The move spent in capturing the offered piece loses vital time for the opponent and the player employing the sacrifice uses the time gained to launch his own attack.

The game chosen as an example was played at Dusseldorf in 1908 between Jacques Mieses and Karel Treybal.

Jacques Mieses (1865-1954), a German Jew moved to England to avoid persecution by Nazis and when FIDE brought out the chess title system in 1950, Mieses became the first British Grandmaster. He was an attacking player with many brilliant victories.

You have already read about Karel Treybal in Chess Sacrifice as a Chess Tactics: forcing the King to a path of doom. In that article, we listed a good number of better-known players who were subdued by his attacking flair and Mieses was one of them. Here is a game that illustrates such an occurrence and also demonstrates how a piece is sacrificed to gain momentum for an attack.

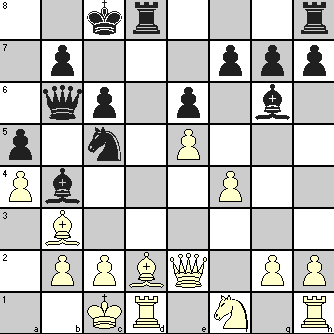
If you play through the game, you can see how both the players, when facing an attack, retaliated with counter-attacks giving rise to a very absorbing tactical game. The position shown in the diagram is after White played 24. Nd5.

sacrifice to gain time

24. Bxh3   25. Bxh3 Nf3+ wins the White Q
25. c4 Bg4  
26. Re3 Nd4   Black is targeting White’s vulnerable f3 square
27. Bxd4 cxd4  
28. Re4 Bf5  
29. c5! Qxd5  
30. Rxe5 Qxe5!   Must have come as a surprise! The Q is exchanged for a Rook and Knight but Black was banking on the open Bishop diagonals and open e-file and f-file for his Rooks to get adequate play as compensation.
31. Rxe5 Rxe5  
32. Qb4 Bc8  
33. Bxb7  


Black seems to be in trouble. If 33. … Bxb7 then 34. c6 Rb5 35. Qxf8+. But White possibly did not anticipate Black’s reply!

33. a5!   Now White is in trouble. If 34. Qb5 then 34. … Bxb7 is possible because of 35. c6 Rxb5
 
34. Qxa5 Bxb7   The RP sacrifice by Black has gained vital tempo for Black
35. g4 Rg5  
36. Kh2 Rxg4  
37. Qb5 Rg2+  
38. Kh3 Rc2!  
39. Kh4 Rf4+  
40. Kg5 Rxc5+  
41. Qxc5 Rf5+  
42. Qxf5 gxf5  
43. Kxh5 Ba6   White resigned as after 44. Bxd3, White cannot stop one of the d-pawn and f-pawn from promotion.


Chess Sacrifice as a Chess Tactics: to open files or lines of attack

Filed under Attacking tactics, Chess lessons, Chess tactics
Tagged as , ,

Among the purposes listed for chess sacrifice in Chess Sacrifices as Chess Tactics, this is one of the most frequent of such uses and may occur sometime or other in a majority of chess games. The lines of attacks that are opened are usually diagonals for Bishops or files for Rooks or either type for the Queen. It is also common occurrence to see a sacrifice of a Bishop to open files for Rooks or Queen, and sacrifice of a Rook to open diagonals for Bishops or files for other Rook or Queen. In certain circumstances, even the Queen may be sacrificed if that brings a quicker checkmate by allowing easy passage for other pieces along the opened lines. Of course we are not excluding the sacrifice of pawns or Knights from the ambit of such chess tactics.

You need not think that such an attacking tactics ends with sacrifice of a Bishop or a Rook or something simple like that. There are famous attacking games involving double Bishop sacrifice or double Rook sacrifice or sometimes even more. Cornering the opponent’s King is the ultimate aim, so the attacking player can afford to give up everything that can clear his way to that goal.

The game used as example here shows a double Bishop sacrifice to open lines for Queen and Rook. It was played by Koltanowski against Defosse in the 1936 Belgian Championship match held at Ghent.

Georges Koltanowski (1903-2000) was awarded IM titile in 1950 and honorary GM in 1988. He was a Belgian Champion, but later moved to USA and became the President of USCF from 1975-1978. Marcel Defosse was the pseudonym of Denis Marion (1906-2000) who was noted as a literary person with a passion for chess. He co-authored with Frits van Seters a book titled “Le Jeu d’Echecs. Manuel du Débutant” (The Game of Chess: Guide for Beginners) published in 1945.

The diagram shows the position at the end of 19 moves.

preparing for double bishop sacrifice

20. Rad1 b4  
21. Be5 Bd6   Purpose of White’s 21st move will be clear, when you see his 26th move!
 
22. Bxh7+! Kxh7   The Bishop sacrifice opens the h-file
23. Qh5+ Kg8  
24. Bxg7! Kxg7   The second Bishop sacrifice opens the g-file.
If 24. … f6 then 25. Qh8+ Kf7 26. Bxf8 Bxf8 (if 26. … Rxf8 then 27. Qh7+ Ke8 28. Rxe6+) 27. Qh5+ Ke7 28. Qh7+ Kd6 29. Rxe6+ wins Black Q
Alternatively 24. … f5 25. Rxe6 Kxg7 26. Qh6+ Kg8 27. Rg6+ Kf7 28. Rg7+ Ke8 29. Rxc7 Bxc7 30. Qe6#
25. Qg5+ Kh7  
26. Rd4 Bh2+   If Black KB had not been diverted from c5 square by White’s 21st move, the 26th move would not be possible!
27. Kh1 Qf4  
28. Rxf4 Bxf4  
29. Qxf4 Rg8  
30. Re5 Resigns   White threatens mate in two.
If 30. … Rg6 then 31. Qh4+ wins the Rook on d8
If 30. … Kg7 then 31. Qg5+ Kh7 32. Qf6 Rg7 33. Rh5+ Kg8 34. Qxd8#


This game and similar others involving such Bishop sacrifice, besides being enjoyable, are also quite instructive. If you can identify the pattern that leads to such sacrifices, you may be able to deploy it in some game where your opponent is not wise to such possibilities!


Chess Sacrifice as a Chess Tactics: gaining space for attack

Filed under Attacking tactics, Chess lessons, Chess tactics
Tagged as , ,

Making out a chess game as a war on the chessboard, can you first tell why in these days of missiles, artillery, aerial attacks and so on, the infantry still holds such an important position in any army? The rockets and gun-shells can annihilate but they cannot win territory, for that you need the infantry who go forward and occupy vacated space. Moreover, when the enemy retreats preparing for a defensive strategy, the heavy armaments have to move forward to keep the enemy in range and so they need advancing space controlled by your infantry. Of course the infantry in turn needs the support of all the heavy firepower, otherwise they become just fodders for enemy cannons.

To draw a simile, the pawns are the infantry which go forward to occupy and control more space on the chessboard. They need support of the other pieces for doing this and the space gained in turn helps the pieces to go in for the killing attack on the opponent King’s position.

I hope I have been able to convey the importance of space in launching chess attacks. The plan to gain space is an important chess strategy and the way you move your pawns and supporting pieces constitute the chess tactics to realize that aim.

You will find all the brilliant tactical masters in chess like Frank Marshall, Mikhail Tal and Rashid Nezhmetdinov tried to create more space for their pieces. They would unhesitatingly sacrifice one or more pieces just to create that space for their other pieces.

The masters who have been successful against these attacking players knew about this tactics. To prevent such attacks, they adopted the strategy of denying that space and used a tactical play aimed at closing the positions through blocked pawns and pieces. They would go through many maneuverings and positional play to frustrate the attacking players, induce them to overreach and then take opportunity of the mistakes to gain the upper hand.

All this was to make you aware of the chess strategies you need to follow for offensive and defensive play. If you are bent on the attack, you must be prepared to use sacrifices to break open the positions. This was one of the uses of sacrifice as discussed in Chess Sacrifices as Chess Tactics.

After all that talk, let us see practical example of how sacrifices are used as chess tactics to create space and how that is utilized to launch successful attacks.

In the Chukaev-Tal game at the 1956 tournament at Tbilisi from which the following position has been taken after 13 moves, you will agree that White was really ‘asking for it’ by his inopportune castling! Nonetheless, it is worth noting how Black immediately swooped in to take advantage of it.

sacrifice to gain space

14. f3 Nb4   Black decided to sacrifice the Bishop to get more space on the Q-side for his attacking chances


White was probably more concerned with the two Black Bishops controlling the diagonals to his King’s castle. If White could anticipate the problems going to be created by Black’s Knight move and tried to prevent it by 14. a3, it would be met by 14. … Qb3 with the idea of moving the Queen to a2 for checkmate at b1.
If White tried 15. Bd3 then 15. … Bxd3 16. Qxd3 Qxb2#
Other alternatives:
15. f3 Qa2 16. fxe4 Qa1+ 17. Kc2 Qxb2+ 18. Kd3 Qb3+ 19. Qc3 Qxc3#
15. Rde1 Qa2 16. Bd3 Bxd3 17. Qxd3 Bxb2+ 18. Kd1 Bxa3 and Black is two pawns up.

Let us see how Black created the space and utilized it for launching his attack.

15. fxe4 Nxa2+  
16. Kb1 Nc3+  
17. Kc1 Nxe4  
18. Qc2 Nxg5  
19. Nf3 Nxf3  
20. Bxf3 a5  
21. Rd3 a4  
22. Re1 Qb4  
23. Re7 Rfe8  
24. Rxe8+ Rxe8  
25. Kb1 b5  
26. Ra3 Re1+  
27. Ka2 Qxa3+   The last surprise!
28. Resigns   If 28. Kxa3 or bxa3 then 28. … Ra1#


The other notable point is the Black QN’s journey along a6-b4-a2-c3-e4-g5-f3 on successive moves and is a classic example of a Knight maneuver that helped to create space for Black’s Q-side attack.

A typical attacking game from Tal.


Chess Sacrifice as a Chess Tactics: Removing the important defensive piece

Filed under Attacking tactics, Chess lessons, Chess tactics
Tagged as , ,

In part 2 of Chess strategy and chess tactics in a nutshell, among the tactics and combinations that can be used against the opponent during the middle game, we suggested identifying the weaknesses in the opponent’s position to selectively target them. Amongst the possible targets, the most important defensive piece was named as one such target. In Chess sacrifices as Chess Tactics, we took up this point and indicated that a chess sacrifice to remove an important defensive piece or to draw it away to open lines of attack is an established chess tactics. We will examine an example from master games to see the application of such attacking chess tactics.

Here, we will look at the game between Salo Landau (1903-1943) and Salomon Flohr (1908-1983), played at Bournemouth in 1939.

Salo Landau was born in Poland but was sent to Netherlands when the Landau family fled the Russians in 1914. Among the chess players in Netherlands, he was ranked no.2 after Max Euwe and became the Dutch champion in 1936 in absence of Euwe who had become the World Champion by that time. Landau was capable of beautiful combinations and won the First Brilliancy Prize for his game against Eero Book (1910-1990), the Finnish champion, in the tournament at Kemeri in 1937. Tragically, like Treybal whose game you have seen in Chess Sacrifice as a Chess Tactics: forcing the King to a path of doom, Landau and his wife and daughter became victims of Nazi atrocities, losing their lives in concentration camps.

In the early 1930s, Salomon Flohr was one of the strongest players in the world and as the Czech champion had a celebrity status in his country. During Second World War, he fled to USSR to escape the Germans and became a Russian citizen. He was awarded International Grandmaster title in 1950. He made important contributions to the theory of many chess openings.

The position in the following diagram has been taken from the referred game after completion of 28 moves.

trying to remove the defender

You can see that the position is open for both the players. Black has just moved his Q to d6 to take control of d-file with his Q and R lined up on the White KB and the Queen also provides support to his important defensive piece viz. the Knight on f6.

But White Q and KB have got the open b1-h2 diagonal to the Black King’s castle and his doubled rooks on the g-file are very menacing for the Black King’s position. In fact, to face this threat, Black brought his Rook to g8 in his previous move. White’s QB is also lined up on the long semi-open a1-h8 diagonal with Black’s Knight in its firing line.

This is how the game developed from this position.

29. Bh7 Nb4 White was trying to draw the Knight away with the offer of a piece sacrifice to open the a1-h8 diagonal for his QB.
29. … Nxh7 30. Rxh7 (threatening Qxh7# on next move)
30. … Nf6 31. Rh7#
or
30. … Rxg7 31. Bxg7+ Kg8 32. Be5+ loses the Queen
30. Qf5 g6
31. Bxg8 gxf5 Other possibilities were:
31. Bxg6 Rxg6 32. Rxg6 fxg6 33. Bxf6+ Kg8 34. Qxg6+ Kf8 35. Qg8#
or
31. Bxg6 fxg6 32. Rxg6 Rxg6 33. Qxg6 Qf8 34. Bxf6+ Qxf6 35. Qxf6+ Kh7 36. Qg7#
 
32. Rg7 Ng4 With the Knight pinned, White was threatening 33. Rh7#
 
33. R7xg4+ f6 A quicker end was 33. Rh7+ Kxg8 34. Rh8#
34. Rg7 Rd7
35. Rxd7 Resigns White threatened 36. Rh7#
If 36. … Qxd7 then 37. Bxf6+ Qg7 38. Rxg7 followed by 39. Rh7#


In keeping with the theme of present article, White first tried to use the chess tactics of offering a piece sacrifice to draw the defending Knight away. But when Black refused to tread that way, White used the Queen to force the g-pawn to move as Black had to cut the communication between Q and KB. In the process, Black’s defending Knight got pinned and could not play any effective role in guarding the castle. White did not hesitate to sacrifice his Queen for reopening the g-file for his Rook pair, as these together with the Bishop pair had enough play to corner the opponent’s King. White Knight made a futile move to block the Rooks but by that time Black had practically no defense left!

What a smooth-flowing attack by Landau!

Chess Sacrifice as a Chess Tactics: Attacking the enemy King

Filed under Attacking tactics, Chess lessons, Chess tactics
Tagged as , ,

If a picture is worth a thousand words, an example is worth a thousand explanations! In Chess Sacrifices as Chess Tactics: Think before you leap!, we have told you what considerations may come for making a chess sacrifice and the first one was to threaten checkmate of the enemy King. Let us see from master games some examples of chess attacks with sacrifice to achieve this objective.

For your learning exercise, I suggest that you try to find out the move by observing the diagram position before looking at the actual play given below the diagram. You at least know (the opponent player was less fortunate!) that a sacrifice is coming in a move or two!

Here is a position after 22 moves, taken from Reti-Bogolyubov game played in 1924 (with White to move next, making preparation for a sacrifice!):

planning bishop sacrifice as prelude to checkmate

Except that White’s Queen and Bishop are more actively poised compared to their counterparts, the position at first glance does not look bad for Black. But see what lies beneath by going through the subsequent moves.

23. Rf1 Rd8   Alternatively, 23. … Qe7 24. Bf7+ Kh8 25. Bd5 which threatens 26. Qxf8+ while preventing 25. … Rd8
If now 25. … Qf6 then 26. Qc8 and Black’s position is hopeless!
24. Bf7+ Kh8  
25. Be8 Resigns   Offer of Bishop sacrifice by White to get checkmate!
If 25. … Rxe8 then 26. Qxf8+ Rxf8 27. Rxf8#
If 25. … Bxc5+ then 26. Qxc5 Rxe8 27. Qf8+ Rxf8 28. Rxf8#
If 25. … h6 then 26. Qxf8+ Kh7 27. Bg6+ Kxg6 28. Qf5#


In the last example, you saw a Bishop sacrifice to get a checkmate threat. In the following position taken after 16 moves from a 1934 game between Monticelli and Fine, you will see a Rook sacrifice to get a checkmate. as played by Black on his next move.

prelude to rook sacrifice for checkmate

You can see that except for KR, all other Black pieces are ready to attack White King’s position whereas White’s pieces are only playing a defensive role. If you remember the objectives of a chess sacrifice, using it to start an attack after enough accumulation of power to sustain it could also be applicable here.

In the position shown, if 17. Bxb4 then 17. … Rxd1+ 18. Qxd1 Nxb3+ 19. cxb3 Qxb4 with a winning position for Black.

The game proceeded as follows.

17. Qe3 Rd3   The Rook sacrifice!
18. cxd3 Nxb3+  
19. Kc2 Bc5   With 19. Kb1 Nxd2+ 20. Ka2 Qxe3 ( 20. Rxd2 Qxe3 21. Nxe3 Bxd2) 21. Nxe3 Bxd3, Black gets a winning advantage.
 
20. Qh3 Nd4+   20. Qe1 Nd4+ 21. Kc1 Qb3 22. Ne3 Qxd3 leads to mate.
 
21. Kc1 Qb3   21. Kb1 Qb3 also wins for Black
 
22. Ne3 Ne2+   22. Ne3 Qxd3 mates in two moves.
23. Kb1 Bxd3+  
24. Resigns   24. Ka1 (or Ka2) Qxa4#


In our planned series of article on using chess sacrifice as an attacking chess tactics, we will see examples of how the other objectives described in “Chess Sacrifices as Chess Tactics: Think before you leap!” were attained in actual play.