On the principle of ‘practice makes perfect’, after you have learned about zugzwang and its application in Chess Tactics: should some of them be prohibited?, we bring you two more examples, one an endgame study and the other from actual play.
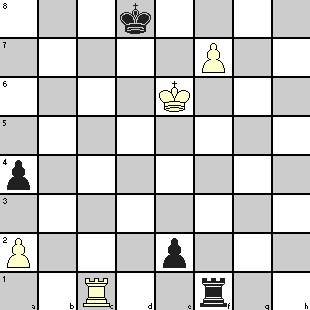
The following diagram shows a study which is slightly more elaborate than the previous examples in the sense of having both pieces and pawns.

White to play and win.
You can see that both White’s KBP and Black’s KP are one step away from promotion. But White’s first move apparently does not give any benefit because of following problems:
- 1. f8=Q Rxf8 2. Re1 Re8+ after which White Rook’s attempt to capture Black’s KP (with support from the King of course) will result in exchange of Rooks and a draw.
- 1. Rxf1 exf1=Q and it is Black who will win!
- If White Rook leaves 1st rank, Black Pawn will promote
- 1. Rb1 e1=Q+ 2. Rxe1 Rxe1+ and Black wins again
Well, you have now probably guessed the move after above options have been ruled out.
The solution is:
| 1. | Re1 | Rf2 | On 1. … Rxe1 2. f8=Q+ Kc7 3. Qc5+ Kd8 4. Qa5+ (3. … Kb7 4. Qb4+), Black loses Rook |
|
| 2. | a3 | This blocking move takes away Black’s options and puts him under zugzwang! | ||
| 2. | … | Rf1 | ||
| 3. | Rxe2 | Rf3 | ||
| 4. | Rd2+ | Kc8 | ||
| 5. | Rd5 | Kc7 | ||
| 6. | Rf5 | Re3+ | ||
| 7. | Kf6 | The Pawn will promote on next move. |
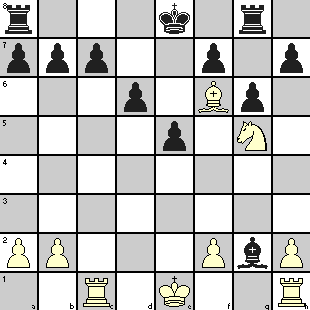
We now give you an example from actual play that took place in a 1953 Danish tournament between A. Kupferstich and J. Andreassen.
Nothing much could be found about A. Kupferstich except that he was part of Danish team in 9th Chess Olympiad held at Dubrovnik in 1950 and also represented Denmark in several friendly matches during 1947-1955. Except that J. Andreassen was a player from Denmark, I could find nothing more about him.
The diagram shows the position after 20 moves.

Though White has an extra Knight, he has four pawns less and his Kingside pawns are isolated. His Rook is under attack and it is natural to expect him to play 21. Rg1 after which Black would play 21. … Bc6 protecting his weak c7 pawn. But White possibly felt that he would have a much better attacking prospect with his Knight and Bishop close to enemy King if he could position his Rook on the 7th rank by capturing the c7 pawn instead of trying to protect his Rook at h1!
This is how the game rolled on.
| 21. | Rxc7! | Bxh1 | ||
| 22. | Nxf7 | Bd5 | Black tried to guard f7 square because of 23. Nxd6+ Kf8 24. Rf7# | |
| 23. | Nxd6+ | Kf8 | ||
| 24. | Bg5 | Rh8 | Black tried to create an escape hole against 25. Bh6+ with mate to follow. | |
| 25. | Bh6+ | Kg8 | ||
| 26. | Rg7+ | Kf8 | ||
| 27. | Rc7+ | Kg8 | Poor Black King had no other go! White could have reduced his agony somewhat by playing 27. Rxb7+ straightaway, unless he was running slow on his clock! |
|
| 28. | Nc8 | Bc6 | Of course 28. … Rxc8 29. Rxc8+ Kf7 30. Rxh8 leaves Black a solid Rook down. | |
| 29. | Rg7+ | Kf8 | ||
| 30. | Rxb7+ | Kg8 | ||
| 31. | Rg7+ | Kf8 | ||
| 32. | Rxa7+ | Kg8 | All these moves can be taken as a demonstration of the power of discovered checks! | |
| 33. | Rxa8 | Bxa8 | ||
| 34. | Nd6! | Resigns | The ‘zugzwang’ move! |
The Knight and Bishop totally immobilizes the Black King and Rook. Black has to helplessly wait for an execution by a final Knight check at e7 or f6.
Even in this position, the game holds interest as White’s task is not easy. He still has to deliver checkmate as stated above but cannot afford to move the Knight till his King is positioned at e6 or f6 or e7 to prevent Black King’s escape when the Knight is moved.
Black’s strategy will be to push his pawns forward till those get captured at e3 and g3. Then he will use the Bishop to prevent White from carrying out his Knight maneuver and also try to capture both White pawns if they try for promotion. If White captures the Bishop, Black can claim stalemate.
What should White do? He should capture Black’s e- and g-pawns and move his King to e6 or f6 or e7. The Knight can then deliver check via (e4-f6 or e8-f6) or (c8-e7 or f5-e7).
Black knows that if White King is at e7, only (e4-f6 or e8-f6) is possible for Knight and Bishop positioned at c6 blocks these moves. If White King is f6, only (c8-e7 or f5-e7) is available to the Knight and Bishop can go to any square on c8-h3 diagonal to block those. Only if the King is at e6, all four options become available, but Bishop can check from d7 or d5 (remember that the Bishop is taboo!) to force White King to f6 or e7.
Assume that White King has reached f6. The Bishop has to be at d7 to guard c8 and f5 and to keep eye on White pawns. So White keeps pushing one of the pawns forcing the Bishop to leave its post to capture the pawn which otherwise gets promoted. The Knight can then move to c8 or f5 to deliver checkmate on next move.
It is possible to win even if White did not have those pawns, but that is another story!
No discussion on zugzwang is complete without reference to “The Immortal Zugzwang Game” between Friedrich Samisch and Aron Nimzowitsch played at Copenhagen in 1923. You have to play it yourself to see its beauty.


Trackbacks/Pingbacks