In Chess sacrifice to threaten mate you have seen examples of how sacrifice is used as an attacking chess tactics to bring about a quick checkmate. Where the opponent King’s position does not permit such direct threat, forcing the King into open for further attack can be an alternative tactics employing a sacrifice. Examples of such attacks you saw in Chess sacrifice to drive the King into open. In this article, we look at examples where sacrifice was used to break open the castle walls which are mostly made up by the pawns in front of the castled King. Once the walls are breached, it becomes easy for other pieces to get access for delivering the final checkmate.
You must of course note that in many cases, you do not get to see the checkmate when the opponent throws his pieces and pawns in the way of attacking forces to avoid that position. This is only delaying the inevitable because the ruinous loss of material can only lead to a defeat ultimately.
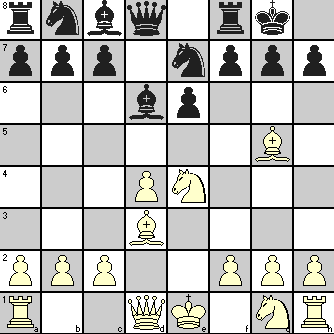
The following position was reached after 6 moves and you can see that Black is in all kinds of trouble because he handled the opening poorly. He is in a cramped position with most of his pieces undeveloped. Against that, White’s Bishop pair, QN and Queen have enough free spaces to create trouble for the Black King. But having a good position is one thing, using that advantage to create a winning attack is something else. Here White precipitates the situation by using offer of piece sacrifice to remove the pawns making up the King’s castle and then moving in to deliver checkmate!

The game proceeded:
| 7. | Nf6+ | gxf6 | Alternatively 7. … Kh8 8. Qh5 h6 9. Bxh6 gxf6 10. Bg5+ Kg7 11. h7# |
|
| 8. | Bxf6 | Qd7 | To be able to reply against 9. Qg4+ with 9. … Ng6 |
|
| 9. | Bxh7+ | Resigns | Because of 9. … Kxh7 10. Qh5+ Kg8 11. Qh8# |
Let us now see another example from a top level game, where sacrifices were used to open up the King’s castle, forcing him to surrender.
Schlechter (1874-1918) playing as White earned the nickname of “Draw Master” as it was very difficult to defeat him, resulting in many drawn games. But it may be an injustice to label him like that considering that in his World Championship Match against Lasker in 1910, he would have won the title if he just accepted an opportunity to draw (after he had missed a win) in the final game. But it seems that he still pressed for a win and in the process lost the game and the possible championship. The total points being equal (win:1, Loss: 1, Drawn: 8), Lasker retained the title. This action by Schlechter certainly does not fit the description of a “Draw Master”!
Maroczy (1870-1951) was a World Championship contender against Lasker in1906 but due to certain problems, the match could not be held. He is known for his idea of a strategic play against Black’s Sicilian defense whereby, after exchange of White’s d-pawn with Black’s c-pawn, White plays c4 which together with his opening move of e4 prevents Black from playing d5 to free his position. Though he is not known to have ever played this formation, it goes under the name “Maroczy Bind’ and was considered to give White a strong position.
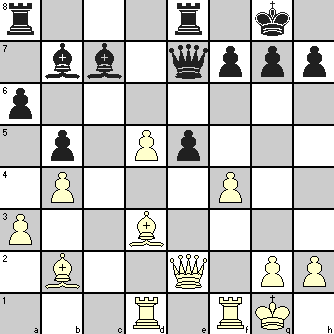
The following position after 19 moves in a 1907 game between two renowned defenders does not show that White is about to start a fierce attack through sacrifices after Black failed to appreciate the consequence of the exchange of Knights in opening up the lines of attack.
Position after Black’s 19. … Rfe8:

As per later analysis, 19. … Rae8 would give Black a better fighting chance after exchange of Queens and Bishops on e5 square. The game proceeded as follows:
| 20. | fxe5 | Bxe5 | ||
| 21. | Bxh7+ | Kxh7 | The first sacrifice to breach the wall! | |
| 22. | Qh5+ | Kg8 | ||
| 23. | Bxe5 | f6 | If 23. … Qxe5 24. Qxf7+ (made possible by Black’s incorrect 19th move) Kh8 25. Rf5 and Black will lose Queen to stave off checkmate. |
|
| 24. | Bxf6 | gxf6 | The second sacrifice lays the King bare! | |
| 25. | Rd3 | Qh7 | ||
| 26. | Rg3+ | Kh8 | ||
| 27. | Qf3 | Qf7 | White was pursuing the combination he had planned, so did not look at the possibility of 27. Qxh7+ Kxh7 28. Rf4 with mate to follow. |
|
| 28. | Qg4 | Resigns | Black is going to lose the Queen after 29. Rh3+ |


5 Comments
Hey I have two doubts in the first sacrifice…
What if black would have moved pawn in f7 to f5 to block the white bishop range just after white drew the queen to h5..
Alternatively, black could have moved his knight to g6.
Please reply at my email address….
I just can’t wait…..
And anyway gr8 blog…!!! Cheers 🙂
Rajeev can you write down the moves please I am bit confused here.
@rajeev
When we examined the possibility of 8. Qh5, White’s Knight was standing on f6 square (7. Nf6+), so Black’s f7 pawn could not move as you suggested.
White Q was threatening Qxh7# with the support from both the Knight at f6 and the Bishop at d3. Black’s Ng6 would block the Bishop, what about the White Knight?
We cannot resist the fascination of sacrifice, since a passion for sacrifices is part of a Chess player’s nature
@Jhon
Not to say the temptation of hearing the crowds cheer!
After losing the return World Championship match to Botvinnik, Tal said, “When I lost the title to Botvinnik, chess could be played quietly again!”
Trackbacks/Pingbacks