If a picture is worth a thousand words, an example is worth a thousand explanations! In Chess Sacrifices as Chess Tactics: Think before you leap!, we have told you what considerations may come for making a chess sacrifice and the first one was to threaten checkmate of the enemy King. Let us see from master games some examples of chess attacks with sacrifice to achieve this objective.
For your learning exercise, I suggest that you try to find out the move by observing the diagram position before looking at the actual play given below the diagram. You at least know (the opponent player was less fortunate!) that a sacrifice is coming in a move or two!
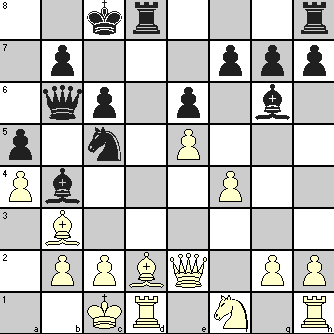
Here is a position after 22 moves, taken from Reti-Bogolyubov game played in 1924 (with White to move next, making preparation for a sacrifice!):

Except that White’s Queen and Bishop are more actively poised compared to their counterparts, the position at first glance does not look bad for Black. But see what lies beneath by going through the subsequent moves.
| 23. | Rf1 | Rd8 | Alternatively, 23. … Qe7 24. Bf7+ Kh8 25. Bd5 which threatens 26. Qxf8+ while preventing 25. … Rd8 If now 25. … Qf6 then 26. Qc8 and Black’s position is hopeless! |
|
| 24. | Bf7+ | Kh8 | ||
| 25. | Be8 | Resigns | Offer of Bishop sacrifice by White to get checkmate! If 25. … Rxe8 then 26. Qxf8+ Rxf8 27. Rxf8# If 25. … Bxc5+ then 26. Qxc5 Rxe8 27. Qf8+ Rxf8 28. Rxf8# If 25. … h6 then 26. Qxf8+ Kh7 27. Bg6+ Kxg6 28. Qf5# |
In the last example, you saw a Bishop sacrifice to get a checkmate threat. In the following position taken after 16 moves from a 1934 game between Monticelli and Fine, you will see a Rook sacrifice to get a checkmate. as played by Black on his next move.
You can see that except for KR, all other Black pieces are ready to attack White King’s position whereas White’s pieces are only playing a defensive role. If you remember the objectives of a chess sacrifice, using it to start an attack after enough accumulation of power to sustain it could also be applicable here.
In the position shown, if 17. Bxb4 then 17. … Rxd1+ 18. Qxd1 Nxb3+ 19. cxb3 Qxb4 with a winning position for Black.
The game proceeded as follows.
| 17. | Qe3 | Rd3 | The Rook sacrifice! | |
| 18. | cxd3 | Nxb3+ | ||
| 19. | Kc2 | Bc5 | With 19. Kb1 Nxd2+ 20. Ka2 Qxe3 ( 20. Rxd2 Qxe3 21. Nxe3 Bxd2) 21. Nxe3 Bxd3, Black gets a winning advantage. |
|
| 20. | Qh3 | Nd4+ | 20. Qe1 Nd4+ 21. Kc1 Qb3 22. Ne3 Qxd3 leads to mate. |
|
| 21. | Kc1 | Qb3 | 21. Kb1 Qb3 also wins for Black |
|
| 22. | Ne3 | Ne2+ | 22. Ne3 Qxd3 mates in two moves. | |
| 23. | Kb1 | Bxd3+ | ||
| 24. | Resigns | 24. Ka1 (or Ka2) Qxa4# |
In our planned series of article on using chess sacrifice as an attacking chess tactics, we will see examples of how the other objectives described in “Chess Sacrifices as Chess Tactics: Think before you leap!” were attained in actual play.


2 Comments
“Even the laziest King flees wildly in the face of a double check!”
I love this quote very much
@Raz
Nice quote! It is a fact that I can think of double check as one of the only two situations where the King has to move!
Trackbacks/Pingbacks