Category Archives: Endgame Tactics

Chess Endgame tactics: Forcing opponent’s king to move to its own doom!

0
Filed under Chess lessons, Chess Puzzles, Chess tactics, Endgame Tactics
Tagged as , ,

We have shown you a few endgame compositions which brought out some specific ideas that could very well be used in some of your endgames. Endgame studies by Grandmasters like Lasker and Reti are rich in ideas as good as in many of the games they won in tournaments.

Genrikh Kasparyan (1910-1995) won Armenian championship several times but not much success in USSR championship and so had to remain satisfied with the title of an International Master. He later realized that his forte was in creating interesting endgame studies. He was so successful in this field that FIDE bestowed him with the title of International Grandmaster of Chess Compositions, the first player to be so honored. No collection of endgame studies will be complete without some of these compositions from Kasparyan!

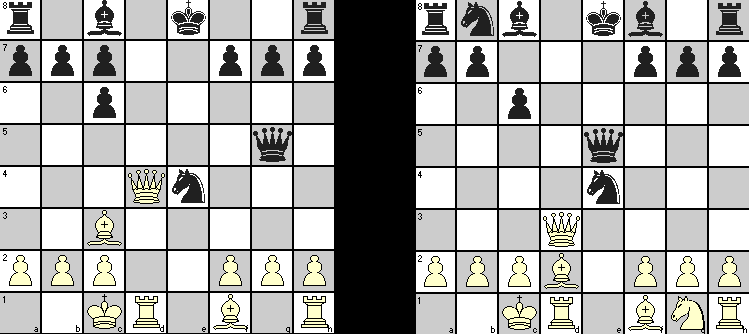
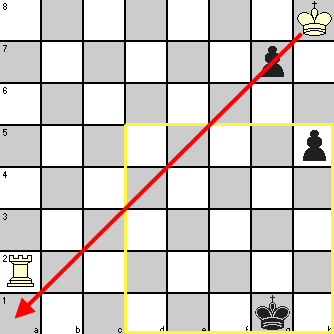
But during his playing days, he did come up with some beautiful combinations which can be appreciated from his handling of the position reached in one of his games in a simultaneous display in 1936. No comments are necessary as after the first move, all subsequent moves by Black are forced.

A combination ending in pawn checkmate

1. Rxc6 Bxc6  
2. Qc4+ Kb7  
3. Qxc6+ Kxc6  
4. Ne5+ Kc5  
5. Nd3+ Kd4  
6. Kd2 Qe6  
7. c3#  


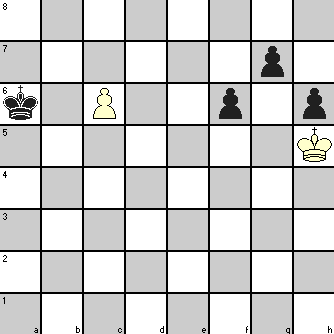
The checkmate by a pawn move may have induced Kasparyan to create studies with similar finesse. We show below one of Kasparyan’s most famous endgame studies so that you will be able to appreciate his originality in this field. White has to play and win.
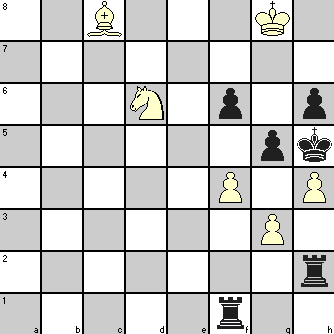
An endgame study for pawn checkmate

1. Ne8 Kg6   White was planning 2. Ng7+ Kg6 3. Bf5#
 
2. h5+ Rxh5   2. … Kxh5 enables White to implement his original plan
3. f5+ Rxf5  
4. g4 Rf4   To prevent 5. Bxf5#
5. Bf5+ Rxf5  
6. Ng7   Wins as Black has to move one of the Rooks and White’s NP captures the other Rook with check and mate.


End game Tactics: Visualizing the moves is key to tactics

0
Filed under Endgame Tactics
Tagged as , , , , , ,

The game of chess involves tactics and only tactics. Tactics need not be employed only in the opening game or the middle game. Even in end games, tactics plays a very vital role. Effective implementation of the tactics is very important. Equally important is the counter-moves. If the tactics is not properly understood and visualized, then the tactics of the opponent succeeds and you will end in the losing side.

Let us discuss an example from the World Championship tournament, which unfolds yet another interesting dimension of tactics, especially at the end game.

Given below is the position at the end of 46 moves:

White to Move

1

As is the case always in our articles on tactics, let us analyze the strengths and weaknesses of the relevant pieces.

Black has two bishops as against two white Knights and they are well centralized. The rook at b2 is also well developed. As this is an end game, bishops stand to have a better advantage than Knight. A closer look of the black pieces would also reveal that the King at c7 is vulnerable. Also the rook at e7 is very weak in that it cannot be moved to any other places other than g7.

The diagram given below depicts the same:

2

Tactics in chess is all about exploiting the vulnerabilities of the opponent, and taking advantage of those vulnerabilities.

It is the turn of the white to move. We have already considered the weaknesses and strengths of the black pieces. The black King at c7 is vulnerable. The White might consider checks and other attacking options, as it is in a weaker position and any slackness on his part might lead the black to take advantage of his bishops.

What are the checking options available to White now?

A check by Rook at d8 is one option. What will happen then?

Option #1

1 R8d7+ RxR
2 Ne6+ Kc8

By this option, nothing concrete can be achieved for by the White to gain positional advantage.

What is the next option available to White now?

A check by Rook at d3 is one more thing worth considering for giving check on Black queen.

Option #2

1 R3d7+ RxR
2 Ne6+ Kb7
(After black’s move, White finds that the black’s bishop at c5 is vulnerable and the White Knight can capture that one and give a check – Nxc5+. By doing so the Black rook at d7 is also forked by Knight)

2. ….. Kb6 (suppose if Black king moves to b6, White can consider check by rook at b8 for which the Black can block by moving the rook from d7 to b7. But White gets an interesting point worth noting. – The black’s rook at b2 might become vulnerable as well.

The two options considered above did provide interesting insights.

Among the other options available for giving check on the black King is the move by Knight to e6.

White precisely did that move, presuming that Black’s rook will capture the Knight and then pave the way for the two black rooks to attack the black queen as planned earlier.

47. Ne6+ Rxe6
48. R3d7+ Kb6
49. Rb8+ Ka6
… and the game went on with finally White winning at the end.

This illustrates the importance of tactics and the need for visualization of the moves and counter-moves, at least the next 2 or 3 moves is very essential. This is the beauty of tactics in chess.

Chess Tactics: Old wine often comes in new bottles

0
Filed under Chess lessons, Chess tactics, Chess Tutorials, Endgame Tactics
Tagged as ,

While showing you some common traps in chess, we pointed out how the same themes occur in master games at different periods of time. That is why it is important to assimilate such chess tactics and look for opportunities to apply those in your games. Of course the board situation will never be identical, but the pieces participating in such combinations will be occupying more or less similar positions. Sometimes you may have to make some preparatory moves to get the pieces where you want them if you can identify the pattern and the potential to deploy the thematic moves.

If you learned the lesson on how Bishop and Rook can combine on the eighth rank, it should not be a problem to identify the similarities between the following two positions. The first one dates back to 1864 and arose in a game between two relatively unknown players, Maczusky with White and Kolisch with Black. The second is from a game held in 1910 between two well-known Grandmasters Reti (White) and Tartakover (Black).

common themes in endgames

Do you identify the similarity between the two positions and also with the theme shown to you in the article referred above?

The games proceeded as follows:

1. f4 Qxf4+   1. Qd8+ Kxd8
2. Bd2 Qf5   2. Bg5+ Kc7
3. Qd8+ Kxd8   3. Bd8#
4. Bg5+ Ke8        
5. Rd8#        


Any discussion on endgame studies cannot be considered complete unless it includes ‘Saavedra position’. But though we did not name it, the position has been seen by you in the second problem in our article on winning chess strategies. The name comes from Saavedra, a Spanish priest, who suggested the under-promotion as the winning line in the position previously considered as ‘drawn’ and he may be the only chess player ever to become famous for a single move!

In endgame tactics, it is often easy to miss some finesse available to you or your opponent that may change the complexion of the game. Be always alert to look for such possibilities before proceeding with the moves that may seem obvious! Following is an example where Black missed such opportunity while making his move.

watch out for alternate finesse

The game proceeded as follows:

1. Rxd1+  
2. Kxd1 Rxf5  
3. gxf5 Kf3  
4. f6 Kf4  
5. Ke2 Kf5  
6. Ke3 Kxf6  
7. Kf4   White got the opposition and a drawn game


In playing above, Black missed the following line that would give him a win!:

1. Rf1+  
2. Rxf1 Rxd1+  
3. Kxd1 Kxf1   Now Black gets the opposition and wins the game!


Chess tactics: managing endgames

0
Filed under Chess lessons, Chess tactics, Chess Tutorials, Endgame Tactics
Tagged as

In the view of experts, it is in the endgame that an amateur is most likely to falter and the difference between an expert and an amateur becomes apparent during this phase. That is why we have dedicated quite a good number of articles on endgame tactics.

Knowing appropriate techniques is important no doubt, but because of the limited number of pieces on board, a player often needs to show qualities of a higher order like imagination, vision, invention, subtlety, perception of unusual possibilities etc. to come out a winner consistently. We have stressed the need to study endgames from master play in the article on chess tactics in endgames but did not discount the usefulness of studying endgame compositions by experts that brings out specific ideas you can put to use.

To see if you have learned your lesson from the article referred above, we give below another composition by the same Grandmaster, where White has to move and draw following similar principles. See if you can find the solution (given at the end of this article)!

endgame problem

In the following composition, White is required to play and win. If White tries d8=Q immediately, Black will play Rb8 forcing White to capture the Rook by Qxb8 and Black gets a draw due to stalemate!

unusual possibility in endgame

1. Nb2 Rf1+   The Knight blocked the Rook’s check on rank 8 and if 1. … Rxb2, White pawn queens. The Knight also guards d1 square against Rd1+ by Black at move 3.
2. Ke7 Re1+  
3. Kd6 Re2   If White tries 4. d8=Q, Black is ready to play 4. … Rd2+ capturing the Queen
         
4. Nc4 Re1   The Knight prevents 4. … Rd2+, so Black gets ready for 5. … Rd1+
         
5. Nb6   This wins for White. If 5. … Kxb6 6. d8=Q+ . If 5. … Rd1+ 6. Nd5 and Black cannot prevent the pawn promotion


The following position, though a composition by English chess Master Joseph Blake, can possibly occur in real games. This shows some very inventive ideas on the part of both players though White is required to play and win.

inventive ideas in endgame

The points to note for White’s move is that a check on rank 8 will mate the Black K once White K unblocks by moving to rank 7. RP of both players are ready to Queen, but White Q cannot capture Black Q on a-file as it will result in stalemate and draw.

Black on the other hand will try to force capture of his Q on a-file for reason explained above. As White tries to avoid it, Black will try to place his Q on rank 7 preventing White King’s move to that rank to unblock rank 8.

Let us see what tactics by White will overcome Black’s resistance and deliver checkmate.

1. h8=Q a1=Q  
2. Qg8 Qa2   To avoid capturing Black Q on a-file and being captured itself, White Q shifts along rank 8 and Black Q shifts along a-file to be in opposition to White Q
         
3. Qe8 Qa4   Why the White Q couldn’t go to e8 in move 2? If 2. Qe8, then Black plays 2. … Qg7 and White K cannot move to rank 7. If White tried 2. Qf8, Black would play 2. … Qa3 followed by 3. … Qd6+
4. Qd5+ Ka8  
5. Qh8   This wins. Black cannot bring his Q to a1 in opposition to White Q which can now capture Black Q with a check. If Black Q tries to give a check, White K will move to rank 7 with discovered check and mate by his Q


A lot of inventive ideas have been packed in apparently simple situation. You now understand how to consider different possibilities and to plan for taking care of those to achieve your target.

***********************

Solution to the problem:

1. Kg6 f5  
2. Kxg7 f4  
3. Kf6 f3   3. … Kb6 4. Ke5 f3 5. Kd6 ends in a draw
4. Ke6 f2  
5. c7   drawn


Chess Endgame Tactics: some fine points

0
Filed under Beginner Chess Tips, Chess Basics, Chess lessons, Chess tactics, Chess Tutorials, Endgame Tactics, Forks
Tagged as

In the article suggesting the best way to learn endgame tactics, we laid more stress on endgame plays by top players than on chess problems and chess studies. But at the same time, we pointed out that some of these problems and studies could benefit you in developing ideas on some finer endgame tactics like “underpromotion”, gaining tempo etc., some of which may appear in the same problem or study.

Here we will show you some creative ideas that can stand you in good stead in your actual endgame plays.

importance of tempo in endgame

In this study by Moravec, White is required to play and win. To decide on your tactics, you should analyze as follows:

  1. Even with the first move applied to White K to chase the Black RP, it will remain two moves outside ‘the Square’ for that pawn. So if Black continues to push RP, White K will only be on rank 3 when RP reaches h1 to get promoted.
  2. If White so wants, his K can capture the Black NP in its stride towards the RP
  3. When White K reaches g3 (after Black RP has reached h1 to become a Queen), Black on his next move cannot deliver a check by his Q with support from his K because of the White R controlling rank 2. Black thus loses a tempo!
  4. White on the next move can deliver check by Ra1 and because of his K on g3, will cause checkmate! If on the previous move, Black tried Kf1, then check by Rook will result in his loss of Q!
  5. At step 3, Black Q could go to h8 to control a1-h8 diagonal and the square a1 preventing Rook’s check (and thus retaining the tempo) – provided there were no Black P on g7 blocking that diagonal!
  6. The conclusion is: White K must not capture the NP at step 2 so as to deny Black any tempo after pawn promotion, which in turn gives him the tempo for delivering checkmate or capturing Black Q!

Once you have understood the idea, the sequence of moves become clear.

1. Kh7 h4   not 1. Kxg7
2. Kg6 h3  
3. Kg5 h2  
4. Kg4 h1=Q  
5. Kg3   White wins with 6. Ra1+


But Black had a resource that would make White’s win extremely difficult. This comes out of an attempt to gain tempo as shown below!

4. Kg4 g5   unblocks the a1-h8 diagonal
 
5. Kg3 h1=N+   The under-promotion to Knight gains tempo for Black as White K has to move. White’s K and R against Black’s K and N gives difficult theoretical win for White.


use of opposition and zugzwang

The above is a study by Lasker but this type of Rook and Pawn ending may come up in actual play. So you should note in the following moves how White combines ‘opposition’ by his King and check by his Rook to push White King away from Black’s QBP while not allowing Black to give check along any row.

1. Kb7 Rb2+  
2. Ka7 Rc2  
3. Rh5+ Ka4  
4. Kb7 Rb2+  
5. Ka6 Rc2  
6. Rh4+ Ka3  
7. Kb6 Rb2+   If 7. … Kb3 8. Kb7. If 7. … Ka2 8. Rxh2
8. Ka5 Rc2  
9. Rh3+ Ka2  
10. Rxh2   White gets Queen giving up his Rook and wins