We have discussed at length about basic chess endings with Rook and Pawn as also some special techniques for handling a few typical situations. We also said that with Rooks present, a majority of one or two pawns often do not yield much benefit and such chess endgames are more likely to result in a draw, especially if the pawns are on the same side with their Kings close at hand.
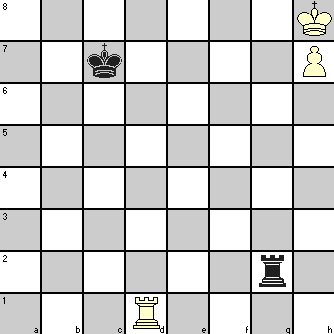
But that is only a general observation. In this article we go through the lengthy process of playing through such a situation where White thought that exact play could give him a win with his single pawn majority if he could get a passed and protected KP.

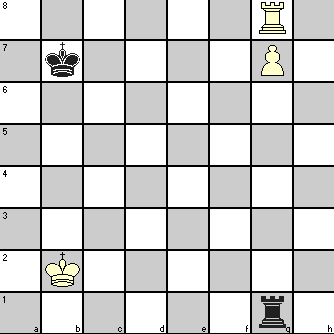
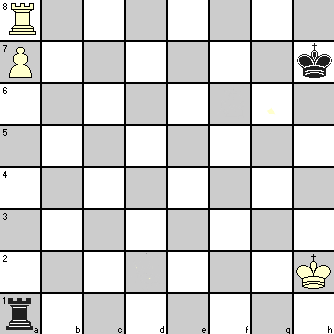
At first sight, there does not seem to be much prospect of a win for White, so let us see what exactly was in his mind! We can of course see that White King cannot advance now without losing the BP.
| 1. | Rb6 | Ra2 | White’s move blocked Black King’s support to his KBP. |
|
| 2. | Rd6 | Rb2 | Black is shuttling his Rook on rank 2 as ‘wait and watch’ policy while preventing White King from moving forward |
|
| 3. | Kg2 | Ra2 | 3. Kg3 f4+ 4. Kxf4 Rxf2+ loses a pawn for White or 3. Kg3 f4+ 4. exf4 doubles the pawns effectively giving White BP and RP against Black’s RP which is a technical draw | |
| 4. | h4 | Ra4 | ||
| 5. | Rd4 | Ra6 | Other options are worse for Black e.g., 5. … Ra2 6. Kg3 Kf6 7. Rb4 Ke5 8. Rb7 f4+ 9. Kf3 or 5. … Ra2 6. Kg3 Re2 7. Rb4 Kf6 8. Rb6+ Kf7 9. h5 Kg7 10. Rb7+ Kh6 11. Rf7 Kg5 12. f4+ Kh6 13. Kf3 wins as Black K is out of position and both Black R and BP are en prise |
|
| 6. | Kg3 | Kf6 | ||
| 7. | Kf4 | h6 | ||
| 8. | h5 | Rb6 | ||
| 9. | f3 | Ra6 | Black R cannot leave rank 6 for fear of check by White R | |
| 10. | Rb4 | Rc6 | ||
| 11. | Rb7 | Rc4+ | White was threatening 12. Rh7 followed by 13. Rxh6 | |
| 12. | e4 | fxe4 | ||
| 13. | fxe4 | Rc5 | Whie has got his passed KP. Black could possibly try Rc1 here instead of waiting till move 16 | |
| 14. | Rb6+ | Kg7 | ||
| 15. | Rg6+ | Kh7 | Black’s only move to save his RP. If White had a passed KBP rather than KP, Black could have saved the game. | |
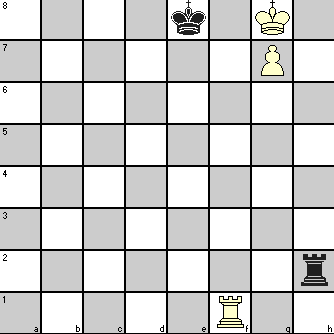
| 16. | e5 | Rc1 | ||
| 17. | e6 | Rh1 | ||
| 18. | Rg3 | Rh4+ | 18. … Rxh5 19. e7 wins for White 18. … Re1 19. Re3 Rf1+ 20. Ke5 Rf8 21. e7 Re8 22. Ke6 Kg1 23. Kd7 Kf7 24. Rf3+ followed by 25. Kxe8 |
|
| 19. | Rg4 | Rh1 | ||
| 20. | Kf5 | Rxh5+ | ||
| 21. | Kf6 | Rh1 | ||
| 22. | e7 | Re1 | 22. … Rf1+ 23. Ke5 Re1+ 24. Re4 | |
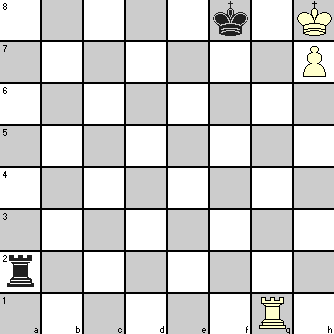
| 23. | Rg7+ | Kh8 | ||
| 24. | Rf7 | Rf1+ | ||
| 25. | Kg6 | Black is helpless. 25. … Rg1+ 26. Kh5 Rg8 27. Rf8 Kg7 28. Rxg8+ Kxg8 29. e8=Q+ Alternatively, Black R can continue giving check while the White K keep moving in zig-zag fashion between g-file and h-file till it reaches rank 2 (g6-h5-g4-h3-g2) after which Black runs out of check and White KP gets promoted. |