Category Archives: Attacking tactics

Chess Tactics: Method Approach to Calculating Combinations

0
Filed under Attacking tactics, Chess Basics, Chess lessons, Chess Tutorials
Tagged as , , , , ,

From the mails received from many beginners, it appears that they are often at a loss in finding the best sequence of moves they should follow in response to a move by the opponent. In effect, they are asking how to make the calculations for a combination (a sequence of moves to achieve a specific purpose like mating the king, winning some material, gaining space etc.).

In the opening phase, they need to understand the strategic ideas and tactical possibilities for the opening or defense they adopt. With regular practice, these can become fairly automatic response, so we presume that the problem is not for this phase of the game.

But after entering the middle game where each has to chart his own path, the aforesaid problem can surely be significant. So how does one proceed?

You must be very clear about the ideas you have been following till you reached such a stage. Whatever move supports or enhances those ideas are good, whatever takes away or counters those ideas are bad – unless the board situation makes it necessary to abandon the earlier plans and formulate new ones.

One thing is certain – you know what you have in your mind! Problem is to guess what your opponent is thinking. But you get clues from the moves that he is making and do not reject any move by opponent as silly or a mistake unless you become sure of it by observing the disposition of his pieces.

This brings us to the essence of analysis – the moves that have been played (you can see those) and moves that are going to be played (you guess those) because those will have some link to the moves played not only by the opponent but by you also. So think about the purposes behind any move and whether those are offensive, defensive or a mixture of both.

Defensive moves should be relatively easy to identify as those will try to counter threats you have posed by your moves or threats that your opponent reasonably expects you to create. When planning your attack, you may have expected these responses and decided on your counter-action. But if the response is unexpected, try to see if there is a hidden agenda of a counter-attack or creation of a new defensive resource (like a stalemate possibility) and prepare your next moves accordingly.

Offensive moves like a direct attack can be seen easily but those hidden behind some combination may often appear innocent. So, all moves other than obviously defensive ones should be analyzed for their inherent ideas.

Why did your opponent make a particular move? It may be for:

  • attacking your piece or pawn (if that is undefended, you can take defensive action but be suspicious if opponent aims at a defended piece, particularly using a piece of higher value as this may be a precursor to a sacrifice or more forces may be on the way)
  • getting a piece to a better position (may be strategic but be sure that it does not pose any immediate offensive possibility)
  • opening the line for another piece (examine if that creates attacking chances)
  • vacating a square for another piece or pawn (see which piece or pawn can occupy that vacated square and what they can achieve)
  • control of some other square (look for the piece or pawn which can occupy that square and their possible aims)
  • providing support to a piece or pawn that is not under your attack (find why he expects some action around that piece)
  • creating a decoy to lure some critical defender away (note which of your defender is targeted and then see which of your pieces or squares will suffer if that defender moves – gives you idea of where the attack may come)
  • driving your pieces away when capture is not possible (see how it can help your opponent if your piece is shifted)
  • starting a long-range pin or skewer (be aware of this whenever you see any opponent piece taking up a line to your King, or a piece of lower value is positioned in the same row, file or diagonal to your piece of higher value. Even though there may be other pieces or pawns interposing at that point of time, examine the possibility of those getting removed in some way to activate the pin.)
  • initiating the process towards discovered or double checks (these are always dangerous and forcing in nature, the presence of a piece capable of delivering check and in line with your King should alert you about such chances)
  • offering a sacrifice (be careful of the possible consequences of accepting the offer unless it is forcing, particularly in the light of possibilities listed above)

Though we have written above assuming you to be the defender, you may keep the same points in mind to plan your own attacking methods and to decide which of these will be most appropriate in a particular situation.

If you have identified some weakness in your opponent’s position and the possibility of gaining an expected advantage, you may even calculate backwards. Visualize the situation you want to achieve with your and opponent’s pieces in required positions. Then work backward on how the pieces concerned can reach those specific positions from their current locations and you have got your desired combination!

It may look simplistic and I do not claim that it is always possible, but if you can discipline yourself to think in those lines and practice such actions, these thought processes will become your second nature over a time.

A simple but concrete example may make the process clearer to you. Take a look at the following position with White to move.
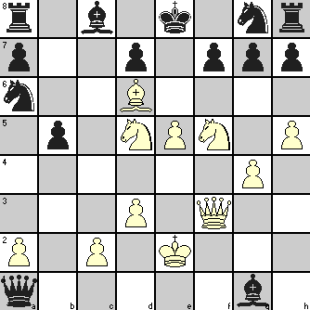
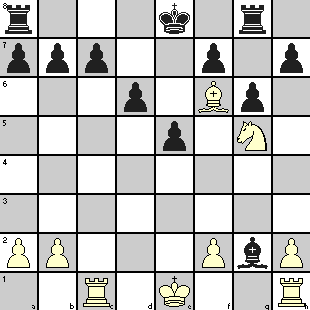
planning a mating attack

You can see that Black has a material advantage of two rooks and a bishop (of course engineered by White to get his attack going)! Black Queen and Bishop, though sitting in White’s base rank, cannot deliver any viable check and has practically been sidelined. Black’s QN is uselessly posted at the wrong edge of the board and his other pieces are still at their home positions! Black’s King is exposed in the center while White’s Knights and Bishop are dangerously close to Black King with the White Queen ready to come up along the semi-open f-file.

Once you have assessed the position and discounted any viable threat by Black, what moves by White can you think of? A closer look at the Black King shows that of the three squares (d8, f8 and e7) accessible to the King, only d8 is viable as f8 is denied by White Bishop and e7 by both Knights and the Bishop as well. Even if the King moves to d8, it cannot go further via c7 as that square is controlled by the Knight at d5.

Conclusion:
If you can deliver a check now (Nf can do that from g7 with impunity), King has to move to d8 and check by Bishop at e7 with support from the other Knight would create checkmate – provided Black’s KN could be forced to relinquish its hold on e7. You also realize that once the King moved to d8, White Queen can move up (remember that the Knight has moved to g7) to f6 for a checkmate unless Black’s KN intervenes. But this Knight cannot guard e7 if it captures at f6!

So the sequence of moves becomes clear –

1. Nxg7+     Kd8
2. Qf6+        Nxf6
3. Be7#

If it interests you, this game was played between Anderssen (the best player around that time) and Kieseritzky at London in 1851 and the game has earned the title of “The Immortal Game” because of the way White conducted his attack. I am sure any online chess repository will have this game and you can play through the full game – but try to analyze and predict the moves by White (the game lasted 23 moves).
 

Chess Tactics to use the might of the Passed Pawn

1
Filed under Attacking tactics, Chess lessons, Chess tactics
Tagged as ,

We keep bringing this up from time to time because this aspect of chess games occurs quite frequently to influence the course of the game. In Chess Tactics: A protected passed pawn is a passport to win, you were introduced to this aspect and Chess Tactics in Middle Game: Power of the Passed Pawn elaborated on this theme. Chess Tactics in Middle Game: Give up Queens to get Passed Pawns! as also Chess Sacrifice as a Chess Tactics: creating passed pawn showed you the lengths to which a player can go to create a passed pawn to this end. We also showed in Chess Sacrifice as a Chess Tactics: promoting a passed pawn how a player can doggedly pursue the course to promote a pawn successfully.

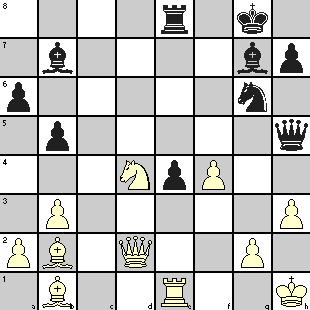
If you think that I am being overly enthusiastic about the power of a passed pawn, you may take a look at the position shown in the following diagram. This position occurred after 29 moves in a game played between Evgeni Vasiukov and Rashid Nezhmetdinov during tournament held at Kharkov in 1956.

Evgeni Vasiukov (b.1933) became an IM in 1958 and GM in 1961. He won the Moscow Championship six times. He scored victories against many of the notable Russian players like Bronstein, Smyslov, Tal, Petrosian, Keres, Polugaevsky etc. but not against Spassky, Karpov and Korchnoi.

Rashid Nezhmetdinov was introduced to you in Importance of chess strategy – Part 1 and has been featured several times after that.

the passed pawn waiting to show its power

When you look at the position, who draws your attention first? Isn’t it that tiny passed pawn of Black, physically and metaphorically in the centre of the field? It is already in the focus of the opposing Rooks and Bishops. Otherwise, both players seem to have equal chances though Black Queen and Knight are in slightly more active position to launch attack on the White King. Let us see how everything gets tied up to the progress of that passed pawn. The immediate threats by Black were 30. … e3 31. Rxe3 Rxe3 32. Qxe3 Nxf4 33. Qxf4 Qxh3+ 34. Kg1 Qxg2#.

Here is the saga of the passed pawn:

30. Qe3 Nh4  
31. Rc1 Qg6  
32. Rg1 Bxd4   Black removed the piece that could help in White’s defense against his plans.
 
33. Qxd4 Nf5   The Knight move freed the pin on e-pawn with a tempo by attacking the Queen.
34. Qd1 e3  
35. Be5 e2   White’s best bet was possibly 35. Bxf5 to exchange his inactive Bishop for the troublesome Knight. Instead, White tried to cut-off the Rook support, but the Pawn did not need it! It went ahead chasing the Queen while clearing the line for Black’s Bishop. Of course, the Pawn was taboo because of 36. Qxe2 Ng3+ winning the Queen
 
36. Qe1 Ng3+   The Knight came to support the pawn …
 
37. Kh2 Nf1+   … but the Knight now ventures further with the support of the Pawn! The Pawn ensured that capturing the Knight meant suffering checkmate.
 
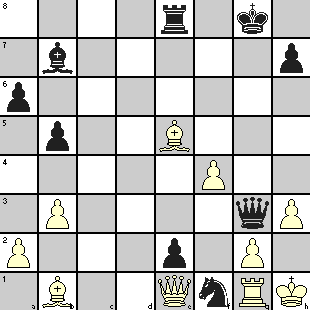
38. Kh1 Qg3   White resigned because to tackle the double-threat of 39. … Qh2# or 39. … Qxh3#, he had to exchange the queen through 39. Qxg3 Nxg3+ 40. Kh2 Nf1+. But Black would recover his Queen through Pawn promotion on next move e.g., 41. Kh1 e8=Q or 41. Rxf1 exf1=Q


Position after Black’s 38th move.

the passed pawn standing tall above alll

Would you agree with me now? Incidentally, Mikhail Botvinnik, the 6th World Champion had this to say about the winner: “Nobody sees combinations as Rashid Nezhmetdinov”.


Chess Tactics: Some more applications of Zugzwang

0
Filed under Attacking tactics, Chess Basics, Chess lessons, Chess tactics, Endgame Tactics
Tagged as , ,

On the principle of ‘practice makes perfect’, after you have learned about zugzwang and its application in Chess Tactics: should some of them be prohibited?, we bring you two more examples, one an endgame study and the other from actual play.

The following diagram shows a study which is slightly more elaborate than the previous examples in the sense of having both pieces and pawns.

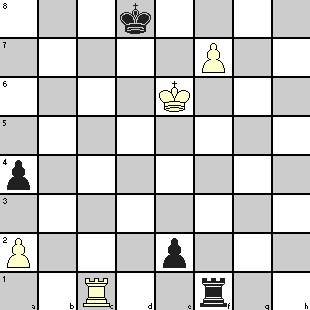
endgame study showing zugzwang

White to play and win.

You can see that both White’s KBP and Black’s KP are one step away from promotion. But White’s first move apparently does not give any benefit because of following problems:

  • 1. f8=Q Rxf8 2. Re1 Re8+ after which White Rook’s attempt to capture Black’s KP (with support from the King of course) will result in exchange of Rooks and a draw.
  • 1. Rxf1 exf1=Q and it is Black who will win!
  • If White Rook leaves 1st rank, Black Pawn will promote
  • 1. Rb1 e1=Q+ 2. Rxe1 Rxe1+ and Black wins again

Well, you have now probably guessed the move after above options have been ruled out.

The solution is:

1. Re1 Rf2   On 1. … Rxe1 2. f8=Q+ Kc7 3. Qc5+ Kd8 4. Qa5+ (3. … Kb7 4. Qb4+), Black loses Rook
 
2. a3   This blocking move takes away Black’s options and puts him under zugzwang!
2. Rf1  
3. Rxe2 Rf3  
4. Rd2+ Kc8  
5. Rd5 Kc7  
6. Rf5 Re3+  
7. Kf6   The Pawn will promote on next move.


We now give you an example from actual play that took place in a 1953 Danish tournament between A. Kupferstich and J. Andreassen.

Nothing much could be found about A. Kupferstich except that he was part of Danish team in 9th Chess Olympiad held at Dubrovnik in 1950 and also represented Denmark in several friendly matches during 1947-1955. Except that J. Andreassen was a player from Denmark, I could find nothing more about him.

The diagram shows the position after 20 moves.

getting to a zugzwang

Though White has an extra Knight, he has four pawns less and his Kingside pawns are isolated. His Rook is under attack and it is natural to expect him to play 21. Rg1 after which Black would play 21. … Bc6 protecting his weak c7 pawn. But White possibly felt that he would have a much better attacking prospect with his Knight and Bishop close to enemy King if he could position his Rook on the 7th rank by capturing the c7 pawn instead of trying to protect his Rook at h1!

This is how the game rolled on.

21. Rxc7! Bxh1  
22. Nxf7 Bd5   Black tried to guard f7 square because of 23. Nxd6+ Kf8 24. Rf7#
23. Nxd6+ Kf8  
24. Bg5 Rh8   Black tried to create an escape hole against 25. Bh6+ with mate to follow.
25. Bh6+ Kg8  
26. Rg7+ Kf8  
27. Rc7+ Kg8   Poor Black King had no other go! White could have reduced his agony somewhat by playing 27. Rxb7+ straightaway, unless he was running slow on his clock!
 
28. Nc8 Bc6   Of course 28. … Rxc8 29. Rxc8+ Kf7 30. Rxh8 leaves Black a solid Rook down.
29. Rg7+ Kf8  
30. Rxb7+ Kg8  
31. Rg7+ Kf8  
32. Rxa7+ Kg8   All these moves can be taken as a demonstration of the power of discovered checks!
33. Rxa8 Bxa8  
34. Nd6! Resigns   The ‘zugzwang’ move!


The Knight and Bishop totally immobilizes the Black King and Rook. Black has to helplessly wait for an execution by a final Knight check at e7 or f6.

Even in this position, the game holds interest as White’s task is not easy. He still has to deliver checkmate as stated above but cannot afford to move the Knight till his King is positioned at e6 or f6 or e7 to prevent Black King’s escape when the Knight is moved.

Black’s strategy will be to push his pawns forward till those get captured at e3 and g3. Then he will use the Bishop to prevent White from carrying out his Knight maneuver and also try to capture both White pawns if they try for promotion. If White captures the Bishop, Black can claim stalemate.

What should White do? He should capture Black’s e- and g-pawns and move his King to e6 or f6 or e7. The Knight can then deliver check via (e4-f6 or e8-f6) or (c8-e7 or f5-e7).

Black knows that if White King is at e7, only (e4-f6 or e8-f6) is possible for Knight and Bishop positioned at c6 blocks these moves. If White King is f6, only (c8-e7 or f5-e7) is available to the Knight and Bishop can go to any square on c8-h3 diagonal to block those. Only if the King is at e6, all four options become available, but Bishop can check from d7 or d5 (remember that the Bishop is taboo!) to force White King to f6 or e7.

Assume that White King has reached f6. The Bishop has to be at d7 to guard c8 and f5 and to keep eye on White pawns. So White keeps pushing one of the pawns forcing the Bishop to leave its post to capture the pawn which otherwise gets promoted. The Knight can then move to c8 or f5 to deliver checkmate on next move.

It is possible to win even if White did not have those pawns, but that is another story!

No discussion on zugzwang is complete without reference to “The Immortal Zugzwang Game” between Friedrich Samisch and Aron Nimzowitsch played at Copenhagen in 1923. You have to play it yourself to see its beauty.


Chess Tactics: should some of them be prohibited?

2
Filed under Attacking tactics, Chess Basics, Chess lessons, Chess Strategy, Chess tactics, Endgame Tactics
Tagged as , ,

Though I said ‘some’ but actually I meant one that goes under a German name and seems to have been in use in German chess literature since since early ninteenth century. It is supposed to have been introduced in English chess literature in early twentieth century by Emanuel Lasker, himself a German!

The word I have in mind is zugzwang. I understand that ‘zug’ means move and ‘zwang’ means ‘compulsion’, so the combined word means ‘compulsion to move’. Essentially, a player is said to be under zugzwang when any move that he makes will make his position worse and not to move would be the best move. But chess rules do not permit a player to skip move and the affected player under compulsion to move is committing a kind of ‘suicide’ by his move! Are you getting my point now? Suicide goes against the laws in most countries of the world and forcing another man to commit it is still more heinous! Shouldn’t therefore be a law against zugzwang (and wouldn’t the victims agree)?

Enough of chatter, can we see some example you will say. Though this is a potent weapon in chess endgames, it can occur at any time.

We first see an endgame problem that, though a very simple one, teaches you what zugzwang is and was created by French composer Henri Rinck (1870-1952) who was arguably the World’s Greatest Composer of chess problems.

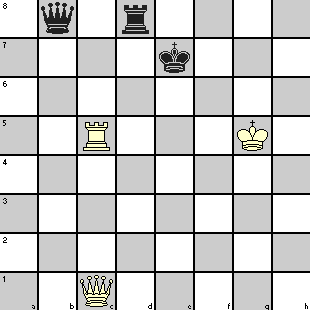
a simple zugzwang

White has to play and win in the position shown. The moves are:

1. Rc7+ Rd7  
2. Qc5+ Kd8   2. … Ke6 3. Qf5+ loses the Rook
3. Kh6  


Black has the move and he is in zugzwang as any move makes him lose. Let us see what some of his options are:

King moves:
3. … Ke8 4. Qe5+ Kf7 5. Rxd7+ Kf8 (or Kg8) 6. Qxb8#

Rook moves:
3. … Rxc7 4. Qf8+ Kd7 5. Qxb8 wins.
If Black’s Rook leaves his second rank without any check, White will play 4. Qe7#

Queen moves:
3. … Qxc7 4. Qf8#.

Black Queen cannot deliver any viable check and trying to remain in contact with c8 square only enables its capture by White. If it loses contact with c8 square, White plays 4. Rc8#.

There are many other options available to Black and we have left it to you to find how the correct move (very important) by White in all the situations result in his winning the Black Rook or Queen or both, or delivering checkmate to the King.

You will notice that putting opponent in zugzwang is preceded by an idle (sometimes blocking) move by the attacker that forces the defender’s hand. In above example, 3. Kh6 was such a move.

Now that you have seen a simple one, here is another problem which is slightly more complex. This is a very old problem but quite instructive as similar position may arise in one of your endgames also. White is to play and win.

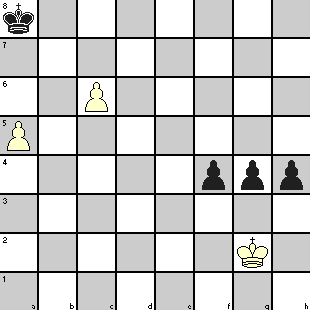
a little more complex zugzwang

With two isolated pawns against three connected pawns, White may appear to be at a disadvantage but White’s winning line is as follows:

1. a6 Kb8   Black King had to move to prevent 2. c7
 
2. Kg1 f3   The idle move Kg1 to wait and watch is the only move that wins for White by creating zugzwang on Black
 
3. Kf2   White’s strategy is simple: move the King to face whichever Black Pawn has advanced. Once that Pawn gets blocked, Black has to move another Pawn. In the meanwhile, Black King cannot move either way without allowing the other White Pawn to promote! You may try with other Pawn moves to verify the tactics.
3. h3  
4. Kg3 h2  
5. Kxh2 f2  
6. Kg2 g3  
7. Kf1  
7. g2+  
8. Kxf2 g1=Q+  
9. Kxg1 Kc7   With no more pawn to move, Black King is forced to take the move it was trying to avoid.
10. a7 Kxc6  
11. a8=Q+   White wins.


Because of its unusual nature, it is a popular theme for chess compositions and Susan Polgar’s blog of July 1 has a problem on this topic.

In Chess Tactics: Some more applications of Zugzwang, you will see a third problem and a game where this tactics was used.


Chess Tactics: using the diagonals to break enemy King’s castle

0
Filed under Attacking tactics, Chess tactics
Tagged as , , ,

There is a recent series of articles on attacking chess tactics by my colleague teaching you in detail about the positional requirements and the chess tactics for Bishop sacrifice at h7 to break open the Kingside castle of the opponent for a quick win.

Nice articles though they were, I was peeved at his giving all the fun to the White player. Why the poor Black should always be at the receiving end? A little more of it and very soon we may get blamed for having a color prejudice!

So I started looking for some game where Black turns the table and pays White in a similar coin, a White who learned the tricks from the aforesaid articles and felt that he could get away by breaking into someone’s home!

The game was played between Eric Lundin and Isaac Boleslavsky in the Groningen tournament of 1946. It is not exactly in the line as described to you in the aforesaid articles, and the sacrifice starts with a Knight and not a Bishop, but the ideas are similar (which is why I said ‘a similar coin’ instead of ‘the same coin’)!

Eric Lundin (1904-1988) was a ten times winner of Swedish Championship. Over a span of 30 years from 1930-1960, he represented Sweden in nine Chess Olympiads. He received IM title in 1950 and an Honorary GM title in 1983.

Isaac Boleslavsky (1919-1977) won the Ukraine Championship in 1938. He came into prominence after World War 2 and became the first plyer ever to remain undefeated in the Candidates’ tournament in 1950 for selecting the next challenger to reigning World Champion Mikhail Botvinnik. After remaining tied with David Bronstein in this tournament as also in the 12-game playoff match, he lost in the second tie-break game. He later devoted his time to coaching. He made several contributions to opening theories in King’s Indian and Sicilian Defense. He was awarded the GM title in 1950.

The game was played with the opening of King’s Indian Defense and if you see the Black player’s expertise in this area, you will realize why he could teach a thing or two to White in the conduct of the game!

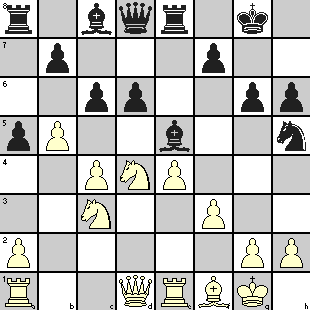
The diagram shows the position after 18 moves have been played.

diagonal attack on castled king

At first sight, it may not look like a storm brewing. But if you note the open Bishop diagonals with Black’s KB targeting h7, QB having a control on c8-h3 diagonal though sitting at his home (which may have made the position look innocuous), White’s Queen ready to join his Knight sitting pretty at h5 and above all, White pieces in very passive positions posing no immediate counter-threat, the situation was asking for trouble! In fact, when you play through the game given at the end, you will find that through the previous few moves and unwise exchanges, White handed over the initiative to Black.

This is how Black demolished White’s position within a few moves.

19. Qd2 Qh4   Black threatened 20. … Bxh2#
20. g3 Nxg3  
21. hxg3 Qxg3+   If 21. Nde2 then 21. … Nxf1 threatening the Queen as well as 22. … Qxh2#. If 22. Kxf1 then 22. … Bh3+ 23. Kg1 Qh2#
22. Bg2 Bh3   White resigned.


Black’s threat of Qxg2# needed White Queen or Rook on 2nd rank and this could be exploited by Black in several ways.

To prevent 23. … Bxd4+ 24. Qxd4 Qxg2#, White could try several optins all resulting in checkmate or material loss to give win to Black e.g.

23. Re2 Qh2+ 24. Kf2 Bg3+ 25. Kf1 Qh1#.

23. Re2 Qh2+ 24. Kf2 Bg3+ 25. Ke3 Bf4+ loses Queen

23. Re2 Qh2+ 24. Kf1 Qh1+ 25. Kf2 Qxg2+ 26. Ke3 Bf4+ 27. Kd3 (27. Kxf4 Qg5#) Bxd2 28. Rxg2 Bxg2 29. Kxd2 c5 30. Nde2 Bxf3 wins.

23. Qf2 Bxd4 loses Queen.

23. Qe2 Qh2+ 24. Kf1 Qh1+ 25. Kf2 Bxd4+ 26. Kg3 Be5+ 27. Kh4 g5+ 28. Kh5 Bg4+ 29. Kxg4 Qh4+ 30. Kf5 Qf4#.

23. Qe2 Qh2+ 24. Kf1 Qh1+ 25. Kf2 Bxd4+ 26. Kg3 Be5+ 27. Kf2 Qxg2+ 28. Ke3 Qxe2+ 29. Rxe2 Bxc3 (29. Nxe2 Bxa1 30. Rxa1 Be6) 30. Rh1 Be6 31. Rc2 Bg7 (31. Rxh6 Bxc4 32. Rc2 Bg7) wins.

23. Qc2 (or Qb2) Qh2+ 24. Kf1 Qh1+ 25. Ke2 Qxg2+ 26. Kd1 Bxd4 27. Rc1 Qxc2+ 28. Kxc2 Bxc3 29. Kxc3 cxb6 wins.

In the articles explaining the nuances of Bishop sacrifice with many types of situations, you should understand that it is rarely possible to make it exhaustive as the variations can be so many. What is important for you is to understand the principles that make such diagonal attacks work and you should be able to identify when such situations arise and modify the basic tactics as per the position. In the present example, though considerably different, most of the pieces involved were same viz. Queen, Knight and two Bishops, the position offered open diagonals, and the attacked side did not have minor pieces close at hand that could help in defending the castle. If you have the ingrediemts and know the recipe (the attacking tactics adapted to the variables), you can always cook up something! And as they say, practice makes perfect!