In Part 1 of this two part article, we discussed the tactics of checkmate with the ‘heavy’ pieces viz., Queen, Rook or a combination of those pieces. Now we will consider the more difficult tasks of creating checkmate with a Bishop pair or a Bishop and Knight.
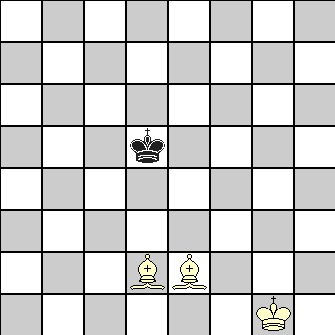
6. When you have a Bishop pair

	1. Kf2		Ke5
	2. Kf3		Kd5
	3. Bc3		Kc5
	4. Ke4		Kd6
	5. Bc4		Kc6
	6. Bd4		Kd6
	7. Bd5		Kc7
	8. Bc5		Kd7
	9. Ke5		Kc7
	10.Ke6		Kd8
	11.Bb6+		Ke8
	12.Bc6+		Kf8
	13.Kf6		Kg8
	14.Bc5		Kh7
	15.Bf8		Kg8
	16.Bg7		Kh7
	17.Be4+		Kg8
	18.Bh6		Kh8
	19.Kg6		Kg8
	20.Bd5+		Kh8
	21.Bg7#
You should note that a wrong step could lead to stalemate and draw.
The point you should realize is that the two bishops side by side on a row or file create a double V forcing the enemy King to remain within the wedge-shaped area. The bishops moves should push the V towards the edge to force the Black King to move there. While repositioning Bishops, your own King has to guard against the Black King escaping out of the wedge.
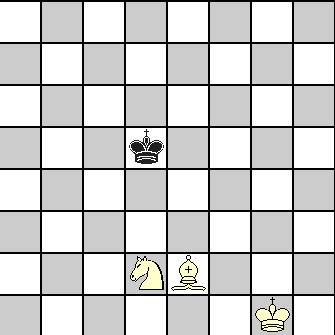
7. When you have a Bishop and Knight
A Bishop and Knight can be used to deliver the checkmate only when the Black King can be pushed into a corner square that is accessible to your Bishop. So, if you have KB (which controls white squares), black King has to be driven to a8 or h1 squares. If it is QB, checkmate will be possible when the black King is in a1 or h8 square. Your game plan has to take this into consideration, otherwise you will be wasting moves.
Depending on the final position reached, the checkmate may be by a Bishop check or a Knight check.
Assuming that your KB is on board, the white squares will be guarded by the Bishop and the black squares by the Knight (or Knight in tandem with King).
Black’s tactics in the above situation will be to avoid going towards a8 or h1 square, so White should guard against this plan of Black.

	1. Kf2		Kd4		21.Bd3		Kf2
	2. Nf3+		Kd5		22.Bc4		Kg2
	3. Ke3		Ke6		23.Ne5		Kh3
	4. Ke4		Kf6		24.Ng6		Kg2
	5. Bc4		Kg7		25.Ke3		Kg3
	6. Kf5		Kh8		26.Be6		Kh2
	7. Ng5		Kg7		27.Kf3		Kg1
	8. Ne6+		Kh6		28.Bh3		Kh2
	9. Kf6		Kh7		29.Nf4		Kg1
	10.Bd3+		Kh6		30.Bg2		Kh2
	11.Ng5		Kh5		31.Nh5		Kg1
	12.Nf7		Kg4		32.Ng3		Kh2
	13.Ke5		Kh5		33.Bf1		Kg1
	14.Bf5		Kh4		34.Bg2		Kh2
	15.Kf4		Kh5		35.Nf1+		Kg1
	16.Be4		Kh4		36.Bh3		Kh1
	17.Bg6		Kh3		37.Kg3		Kg1
	18.Ng5+		Kh4		38.Nd2		Kh1
	19.Nf3+		Kh3		39.Bg2+		Kg1
	20.Bf5+		Kg2		40.Nf3#
There are more than half a dozen ways in which the final check would be possible through the Knight or the Bishop. If you understand the general principle of the tactics, you can find your way to win.
The best way to get familiar with the tactics is to play with your chess-playing friend from a set-up position, telling him the tactics you are going to adopt and your friend should try his best to delay the checkmate. Keep a count and record of the moves and see how quickly you can reach your target. With practice, these types of tactics will soon become a part of your arsenal.
Other Interesting Related Posts you should read:


One Comment
[...] Part 2, we will examine the other positions involving the minor pieces. Interesting Related posts:7 [...]