Monthly Archives: June 2009

Middle game tactics: Dilemma over the choice of rooks to move

10
Filed under Chess Strategy
Tagged as , , , , , ,

One of the important set of pieces with unique advantages of moving forward and backward only on verticals and horizontals and not otherwise is the rooks. The importance of the rooks can be assessed by the fact that the value of two rooks is more than the value of the Queen. No other combination of the major and minor pieces gives a value more than the value of the queen in the game of chess. The rooks are basically stationed at the flanks at the start of the game. As part of the opening strategy, it is imperative that the players try to bring these two rooks into play by preferring to castle and prepare the rooks for further development.

At the start of a typical middle game stage, one could invariably find both the rooks occupying the back ranks while all other minor pieces leave that first rank and take interesting positions in the other ranks. Most of the time even the Queen moves out of the back rank, but the rooks will be stationed there before preparing for the development.

It is imperative that which of the two rooks should be moved as part of the development or defence should be correctly assessed, based on the evaluation of the position of the board, and a wise decision is taken. The choice of the wrong rook for movement will not only complicate the position, it might give away the advantage to the opponent to pounce on the weakness.

To emphasize this important fact, let us look at a part of the game played in German Bundesliga by two grandmasters, where a wrong decision by white has forced him to part with the control over the board and ultimately after great defending and futile attacking, had to settle for a draw.

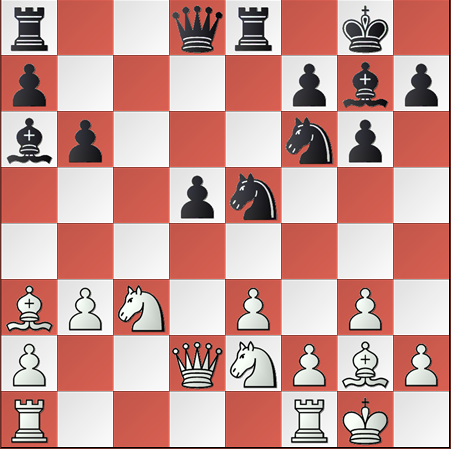
This is the position of the game after 15 moves, and it is the turn of the White to make a move.
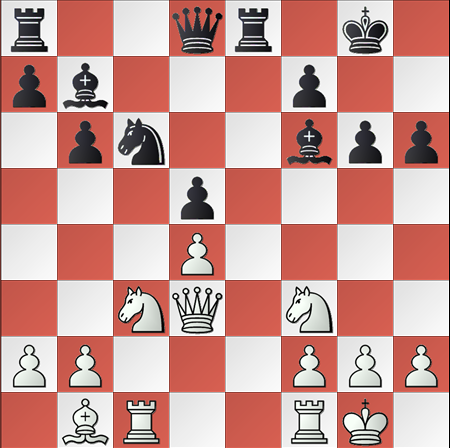
picta1

(White to move)

A cursory look at the position indicates that both the players have developed their pieces fairly well, and are in the midst of an intriguing middle game. It is obvious that White would want to move his rook to the e1 square to share the advantage of the open e file. Here comes the dilemma as to which of the two rooks – rook at c1 or the rook at f1 – that should be moved to the e1 square – is the problem.

The merits of moving the rook at f1 to e1 include – having two rooks at each side – queenside and the kingside – and exercising control over the “c” file and the “e” file. On the contrary, moving the rook at c1 to e1 means the rook at f1 is blocked.

White decided to go ahead with the second option of moving the rook at c1 to e1.

The moves are as follows:

16. Rce1 Qd6
17. Re3 …. White anticipated that an exchange of Rooks as:

1. ….. Rxe3

2. fxe3 ….. would strengthen his position with the Rook at f1

17. …. Bg7 Black did not accept the invitation for exchange

The game continued further and after another 30 moves or more, both the players agreed for a draw.

This is a nice example, which emphasizes that every move, especially the wrong ones such as this one by white, should be judged on its merits.
Middle game tactics: Identifying your weakest piece is essential

8
Filed under Chess Strategy
Tagged as , , , , , , ,

In the game of chess, the most interesting and intriguing part is the middle game, in which both the players vie for positional control and shrewd tactics to gain an upper hand over the opponent. Typically, it is that part of the game where all the major and minor pieces are in the process of being deployed and or stationed in interesting squares as part of the attack and / or defense. The middle game also gains importance in that it is the stage where utmost calculation and concentration is required, and any wrong move or not a correct move might lead to losing control or giving an edge to the opponent.

In such cases, it might quite often happen that you might be caught in a dilemma as to which piece to move or how to go forward in the execution of tactics. This is possible, especially when most of your pieces are in favorable positions and having a tight leash on the opponent’s pieces while at the same time safeguarding your King and other pieces. It is in such times that the technique or trick of identifying your weakest piece among the active pieces comes to your assistance.

Let us try to explore this simple concept of identifying the weakest piece with the help of an interesting game played between two grandmasters in a European team Championship during 1999.

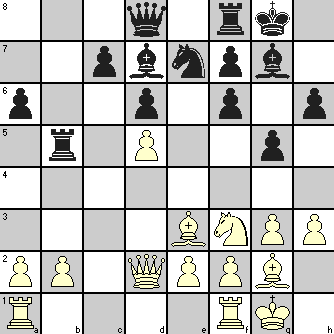
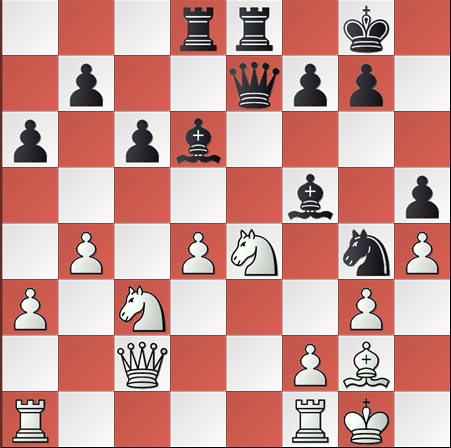
The position of the board after 20 moves by White is given below. It is the turn of black to move.

chess_image1

(Black to move)

A cursory look at the position of black’s pieces reveal that its major and minor pieces are fairly developed and exerting pressure on White. Also, there is not much scope for the black pawns to make any move that might turn out to be advantageous. He is presently caught in a dilemma as how to go forward with his next move. What is the option available to him now.

A second look of the major and minor pieces is warranted before any meaningful outcome regarding his next move. The light-squared bishop is acting as a pin for the White queen and making White’s Knight immovable without the White queen being moved to safety. The black knight at g4, having effective control over the f6 and h6 squares is taking care of the safety of the kingside. The two rooks are fairly centralized and the rook at e8 is providing additional support to the Queen at e7. This analysis reveals that the dark-squared black bishop is the one that can be considered for the next move. Zeroing on the dark-squared bishop also reveals that, but for its occupation of the d6 square, the rook at d8 might have captured the white pawn on d4. A critical analysis of this type will provide instant clues to make the most effective move. Also, the white king at g1 provides the clue that the diagonal a7-g1 might be explored for the dark-squared bishop, if he switches the angle. Black did the same and the game followed as follows:

20. ,,,, Bb8
21. Rad1 Ba7 White tried to protect the d4 pawn with additional support, but the damage had already been done and White might have to lose his pawn in d file.
22. d5 …. His futile attempt to protect his pawn in d file was thwarted.
22. …. cxd5
23. Nxd5 Rxd5
24. Rxd5 Bxe4
25. Bxe4 Qxe4
26. Qxe4 Rxe4
27. Rd8+ Kh7
28. Rd7 Re2

White’s desperate attempts to salvage his pawn in d file or counterattack the Black king in anticipation o any mistake from Black proved futile, and Black, having deployed the idea of identifying the weakest link in an attack, emerged winner in this game.

This game highlights the fact that in addition to execution of shrewd tactics, one needs to be aware of the positional strengths and weaknesses of every piece in the board and make the optimal move at the appropriate time to gain control over the board and the opponent.

Chess Sacrifice as a Chess Tactics: to seize initiative

20
Filed under Attacking tactics, Chess lessons, Chess tactics
Tagged as , ,

Initiative is derived from initiate, which is to originate or start something. In chess, initiative means the ability to take control of the game. You are said to have the initiative when you force the opponent to follow your lead (passive play) rather than initiate something on his own (active play). In Chess Sacrifice as Chess Tactics, we included the use of chess sacrifice as a tool to gain initiative.

Initiative can be gained in several ways like:

  • making an active move that forces the opponent to react only in a certain way, restricting his choice
  • creating pressure on opponent’s position that keeps him busy resisting that pressure
  • playing with tempo i.e., creating a threat to win something

As initiative gives you advantage in play, your aim should be to gain and retain it. If you find that retreating a piece means loss of time, you can retain initiative by exchanging the piece. On the other hand, when you exchange your active piece with a passive piece of your opponent, you lose initiative.

To gain and retain initiative, you must play actively and making a sacrifice is a chess tactics that often constitutes such play. It is said that all sacrifices come about because of some weakness in your opposition’s position. But the presence of a weakness does not create any disadvantage for the opponent unless you are not only able to recognize it but can also make moves to exploit it to your own advantage and a sacrifice often helps you to seize the initiative immediately.

The illustrative game was played at St. Petersburg in 1909 between Ossip Bernstein and Eugene Znosko-Borovsky.

Ossip Bernstein (1882-1962) was a strong Russian master of his time and became Moscow Champion in 1911. Though a doctorate in law, a successful financial lawyer and a businessman, it seems he was plagued by financial misfortunes. He lost his initial fortune due to Bolshevik Revolution in 1918, which forced him to move to France and settle there. He lost again in the Great Depression of 1930 and the third time in 1940 when Nazi Germany invaded France. He was awarded GM title in 1950. He had a near level record against all the great players of his time excepting Capablanca and Alekhine.

Eugene Znosko-Borovsky (1884-1954) had defeated many of his more famous contemporary masters but could not reach the very top level because of many disruptions in his life. He came to be better known for his chess writings than for his games. He settled in France in 1920 where, besides being a writer on chess, he became a literary and drama critic.

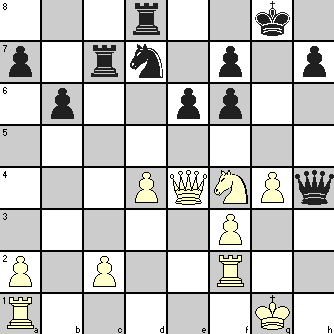
The diagram shows the position after Black’s 22nd move (22. … Qxh4) which was considered risky compared to the alternative 22. … Kh8. When Black played his 23rd move, White immediately identified an opportunity to seize initiative by making a sacrifice! He must have noticed the unguarded Black Rooks, the threat to which formed a part of his attacking plan.

ready to seize intiative by sacrifice

23. Rh2 Qg5 Aside from 23. … Qg3+ which could get the Queen trapped, this was the only square available, all because of Black’s risky 22nd move in accepting the pawn sacrifice offered by White to open the h-file
24. Nxe6 fxe6 The Knight sacrifice opened the e-file and a2-g8 diagonal for White’s Queen
25. Qxe6+ Kh8 25. … Kf8 26. Qd6+ wins the Rook on c-file
25. … Kg7 26. Qe7+ Kg8 27. Qxd8+ wins both the Rooks
25. … Kg7 26. Qe7+ Kg6 27. Qxh7#
26. Qe7 Qg8
27. Rxh7+ Qxh7 You can see how White maintains initiative by exploiting Black’s weaknesses and forced Black’s responses!
28. Qxd8+ Nf8 Black offered the Knight to save the Rook
29. Qxf8+ Qg8
30. Qxf6+ Resigns Black has lost all the K-side pawns, and White’s three passed pawns with a balance in pieces make the win a certainty. Does it remind you of the end position in Chess Sacrifice as a Chess Tactics: creating passed pawn?

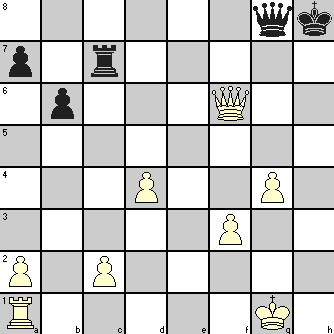
The final position when Black resigned.

too many passed pawns

You also notice how a sacrifice made for a particular objective often create many other benefits which by themselves would be justification for the sacrifice. If you analyze, you will find that the sacrifice of the KRP and the Knight created all these themes for sacrifices discussed in earlier articles – diverting a piece, opening up lines of attack, breaking up King’s castle, seizing initiative, attacking the King, threatening mate or capture of pieces, creating passed pawns – all in a cascading effect!

Watch Actual Game

Middle game tactics: How to handle the rooks at the back rank?

2
Filed under Chess Strategy
Tagged as , , , , , , , , , , ,

In the game of chess, the middle game succeeds the opening stage where the pieces are developed from their initial positions in such a way that they are reasonably placed to plan and launch an attack on the opponent’s King. There is no clear-cut rule stipulating that from the 14th move the middle game commences, or from the 25th move the middle game starts or the opening game ends. However, it can be fairly said that the middle game is all set to begin when the players cease to indulge in mere development of pieces but initiate plans or tactics to launch a series of moves aimed at attacking the opponent’s pieces and/or providing additional safeguards to the squares or pieces in his control.

In most of the opening games, it is but natural that the players resort to the wonderful idea of castling such that the king is moved to a safer place and the two rooks are freed for further development. In such a case, one of the rooks will be in a1 or a8 as the case may be and the other one will be either in e1/e8 or d1/d8 as the case may, but mostly in the back ranks only. A dilemma might arise in such conditions as to which of the two rooks should be moved instead of the other. Again, there is no clear-cut rule such that the rook in the “a” file should be moved and brought to the central ranks than occupying the flank and not the other rook. It depends mainly on the position of the game at that point and a better decision taking into consideration the merits of the move should be made, as otherwise, a moving a wrong rook to an inappropriate square might invite problems and eventually might result in loss of advantage over the opponent. This dilemma of the wrong rook factor has been faced by many grandmasters as well.

One of the fascinating games highlighting the move of a wrong rook and its consequences are discussed in the following example. This is a game played way back in the 1960s in the USA Championship and the position after 13 moves is given hereunder:

chesspic1

(White to move)

A cursory look at the position indicates that both the players have fairly developed their pieces and are in the early stages of the middle game. Black seems to have a slight advantage with his light-squared bishop at a6 and the knight at e5 threatening to occupy the d3 square. Isolated queen pawn is also there in the vital d5 square. Now it is the turn of the white to make a move, and it is but obvious that he has move one of his rooks at the back rank. Which one to move is the dilemma for white.

14. Rfd1 …. This move by White is questionable as the rook at f1 was covering the pawn at f2 and in its absence, if black were to capture the pawn at f2, it would be the King that should come to rescue by capturing the attacking piece or run for cover. Instead he might have considered moving the other rook at a1 to d1 – Rad1.
14. …. Nd3 As expected, Black’s Knight occupies the d3 square.
15. Qc2 …. White plans to evict the Knight at d3.
15. …. Nxf2 Black pounces on White’s wrong Rook move, drags the King out of the back rank.
16. Kxf2 Ng4+
17. Kg1 Nxw3
18. Qd2 Nxg2 Surprise move by Black, wants to attack the King instead of capturing the Rook at d1.
19. Kxg2 d4
20. Nxd4 Bb7+
21. Kf1 ….

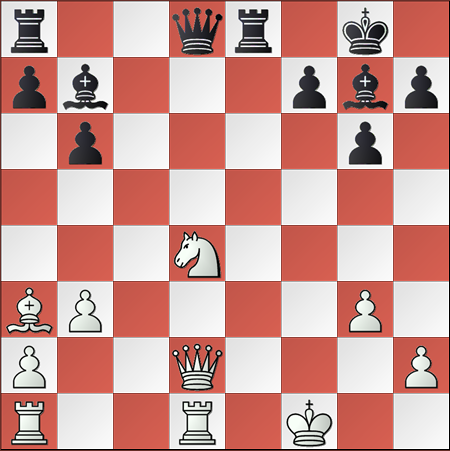
The position after white’s 21st move is given hereunder:

checcpic2

(White to move)

21. …..  Qd7

0-1.

White has resigned the game accepting defeat. The downfall of White at the hands of black Is primarily his wrong choice of rook for providing cover to the d3 square.

This is one of the many interesting aspects one needs to be aware of, especially in the middle game stage, and grab the opportunity when presented by itself.

Chess Sacrifice as a Chess Tactics: creating passed pawn

7
Filed under Attacking tactics, Chess lessons, Chess tactics
Tagged as , ,

With reference to our article on Chess Sacrifice as Chess Tactics, we are now taking up the use of sacrifice as an indirect way to win through the creation of passed pawns.

You know that a passed pawn can be promoted to a Queen, assuming that is what you will want most of the time. And you know the power a Queen commands in a chess game. So if you sacrifice even your Queen against, say, a Bishop to get a passed pawn that can become a Queen, you are in effect getting a Bishop for a pawn! You may like to go through Chess Tactics in Middle Game: Give up Queens to get Passed Pawns to see Queen sacrifices galore!

It is therefore no wonder that many chess tactics are built upon this potential value of pawns. Chess games abound in examples where a lot of tactical moves and exchanges have been made solely to get a passed pawn! Pawns are given away not casually but only as a part of a deeper plan in mind to gain compensation through better attack, better control of space, support for your pieces and such other tactical considerations. The chess tactics to create passed pawns gain particular importance as you enter the endgame. The value of passed pawn increases manifold if there are more than one such pawn linked together, which can sometimes refute even the power of the opponent’s Queen. A player who does not appreciate this value of pawns will come to regret sooner or later.

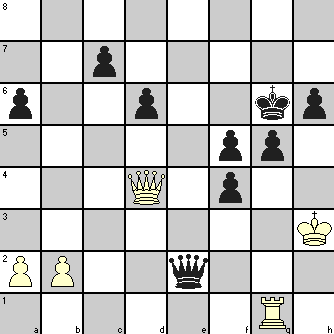
However, you may feel that in trying to show the use of sacrifice as a chess tactics to create passed pawns, we have gone a little overboard in choosing our example! Even though White had a Queen and a Rook against Black’s Queen after 32 moves, he gave up as he must have felt it a futile effort to stop Black’s passed pawns, as many as five of them!

You will say that in terms of the notional value, it was not a sacrifice by Black but a fair exchange (or rather unfair exchange considering value multiplier for linked pawns) in his favor! If you think so, please remember that when Black started the series of sacrifices giving up his Rook pair in exchange of the Bishop pair, he was only two pawns to the good at the end of 23 moves, and none of those were passed pawns.

I selected this game as remarkable from this consideration, particularly when you take into account the quality of the opponent faced by Shirov playing as Black. He won it in a game played at Manila in 1990 against Joel Lautier, who was then the highest-rated GM in France and held by some people as a future World Champion.

Joel Lautier (b.1973) became a World Champion in under-14 category in 1986 and a World Junior Chess Champion (under-20) in 1988. He won the French championship in 2004.

Alexey Shirov (b.1972) was the World Champion in under-16 category in 1988 and became a GM in 1990. In 1994, he became a citizen of Spain. He has always been a crowd favorite because of his aggressive and imaginative style in the line of Mikhail Tal, not surprisingly as he was born in Riga and studied under ‘the Magician from Riga’. You will find him listed in our article Chess tactics: Which masters to study? as one of the masters to study for learning combination play and chess tactics.

The diagram shows the position when it all started after 15 moves had been completed.

stage set for sacrifice

16. Nd4 Rxd5 Black’s first sacrifice taking out first White pawn.
17. Bxd5 Nxd5
18. Nf5 Bxf5
19. Qxd5 Bxh3 The second White pawn to go.
20. Rfd1 Re8
21. Rac1 f5
22. Rd2 Rxe3 Black’s second sacrifice.
23. fxe3 Qe7
24. Kf2 Be5
25. Rh1 Bxg3+ White’s third pawn falls.
For Black, the Bishop is a sham sacrifice as he was planning to capture a Rook. White was forced to accept the offer as 26. Kg1 Qxe3# or 26. Kf3 g4+ again forces the issue.
26. Kxg3 Qxe3+ White loses the fourth pawn
27. Qf3 Qxd2 Loss of Rook was inevitable for 27. Kh2 Qf2+ 28. Kxh3 g4#
28. Qa8+ Kg7
29. Kxh3 Qxe2 White’s fifth and the last K-side pawn vanishes!
30. Qd5 Kg6 30. … Qf2 should have won straightaway because of the threat 31. … g4#. If 31. Qg2 then 31. … Qh4#. In any case, the end was near!
31. Qd4 f4
32. Rg1 f5 White resigned as nothing much could be done against such a pawn phalanx! Black was threatening 33. … g4+ 34. Kh4 Qh2# or if 33. Rh1 then 33. … Qf3+ 34. Kh2 Qg3#

 
The interesting position after 32 moves when White gave up the struggle. Anyone for more passed pawns!?

army of passed pawns


Watch the Actual Game